background image

10

Installation Guide

G:\TW\Lori\Raptor\C4386-90100\c4386-90100.fm5 Page 10
Last Modified: Tuesday, January 27, 1998 8:17 pm
Printing date: Saturday, April 04, 1998

14. Refer to the printout from the Install Assistant (see page 3). Find the section 

labeled DATA CABLE INSTRUCTIONS? 

Follow the instructions on the next page for either “One Device” or “Two 
Devices” as advised.

TIP:

 If you are sharing the IDE data cable between the HP tape drive and 

another device, when the HP tape drive is configured as “Slave” the other 
device must be configured as “Master.” Similarly, if the HP tape drive is 
configured as “Master” the other device must be configured as “Slave.”

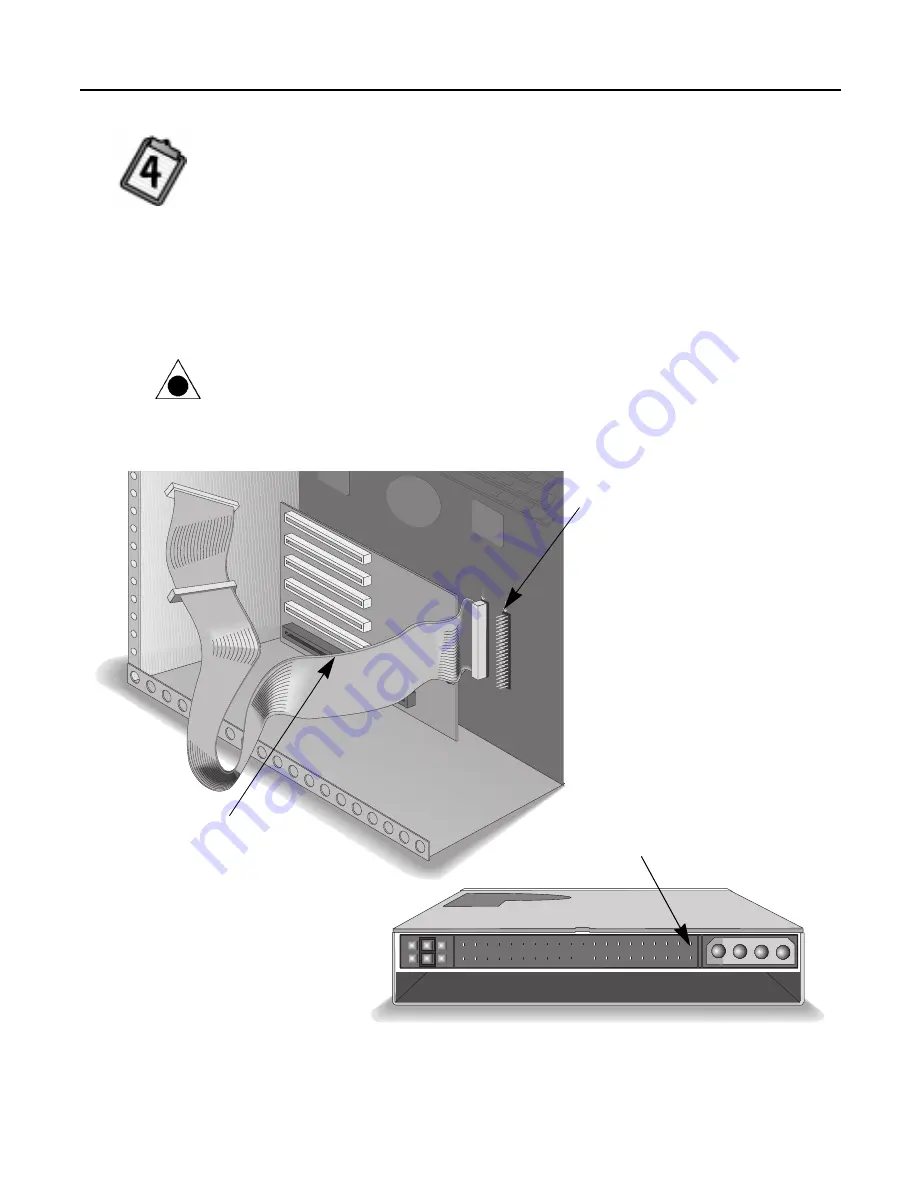
CAUTION: Make sure that you are attaching the cable correctly! You must 
locate PIN-1 on each connector and attach the cable so that the edge with the 
color stripe is aligned with PIN-1. If the cable is attached incorrectly, your 
computer may not boot up.

PIN-1


The cable’s colored edge is aligned 
with PIN-1 of the IDE connector.

colored stripe on
the data cable

PIN-1


The cable’s colored edge is aligned 
with PIN-1 on the tape drive.

Содержание Colorado 5GB C4354A

Страница 1: ...lling Colorado Backup for Windows 95 30 Configuring the drive for Windows NT 4 0 34 If You Have Problems 34 Chapter 4 Using Tapes and Caring for Your Tape Drive Choosing Tapes for Your Tape Drive 37 Inserting Tapes 39 Removing Tapes 40 Caring for Your Tape Drive 41 Chapter 5 Technical Information Minimum System Requirements 42 Colorado Backup for DOS Requirements 43 Colorado Backup for Windows Req...

Страница 2: ...d verify data Recover from a hard drive crash Windows 95 If the Colorado Backup software has already been installed from the Start menu select Programs Colorado Backup User s Guide to view the electronic User s Guide You can also view the User s Guide on the CD To do this insert the Software Installation CD click on Start Run type D SETUP where D is your CD ROM s drive letter then click on the Use...

Страница 3: ...ost successful way to attach your new HP Colorado tape drive 1 Insert the diskette labeled Run this first into your floppy drive 2 For DOS and Windows 3 1 Exit to the DOS prompt type A ASSIST where A is the floppy drive letter and press ENTER For Windows 95 and NT 4 0 Click the Start button on the task bar select Run type A ASSIST where A is the floppy drive letter and click on OK 3 Run the Instal...

Страница 4: ...E controllers CAUTION The discharge of static electricity can damage electronic circuitry You can avoid static discharge by touching a grounded metal object such as your computer s case before and during installation of hardware inside your computer or by wearing a grounding strap 2 Make sure you have the items shown below Installation Guide HP Colorado Software Screws OPTIONAL Data Cable you may ...

Страница 5: ... look different in your country 6 Remove the cover from your computer WARNING Be careful of any sharp edges that may be present inside your computer 7 Refer to the printout from the Install Assistant see page 3 Find the section labeled ADDITIONAL IDE CARD REQUIRED If NO skip this step If YES follow the directions in the HP Colorado IDE Adapter Card Installation Guide before continuing contact your...

Страница 6: ...rive in a larger half height drive bay skip this step If you are installing the tape drive in the smaller 1 inch drive bay remove and discard the mounting bracket from the tape drive The smaller drive bay configuration without mounting brackets is illustrated in the remaining steps of this guide Available half height drive bay Available 1 inch drive bay See your computer s manual if you need help ...

Страница 7: ...you need to move the jumper Slave Check the back of your tape drive and make sure the jumper is on the center location Slave SL or Master Check the back of your tape drive and make sure the jumper is on the right hand location Master MA Don t use CS Cable Select Don t use CS Cable Select Green circuit board is the top of the drive This is a jumper This is a jumper Back view of the tape drive ...

Страница 8: ... your computer manufacturer BEFORE inserting the tape drive You may already have what you need from step 8 12 If there is not much room around the back of the tape drive it may be better to wait until step 17 to complete this step Secure the drive into the bay using the screws included if installing in the large drive bay use the silver screws 6 32 x 1 4 screws if installing in the small drive bay...

Страница 9: ... Install Assistant The first two IDE controllers Primary and Secondary are usually on the mother board of the computer The third fourth or fifth IDE controller may be located on an expansion card or sound board and may not be labeled See your computer s manual if you need Computer manufacturers use a wide variety of labels for IDE controllers Look on your computer s circuit boards for tiny printin...

Страница 10: ...r device must be configured as Master Similarly if the HP tape drive is configured as Master the other device must be configured as Slave CAUTION Make sure that you are attaching the cable correctly You must locate PIN 1 on each connector and attach the cable so that the edge with the color stripe is aligned with PIN 1 If the cable is attached incorrectly your computer may not boot up PIN 1 The ca...

Страница 11: ...led in your computer DO NOT swap connectors The OPTIONAL data cable that came with the tape drive is only used instead if there is no spare connector for the tape drive on your cable or your cable is not long enough Colored stripe aligned with IDE controller Colored stripe aligned with Follow the data cable already attached to the in your each PIN 1 PIN 1 PIN 1 computer to locate the IDE controlle...

Страница 12: ...wer connector you will need to purchase a Y power cable that expands one power connector into two Call your local computer hardware vendor to purchase one 16 Plug the power cable into the back of the tape drive with the beveled edge up 17 If you skipped inserting the screws to secure the drive into the bay do it now see step 12 Beveled edge Beveled edge up ...

Страница 13: ...run the Install Assistant again to verify that the tape drive is installed correctly For DOS and Windows 3 1 Exit to the DOS prompt type A ASSIST where A is your floppy drive letter and press ENTER For Windows 95 and NT 4 0 Click on the Start button on the task bar click on Run type A ASSIST where A is your floppy drive letter and click on OK 20 Run the Install Assistant program and select Test if...

Страница 14: ... may not have a connector attached for access to the IDE controller Now your computer won t boot up Turn off and unplug your computer Double check each connector along the data cable look for and straighten any bent pins The connectors are inserted properly when all pins are covered up and the colored stripe on the side of the data cable lines up with PIN 1 of each connector Is the power cable att...

Страница 15: ...y after that These programs improve access times to the hard drive which will help improve the tape drive s performance Checking for resource conflicts In rare cases your computer s IDE controller may be having a resource conflict where another device is trying to use the IDE controller s I O base address or interrupt request channel IRQ To check for this type of conflict In Windows 95 right click...

Страница 16: ...34 The Colorado Backup software for DOS Windows 3 1 and Windows 95 and the Windows NT applet have the following interchangeability CAUTION If you create backups under more than one operating system use a separate set of tapes for each operating system Label each tape appropriately You created the backup using You can restore backups using Colorado Backup for DOS ver 5 0 Colorado Backup for Windows...

Страница 17: ...ot install Colorado Backup for DOS for use in Windows 95 This application does not support Windows 95 conventions such as long filenames and backups of the registry See Installing Colorado Backup for Windows 95 on page 30 1 Install the tape drive as described in Chapter 1 Installing the Hardware on page 4 The drive must be installed before continuing 2 Refer to the printout from the Install Assist...

Страница 18: ...ress ENTER The following screen appears Highlight here and press ENTER to install the software Highlight here and press ENTER to make an installation diskette to use on another computer that does not have a CD ROM drive Highlight here and press ENTER for information about how to view the online user s guide ...

Страница 19: ... 8GB Colorado 5GB T4000s and press ENTER The following screen appears 8 Either accept the default directory name of C CBD or type a different drive letter and directory name where you want Colorado Backup installed Select OK The following screen appears Highlight here and press ENTER Highlight here and press ENTER ...

Страница 20: ...devices Drive Jumper Setting Two devices can be attached to each IDE controller one device set to Master and one device set to Slave The following screen appears 11 If you want to be able to schedule backups to start automatically while you are away from your computer press the spacebar to mark the check box If you want to save the additional hard drive space required for this feature or do not wi...

Страница 21: ...reen appears indicating that the software installation was successful Select OK Colorado Backup automatically closes leaving you at the DOS prompt 14 Remove the software installation CD from your CD ROM drive and store it in a safe place 15 Reboot by pressing CTRL ALT DEL 16 To start the Colorado Backup software at the DOS prompt type CD CBD or the name of the installation directory you entered in...

Страница 22: ... how to back up and restore data compare files and use the application s options and features For more information on accessing the User s Guide see Viewing the Online User s Guide on page 2 Menu bar Select menu commands from here To copy files from your hard drive to a tape select this button To restore files on tape to a hard drive select this button Status line Displays a short help message Com...

Страница 23: ...e software 2 Refer to the printout from the Install Assistant program that you made AFTER installing the tape drive It will tell you how to configure the tape drive in the following steps 3 Insert the software installation CD into your CD ROM drive If your computer does not have a CD ROM see page 42 4 In Windows open the Program Manager window if it is not already open 5 From the Windows Program M...

Страница 24: ...TOEXEC BAT CONFIG SYS WIN INI and SYSTEM INI files Current copies of these files are saved with the extension OLD in the directory indicated in the previous step Click on OK to proceed Click here to install the software Click here to make an installation diskette to use on another computer that does not have a CD ROM drive Click here to view the online user s guide The first time you click here yo...

Страница 25: ...ado Backup will work properly Make sure all applications are closed and click on OK Colorado Backup and Windows are exited and restarted When the main window reappears you are ready to configure the tape drive Configuration begins with the following dialog box Click on any Help button if you need more information about the displayed dialog box 12 Click on ATAPI tape drive Colorado 8GB or 5GB then ...

Страница 26: ... controller one device set to Master and one device set to Slave 14 The Boot Drive dialog box appears prompting you for the drive from which your computer boots starts Make sure the correct drive letter is entered and click on OK 15 A dialog box appears indicating that the software installation was successful and that you must exit Windows and reboot your computer to complete the configuration pro...

Страница 27: ... Windows program group The scheduling dialog box appears When turned on the Automated Daily Backup feature creates the following operations Automated Total This operation runs each Monday The tape is erased to make room for a Total backup of all detected local hard drives It then copies all files applications systems files and data files from each detected local hard drive The files on tape are th...

Страница 28: ...p m 23 59 if you are using a 24 hour clock appears as the scheduled time for the daily backup 21 Accept the default time or enter the time you prefer to have your backups run automatically Click on OK 22 An explanation of the Automated Daily Backup appears Click on OK An icon labeled Colorado Scheduler appears on your desktop The presence of the icon indicates that the macros will run at their spe...

Страница 29: ...ata compare files and use the application s options and features For more information on accessing the User s Guide see Viewing the Online User s Guide on page 2 Floppy drive icon One for each floppy drive installed in your computer Hard drive icon One for each hard drive installed on your computer If you are connected to a network mapped drives and network servers also appear Tape drive icon Labe...

Страница 30: ... which your tape drive is attached The Windows 95 registry of a remote computer will not be backed up 1 You will need two formatted 3 5 1 44 MB diskettes labeled Recovery Disk 1 and Recovery Disk 2 to use in step 13 2 Attach the tape drive as described in Chapter 1 Installing the Hardware on page 4 The drive must be attached to install and configure the software 3 Insert the software installation ...

Страница 31: ...t Colorado Backup double click on the Colorado Backup icon that appears on your desktop or Click the Start button Highlight Programs Select the Colorado Backup program group Select the Colorado Backup program 10 A registration screen appears Follow the instructions on the screen to register your Colorado Backup software Click here to install the software Click here to make an installation diskette...

Страница 32: ... The following screen appears 13 Insert the formatted 3 5 1 44 MB diskette labeled Recovery Disk 1 into your floppy drive You must use your primary or bootable floppy drive Click on Continue 14 When prompted remove Recovery Disk 1 from the drive and insert the diskette labeled Recovery Disk 2 Click on OK to continue ...

Страница 33: ... Colorado Backup window does not appear or you receive an error message see If You Have Problems on page 34 If you are ready to perform tape operations read Using Tapes and Caring for Your Tape Drive on page 37 Read the User s Guide or the online Help to learn how to back up and restore data compare files and use the application s options and features To read the online help while you are using Co...

Страница 34: ...ur computer does not have a CD ROM see page 42 7 Click OK 8 A list of tape devices appears Select Hewlett Packard Colorado IDE The necessary files are copied to your system 9 Restart the system when prompted If no services fail the drive is ready to use If services fail please contact our QuickFax service for document 5228 The QuickFax phone numbers are listed on page 54 10 Start the Backup applic...

Страница 35: ...page 37 Windows and Windows 95 users If the tape drive icon appears with a red mark through it the software either cannot find the drive at the selected settings or the inserted tape is not compatible Windows 3 x users can click on the tape icon to read the error message Exit the software and restart it If the mark remains try the operation with a different tape If your computer has a power manage...

Страница 36: ...36 Installation Guide boot order settings in your CMOS program To learn how see the documentation that came with your computer or call the computer manufacturer ...

Страница 37: ...P Colorado 5GB HP Colorado 8GB HP Colorado 4i e C4427A 1 pack TR 3 3 2 GB minicartridge RW R R C4427B 2 pack TR 3 3 2 GB minicartridge RW R R C4427D 5 pack TR 3 3 2 GB minicartridge RW R R C4429A 1 pack HP Colorado 5 0 GB cartridge RW RW RW C4429B 2 pack HP Colorado 5 0 GB cartridge RW RW RW C4429D 5 pack HP Colorado 5 0 GB cartridge RW RW RW C4425A 1 pack TR 4 8 0 GB minicartridge RW RW C4425B 2 ...

Страница 38: ...your tapes Please note the differences between the HP Colorado cartridges and the standard mini data cartridge when they are fully inserted CAUTION Do not erase C4425 or C4429 tapes with bulk erasers Magnetic bulk erasing removes tracking reference points that are placed on the tape at the factory Without these points the tapes cannot be read by your tape drive The Erase utility in Colorado Backup...

Страница 39: ...e drive s opening and push the tape firmly into the drive You will feel it lock into place After the cartridge is inserted you will hear the sound of the tape being wound back and forth This sound indicates that the tape drive is finding the beginning of the tape determining the tape s length and format and positioning the drive s read write head Metal base plate Tape access window ...

Страница 40: ... the computer or firmly bump the tape you will not be able to read the data currently written to the tape Also the tape will not be recordable until it is erased with Colorado Backup s Erase utility Never use a magnetic bulk eraser to erase your HP Colorado tapes Bulk erasers remove reference points on the tape that are vital Removing these points makes tapes unusable Approximately 1 2 5cm of the ...

Страница 41: ...You do not need to perform any routine maintenance on the HP Colorado tape drive CAUTION Do NOT clean the read write head of an HP Colorado tape drive CAUTION Do NOT degauss or demagnetize the read write head of an HP Colorado tape drive Damage to your tape drive will result ...

Страница 42: ...to install the backup software If you need special rails cables or other accessories to install the tape drive contact your computer manufacturer or local computer hardware vendor to purchase them See the operating system requirements on the following pages If your computer does not have a CD ROM drive You can make installation diskettes by using another computer to which you have access Insert th...

Страница 43: ...86 Enhanced mode To verify your version and mode from the Program Manager open the Help menu then select About Program Manager The software version is listed and 386 Enhanced Mode must appear in the box 4 MB of RAM in Windows 3 1 8 MB of RAM in Windows for Workgroups 10 MB of available hard drive space 5 MB for the software and an additional 5 MB of space for operations overhead To check available...

Страница 44: ...LAN Installation When using Colorado Backup on a LAN the tape drive hardware and software must be installed in a workstation Do not install them on the network server For other LAN installation options call the Customer Support phone number listed on page 54 NOTE Do not use Colorado Backup for Windows 95 to backup Novell servers Colorado Backup for DOS can backup Novell 2 x and 3 x servers or Colo...

Страница 45: ... IDE Interface Type To use the internal tape drive your computer requires an available connector on an IDE controller Your computer may have a Single FIFO or Dual FIFO IDE controller If it is Single FIFO the tape drive will run 12 25 slower than with a Dual FIFO IDE controller Insert the Install Assistant diskette run ASSIST EXE S to see an evaluation of your computer system Hard Drive If you atta...

Страница 46: ...es per second Load time 15 seconds Tape Format QIC 3095 Number of tracks 73 Bit density 67 733 Encoding method RLL1 7 Error Correction 6 level Reed Solomon Interface ATAPI Reliability Specifications Hard error rate 1 in 1015 bits read with Reed Solomon ECC Mean time between failure 250 000 hours predicted Warranty 2 year limited warranty Power Requirements 5 Vdc 0 7 A 12 Vdc 1 0 A Specified Operat...

Страница 47: ... User s manual statement for VCCI class B product Translation for VCCI class B product This equipment is in the Class B category information technology equipment based on the rules of Voluntary Control Council For Interference by Information Technology Equipment VCCI Although aimed for residential area operation radio interference may be caused when used near a radio or TV receiver Read the instru...

Страница 48: ...a circuit different from that to which the receiver is connected Consult the dealer or an experienced radio TV technician for help Information for user CAUTION Changes or modifications of this equipment not expressly approved by Hewlett Packard could result in violation of Part 15 of FCC rules DECLARATION OF CONFORMITY according to ISO IEC Guide 22 and EN 45014 Manufacturer s Name Manufacturer s A...

Страница 49: ...tary Information EN60950 1992 A1 1993 A2 1993 A3 1995 EN 55022 1994 Class B EN 50082 1 1992 IEC 801 2 1991 4kV CD 8kV AD IEC 801 3 1984 3V m IEC 801 4 1988 1kV Power Lines 0 5kV Signal Lines ENV 50140 1993 3V m The product herewith complies with the requirements of the Low Voltage Directive 73 23 EEC and the EMC directive 89 336 EEC and carries the CE mark accordingly August 01 1997 Richard Spangl...

Страница 50: ...obtained In some jurisdictions HP s consent may not be required for limited disassembly or decompilation Upon request you will provide HP with reasonably detailed information regarding any disassembly or decompilation You may not decrypt the Software unless decryption is a necessary part of the operation of the Software Transfer Your license will automatically terminate upon any transfer of the So...

Страница 51: ...nt to new in performance or may have been subject to incidental use 5 Warranty does not apply to defects resulting from a improper or inadequate maintenance or calibration b software interfacing parts or supplies not supplied by HP c unauthorized modification or misuse d operation outside of the published environmental specifications for the product or e improper site preparation or maintenance 6 ...

Страница 52: ...ox and in the box along with your name and address All product returns must have an accompanying return authorization number To ensure timely and accurate processing of your return the number must be clearly printed on the outside of the box Use the appropriate address for your location A traceable shipping method is recommended The postage shipping and insurance charges incurred in shipping to He...

Страница 53: ...Technical Information 53 ...

Страница 54: ... hpstor CompuServe Go HPSYS World Wide Web http www hp com go colorado_support Bulletin board site 8 N 1 F 1200 28 8K baud Europe 31 0 495 546909 Asia Pacific Australia 03 9890 0276 Korea Hitel 02 762 0228 Access Go HPK Chollian 02 220 2001 New Zealand 09 356 6642 Taiwan 02 9233233 First Name HP Last Name BBS QuickFax Faxback Service Simply dial the fax number from a touch tone phone or Group 3 fa...

Страница 55: ...er referral 970 635 1500 Canada for French speaking customers pour assistance en français 1 800 387 3867 During warranty period Technical support 970 635 1500 After warranty period charges begin only when you connect to a Support Technician prices are subject to change without notice Technical Support 800 810 0130 Per incident fee of 25 US dollars charged to Visa MasterCard or American Express U S...

Страница 56: ...2624175 8610 62614176 Korea M F 8 30 19 00 02 3270 0700 080 999 0700 toll free New Zealand M F 9am to 9pm Auckland Time 09 356 6640 Singapore M F 9 00 17 00 65 271 7233 Taiwan M F 8 30 17 30 02 717 9609 FAX USA 970 667 0997 Asia Pacific Australia 03 9272 4099 Korea 02 3270 0707 New Zealand 61 3 9272 4099 Singapore 65 278 9225 Taiwan 02 5140276 USA Hewlett Packard 815 SW 14th Street Bldg E Loveland...

Отзывы: