background image

20

Upgrading and Servicing Guide

4

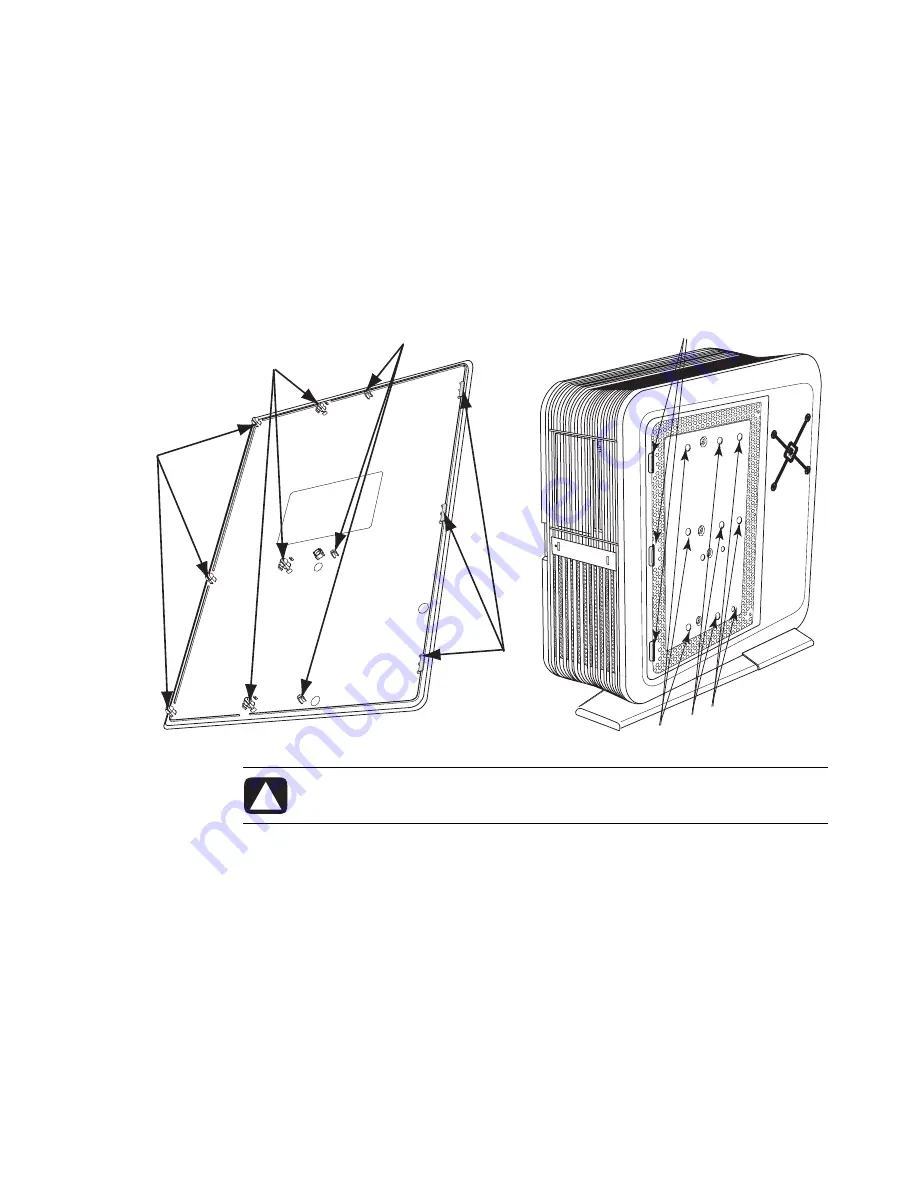
To install an inlay:

a

To vertically position the inlay with the panel, align the top row of snap studs (

Q

on the inlay with the top row of holes (

R

) in the panel. 

b

Lower the inlay onto the panel just to the right of the slots (

T

), while maintaining 

the vertical position.

c

Slide the inlay toward the front of the chassis inserting the three tabs (

S

) on the 

inlay into the slots (

T

) in the panel. 

T

R

R R

S

Q

Q

Q

CAUTION: To avoid damaging the inlay, do not hold or pull out the inlay more 
than 2.54 cm (1 inch) away from the panel.

Содержание blackbird 002

Страница 1: ...Upgrading and Servicing Guide ...

Страница 2: ...SA Copyright 2007 Hewlett Packard Development Company L P This product incorporates copyright protection technology that is protected by U S patents and other intellectual property rights Use of this copyright protection technology must be authorized by Macrovision and is intended for home and other limited pay per view viewing uses only unless otherwise authorized by Macrovision Reverse engineeri...

Страница 3: ... access 18 Locating Components Inside the Computer 22 Removing and Replacing Drives 23 Removing an optical drive 23 Adding or replacing an optical drive 28 Removing the hard disk drive 33 Adding or replacing a hard disk drive 34 Adding Memory 35 Removing a memory module 36 Installing a memory module 37 Removing and Installing an Add in Card 39 Removing an add in card 39 Installing an add in card 4...

Страница 4: ...iv Table of Contents ...

Страница 5: ...components of your computer Illustrations show either the air cooled chassis or the liquid cooled chassis The specifics of the chassis in the illustrations may vary from your computer model Items located inside the chassis may vary depending on your specific model computer Opening and Closing the Computer WARNING Please read Safety Information in the Limited Warranty and Support Guide before insta...

Страница 6: ...teps in the order in which they are listed before opening the computer 1 Remove any memory card or optical disc CD or DVD from the computer 2 Shut down the computer 3 Turn off the computer power supply by using the rocker switch on the back of the chassis 4 Disconnect the power cord from the electrical outlet and then from the computer 5 Disconnect all other attached cables such as the keyboard mo...

Страница 7: ...nstall any software drivers supplied by the card manufacturer Accessing the chassis through the access door left side To upgrade or service the majority of components in the computer you must access the chassis through the access door left side Complete the following steps to open the left access door remove the door exterior inlay when replacing it or lift the access door off its hinges 1 See Bef...

Страница 8: ...f the door latch A and then swing the door open The door opens until it is about 85 degrees to the chassis Do not force the door to open more than 85 degrees CAUTION To avoid damage do not open the access door more than 85 degrees WARNING Beware of sharp edges inside the chassis A ...

Страница 9: ...icing Guide 5 3 To remove the exterior door inlay when replacing it a Remove the inlay screw B from the inside of the door b Close the door NOTE Do not remove the access door from the chassis hinges during these steps B ...

Страница 10: ...ay b Continue to slowly pull out the edge of the inlay to free the two columns of three snaps located on each side of the middle of the inlay c Holding the inlay near to the door slide it toward the back of the chassis to free it d Set the inlay aside To install the inlay see Replacing the access door on page 8 CAUTION To avoid damaging the inlay do not pull out the inlay more than 2 54 cm 1 inch ...

Страница 11: ...cing Guide 7 4 To remove the door from the chassis hinges a Open the door fully so that it is at 85 degrees to the chassis b Lift up the door about 2 54 cm 1 inch until the hinges clear the hinge pins c Set the door aside ...

Страница 12: ... on its hinges install an exterior inlay or close the door 1 To place the door on its hinges a Position the door completely open at 85 degrees to the chassis b Insert the back edge of the door into the chassis with the hinges over the hinge pins CAUTION To avoid damage do not open the access door more than 85 degrees ...

Страница 13: ...h the top row of holes G in the door b Lower the inlay onto the door just to the left of the slots E while maintaining the vertical alignment c Slide the inlay toward the front of the chassis inserting the three tabs D on the inlay into the slots E in the door CAUTION To avoid damaging the door check that both of the door hinges are properly seated onto the hinge pins CAUTION To avoid damaging the...

Страница 14: ... to bottom just to the left of the edge of the inlay H to engage the first column of snap studs f Move toward the middle of the inlay and press the inlay from top to bottom again to engage the second column of snap studs I g Move near the left edge of the inlay and press the inlay from top to bottom again to engage the last column of snap studs J d Open the door e Insert the inlay screw B on the i...

Страница 15: ...computer on page 3 Removing the internal covers Complete the following steps to access the components inside the chassis by removing the internal covers PCI door thermal divider and power supply baffle 1 Open the access door See Accessing the chassis through the access door left side on page 3 2 Open the PCI door by moving the latch K to the left and then swinging the door open If necessary lift u...

Страница 16: ...12 Upgrading and Servicing Guide 3 Remove the thermal divider L by pulling it straight out of the chassis 4 Remove the power supply baffle by pulling the baffle M straight out of the chassis L M ...

Страница 17: ...r by positioning the divider onto the guide rails L1 and then sliding the divider straight into the chassis 3 Replace the PCI door a Hold the door perpendicular at 90 degrees to the chassis with the hinges over the hinge pins and then lower the door onto the pins b Swing the door closed CAUTION To avoid damaging the PCI door check that both of the door hinges are properly seated onto the hinge pin...

Страница 18: ...lace the inlay or the SATA backplane You must remove the inlay to access the SATA backplane 1 Loosen the inlay screw N from the inside of the chassis CAUTION To avoid damage when you remove the inlay protect the inlay by placing it onto a smooth surface covered by a soft cloth NOTE The inlay screw N is a captive screw Do not remove it from the chassis N ...

Страница 19: ...lay to free the two columns of three snaps located on each side of the middle of the inlay c Holding the inlay near to the panel slide the inlay toward the back of the chassis to free it d Set the inlay aside This completes the steps to remove the inlay Continue with step 3 to access the SATA backplane To install the inlay see Replacing the right side access on page 18 CAUTION To avoid damaging th...

Страница 20: ...16 Upgrading and Servicing Guide 3 To open the right access panel a Remove the three screws P that secure the panel b Swing open the panel P ...

Страница 21: ...The access panel opens until it is about 85 degrees to the chassis Do not force the panel to open more than 85 degrees CAUTION To avoid damage do not open the panel more than 85 degrees WARNING Beware of sharp edges inside the chassis ...

Страница 22: ... step 4 1 To place the panel on its hinges a Position the panel at 85 degrees to the chassis b Insert the back edge of the panel into the chassis with the hinges over the hinge pins c Lower the panel onto the hinges 2 Close the panel CAUTION To avoid damage do not open the access panel more than 85 degrees CAUTION To avoid damaging the panel check that both of the panel hinges are properly seated ...

Страница 23: ...Upgrading and Servicing Guide 19 3 Insert three screws P to secure the panel P ...

Страница 24: ...les R in the panel b Lower the inlay onto the panel just to the right of the slots T while maintaining the vertical position c Slide the inlay toward the front of the chassis inserting the three tabs S on the inlay into the slots T in the panel T R R R S Q Q Q CAUTION To avoid damaging the inlay do not hold or pull out the inlay more than 2 54 cm 1 inch away from the panel ...

Страница 25: ...d e Slowly press the inlay from top to bottom just to the right of the edge of the inlay U to engage the first column of snap studs f Move toward the middle of the inlay and press the inlay from top to bottom again to engage the second column of snap studs V g Move near the right edge of the inlay and press the inlay from top to bottom again to engage the last column of snap studs W U W V ...

Страница 26: ...ze optical disc drive or other 5 25 inch device E Slim optical disc drive optional drive F Slim optical disc drive G Access panel right side with inlay H SATA backplane including the LED switch settings I Hard disk drive in lower bay with four additional bays for optional hard disk drives J Power supply NOTE The connectors and components of your chassis model may vary from the illustration ...

Страница 27: ...Removing a slim optical disc drive 1 Prepare the computer to be opened and then open the left access door See Opening and Closing the Computer on page 1 CAUTION Before removing the hard disk drive back up your personal files that are on the drive to an external storage device such as a CD or DVD Failure to do so may result in data loss After replacing the primary hard disk drive you use the recove...

Страница 28: ... when facing the front of the chassis and B is the tab for the optional slim disc drive between the primary slim drive and the full size drive when facing the front of the chassis which may be a drive or a filler The following figure on the right shows the slim drive assembly including the pins of the data connector D and the power connector E 3 Release the drives by pulling out the optical drive ...

Страница 29: ...h the full size drive or filler partway out through the front of the chassis 5 Remove the optional slim optical disc drive by pulling the drive tab B toward the inside of the chassis and then rotating it toward you and out of the chassis B ...

Страница 30: ...d then open the left access door See Opening and Closing the Computer on page 1 2 Remove the data cable plug and the power cable plug from the back of the optional full size optical disc drive Use a gentle rocking motion to free the power plug press the latch on the data plug and then pull it from the connector The following figure shows the location of the back of the full size optical disc drive...

Страница 31: ...Upgrading and Servicing Guide 27 3 Release the drive by pulling out the optical drive latch H 4 Remove the drive by pushing it out through the front of the chassis H ...

Страница 32: ... at the bottom The light bar A is at the top b Insert the knobs C of the drive assembly into the slot F1 or F2 and then rotate the assembly away from you and into the slot Push it toward the front of the chassis until the assembly is completely seated The light bar A should extend out of the front of the chassis IMPORTANT Be sure that the slim optical disc drive is in an adapter Get your replaceme...

Страница 33: ...optical disc drive assembly B Tab on the primary or the optional slim optical disc drive C Alignment knobs D Power connector pins E Data connector pins F Slots for slim optical disc drives F1 is primary drive slot F2 is optional drive slot B B A E D C C F2 F1 F2 F1 B C ...

Страница 34: ...l the way into the chassis 4 Secure the drives by pushing in the optical drive latch H 5 Connect the data cable plug and the power cable plug to the connectors on the back of the slim optical disk drives 6 Close the access door and the computer See Opening and Closing the Computer on page 1 H ...

Страница 35: ...he replacement drive with the top of the drive the disc tray facing up Place the rail with the notch D facing up on the left side of the replacement drive Align the two holes in the rail labeled B with the top row of holes on the drive and then insert the screws through the B holes in the rail d Remove the two screws and the rail C on the right side of the unit e Place the rail with the notch D fa...

Страница 36: ...toward the right Slowly insert the drive into the chassis through the front If the drive starts to bind or becomes stuck stop inserting it Remove the drive and check that the rails are correctly installed and that the top of the drive is facing toward the right 3 Secure the drive by pushing in the optical drive latch H E H ...

Страница 37: ... 5 Close the access door and the computer See Opening and Closing the Computer on page 1 Removing the hard disk drive 1 Prepare the computer to be opened and then open the left access door See Opening and Closing the Computer on page 1 2 Press the hard disk drive drawer latch A lift the handle B and pull the drawer from the chassis 3 Pull out the flexible right side of the drawer C and lift the dr...

Страница 38: ...side A to match the drive 3 Pull out the flexible right side of the drawer C and lower the drive into the drawer inserting the pins E on the right side into the drive D If necessary adjust the position of the pins on the right side to match the drive WARNING The lowest of the five hard disk drive drawer slots contains the operating system If you install the primary hard disk drive in another slot ...

Страница 39: ...omputer on page 1 Adding Memory Your computer comes with random access memory RAM which temporarily stores data and instructions on your computer The computer has one or more memory modules but you may be able to replace the existing memory module s with higher capacity ones The motherboard contains sockets for DDR type double data rate DIMMs dual in line memory modules The exact number of sockets...

Страница 40: ...emove the PCI door and remove the thermal divider See Opening and Closing the Computer on page 1 2 Locate the memory sockets A and B on the motherboard 3 If necessary for clearance remove the top card from the add in card slot See Removing and Installing an Add in Card on page 39 WARNING Using the wrong type of memory module could damage the computer CAUTION When handling a memory module be carefu...

Страница 41: ...dule install the new memory module in the same memory slot from which you removed one Or If you are adding a memory module note that for this dual channel configuration the total capacity size of the memory modules in the A channel slots must match the capacity of the modules in the B channel slots Install the new modules so that the two channels match WARNING Do not pull the memory module out of ...

Страница 42: ... in card slot See Removing and Installing an Add in Card on page 39 4 Replace the thermal divider replace and close the PCI door close the left access door and the computer See Opening and Closing the Computer on page 1 NOTE If a blank screen displays after you replace or add a memory module the memory module is installed incorrectly or it is of the wrong type Remove and reinstall the memory modul...

Страница 43: ...moving an add in card 1 Prepare the computer to be opened and then open the left access door open and remove the PCI door and remove the thermal divider See Opening and Closing the Computer on page 1 2 Locate the add in card slots A on the outside of the chassis and inside on the motherboard 3 Disconnect any cables connected to the add in card IMPORTANT Removal and installation of liquid cooled gr...

Страница 44: ...resent hold the card at each end and carefully pull it from the chassis gently rocking the card back and forth to free it from the socket Be sure not to scrape the card against the other components CAUTION Your computer may have a latch similar to D on the add in connector Pull up the latch D to release the card from the connector when removing the card NOTE Some long add in cards sit in the slot ...

Страница 45: ...slot cover in place See the Warning that follows The following figure shows a locked slot latch at F IMPORTANT Use only a slot cover that came with your computer WARNING Do not force the slot latch to close Check inside the chassis that the end of the slot cover or card G fits against and around the alignment pin H Do not close the latch unless the card or slot cover is properly seated F E H G ...

Страница 46: ...d B is a PCI connector Your computer may vary 3 Inside the chassis position the add in card over the add in card connector For some add in cards tip the end of the card into the exterior slot opening and then position the card over the add in card connector For some long add in cards insert the right side of the card into the slot guides toward the right front of the chassis 4 Gently but firmly pr...

Страница 47: ...ce the slot latch to close Check inside the chassis that the card G fits against and around the alignment pin H Do not close the latch unless the card is properly seated IMPORTANT Some graphics cards require two power cable plugs These two power cables must connect to power supply connectors that are in the same row of the power supply Do NOT connect the two power cables from one graphics card to ...

Страница 48: ...2V5 PCI E blue connector on second row 7 Replace the thermal divider replace and close the PCI door close the left access door and the computer See Opening and Closing the Computer on page 1 WARNING If you disconnect the power connector for the liquid cooling system ensure that it is reconnected prior to connecting power and turning on the computer Failure to do so may result in damage to the cool...

Страница 49: ...e location of each plug connected to the power supply and label the cable Press the latch A on each plug and then pull the plug from the connector WARNING Remove the power cord from the computer Failure to do so before removing the power supply can result in personal injury or equipment damage A A WARNING If you disconnect the power connector for the liquid cooling system ensure that it is reconne...

Страница 50: ...crews B that secure the power supply assembly in the chassis 4 From inside the chassis push out the power supply assembly through the back of the chassis 5 Remove the four screws C that secure the power supply bracket to the power supply and then remove the bracket C B B B B C C C ...

Страница 51: ...cket C with the screw holes on the face of the power supply 2 Insert four screws C to secure the bracket to the power supply 3 From the back of the chassis insert the power supply assembly into the opening D 4 Tighten the four screws B in the bracket to secure the power supply assembly in the chassis C B B B B C C C D ...

Страница 52: ...ck connector H 12V2 CPU turquoise connector I 12V5 PCI E black connector WARNING If you disconnect the power connector for the liquid cooling system ensure that it is reconnected prior to connecting power and turning on the computer Failure to do so may result in damage to the cooling system and to the computer IMPORTANT Some graphics cards require two power cable plugs These two power cables must...

Страница 53: ... LED switch on the SATA backplane Removing the SATA backplane 1 Prepare the computer to be opened and then open the left access door open the PCI door remove the thermal divider and access the chassis through the right side also opening the right access panel See Opening and Closing the Computer on page 1 2 On the left side of the computer remove all the hard disk drives or the drive drawers from ...

Страница 54: ...50 Upgrading and Servicing Guide 4 Locate the SATA backplane B on the right side of the chassis B ...

Страница 55: ...t damage the cables Remove the tie wraps from the anchors 6 Label the five SATA data cable plugs D1 D5 and then disconnect them 7 Disconnect the plugs F at the top of the card 8 Remove the six screws G that secure the card to the chassis and then lift the card from the chassis C C C C C D5 D3 D1 D2 D4 E G F F G ...

Страница 56: ...ings on the replacement SATA backplane to match the switch settings on the old backplane 2 Align the replacement SATA backplane over the posts and screw holes and place the card onto the chassis Insert the six screws G that secure the card to the chassis E C C C C C D5 D3 D1 D2 D4 E G F F G ...

Страница 57: ... cables 6 On the left side of the computer inside the hard disk drive drawer bay reconnect the the power plug A to the SATA backplane B 7 Replace all the hard disk drives or the drive drawers into the chassis See Adding or replacing a hard disk drive on page 34 8 Close and replace the right access replace the thermal divider replace and close the PCI door close the left access door and the compute...

Страница 58: ...ter on page 1 2 Remove any cables or add in cards as needed so that you can reach the battery See Removing and Installing an Add in Card on page 39 3 To remove the battery push the latch away from the battery and lift it out of the socket 4 Install the new CR2032 battery in the socket with the positive side facing the latch 5 Replace the add in cards or any cables you removed 6 Replace the thermal...

Отзывы: