background image


24 hp 

pocket 

camera 

Select the best exposure mode for different subjects or 
lighting conditions according to suggestions below: 


Auto mode.

 Best for normal, hand-held shots. Slowest 

shutter speed 1/15 second.  


Slow mode.

 Best for darker, indoor shots. Slowest 

shutter speed 1/8 second.     


Action mode.

 Best for outdoor shots of moving 

subjects. Slowest shutter speed 1/125 second.    


Night mode.

 Best for very dark or night scenery and 

other low-light conditions. Slowest shutter speed 1/2 
second.     


Manual mode.

 When you want full control of shutter 

speed and gain. Slowest shutter speed 1/2 second.       

Note that at slower shutter speeds (greater than 1/15 second), 
it may be difficult to hold the camera steady. Place the camera 
on a solid surface if possible to ensure that the picture is not 
blurry.  

To select an exposure mode 


In Capture mode, tap the mode setting on the display to 
cycle through all the mode settings. 
–or– 
On the 

Settings

 menu, tap 

Mode

, and then select an 

exposure mode from the list.  

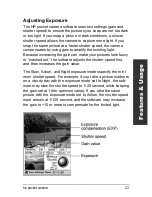
Manual exposure mode offers the most precise control over 
capture settings. When the exposure mode is set to Manual, 
you can set exposure compensation (EXP), shutter speed, and 
gain by selecting values from the lists onscreen.  


Содержание 728 - Jornada - Handheld

Страница 1: ...hp pocket camera for hp jornada pocket pc User s Guide Printed in Singapore Edition 1 ...

Страница 2: ...les herein Hewlett Packard Co 2001 This document contains proprietary information that is pro tected by copyright All rights are reserved No part of this document may be photocopied reproduced adapted or trans lated to another language without the prior written consent of Hewlett Packard Co except as allowed under the copyright laws The programs that control this product are copyrighted and all ri...

Страница 3: ...sing Your Pocket Camera 4 Getting Started 5 Step 1 Insert the HP Pocket Camera into Your HP Jornada 7 Step 2 Snap a Picture 8 Step 3 View and Share Pictures 11 Viewing Pictures 11 Sharing Pictures 13 Removing Your HP Pocket Camera 17 Tips for Taking Better Pictures 19 ...

Страница 4: ... Options 29 Viewing and Editing Pictures 30 Viewing Pictures 30 Editing Pictures 36 Rotating Pictures 38 Recording Sounds with Pictures 39 Conserving Memory 41 Advanced Options 43 Conserving Power 43 Displaying Detailed Onscreen Information 46 Camera Log 47 Troubleshooting and Support 49 Caring for Your Pocket Camera 52 Support 52 Glossary 53 Index 55 ...

Страница 5: ...da pocket camera ideal for business or personal use Enjoy fully automatic point and shoot photography Easily transfer pictures from your HP Jornada to your desktop PC or to selected infrared equipped printers such as the HP DeskJet 990Cxi that support IrOBEX JPEG file format can be used in e mail or on Web sites Record voice notes along with a picture Digital effects and manual control of exposure...

Страница 6: ...information and warranty booklet HP CD ROM The HP CD ROM contains two programs the HP pocket camera software for your HP Jornada and a photo imaging program for your desktop PC The HP pocket camera software must be installed on your HP Jornada before you can snap pictures The photo imaging program lets you edit and enhance the pictures you take with your HP Jornada pocket camera ...

Страница 7: ...camera is busy Off camera is off or is not in use 4 Focus ring Turn the ring to focus on your subject See Focusing your Pocket Camera 5 CompactFlash Type I interface Connects to the CompactFlash card slot on your HP Jornada 6 Optical viewfinder Use the optical viewfinder for subjects at distances greater than 2 m 6 ft or when it is difficult to see the digital viewfinder on the screen of your HP J...

Страница 8: ...us ring until the image in the digital viewfinder on the screen of your HP Jornada is clear The digital viewfinder displays subjects exactly as they will be captured by the pocket camera The diagram shows the approximate position of the focus ring based on the estimated distance of the subject For subjects at distances greater than 110 cm 46 in turn the ring clockwise until it clicks into place ...

Страница 9: ...ereby erase all data on your HP Jornada you will need to reinstall the software before you can use your camera again To install the HP pocket camera software 1 Connect your HP Jornada to your desktop PC 2 Insert the HP CD ROM into a CD ROM drive on your desktop PC Installation should begin automatically If installation does not begin click Run on the Start menu and type d hpcd exe where d is the d...

Страница 10: ...friends and colleagues Step 1 Insert the pocket camera into your HP Jornada Step 2 Snap a picture Step 3 View and share pictures The following sections describe each of these steps in detail In addition the Features and Usage section provides further information on the features of your pocket camera and software that can help you take better pictures ...

Страница 11: ... Jornada auto matically turns on in Capture mode When you see the cam era s digital viewfinder on the screen of your HP Jornada you re ready to begin snapping pictures When you place your HP Jornada and pocket camera on a flat surface be sure that the lens is not facing down Resting the HP Jornada on the camera lens may place stress on the camera joints Do not use excessive force when handling the...

Страница 12: ... want to photograph in the digital viewfinder 2 Tap the shutter button on the touch screen or press and release the Action button on your HP Jornada When you snap a picture your HP Jornada makes a clicking sound if you have not muted the sounds and the green LED ring on the camera blinks rapidly to indicate that the picture has been taken and your HP Jornada is processing the picture It may take a...

Страница 13: ...s the last picture captured 3 Shutter button Tap to snap a picture 4 Capture settings Show the current picture and exposure settings Tap to change settings for more information see the Features and Usage section 5 Command bar Tap menus or icons to change modes set options or display advanced controls Tap the Start button to switch between the HP pocket camera software and other applications ...

Страница 14: ...ighting conditions make it difficult to see the picture on your HP Jornada screen or when your HP Jornada cover is closed Use the optical viewfinder when subjects are at distances greater than 2 m 6 ft If you cannot get as close as you would like to your subject tap on the Command bar to zoom in on your subject Tap again to return to normal Pictures you snap using the zoom feature may not be as sh...

Страница 15: ... send pictures in e mail messages to friends and colleagues To switch to Review mode On the View menu tap Review or Tap on the Command bar Review mode has many powerful features including simple editing functions and the ability to display pictures in sequence as a slideshow For more information see the Viewing and Editing Pictures section ...

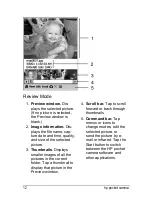
Страница 16: ...elected picture 3 Thumbnails Displays smaller images of all the pictures in the current folder Tap a thumbnail to display that picture in the Preview window 4 Scroll bar Tap to scroll forward or back through thumbnails 5 Command bar Tap menus or icons to change modes edit the selected picture or send the picture by e mail or infrared Tap the Start button to switch between the HP pocket camera soft...

Страница 17: ...y e mail using the HP pocket camera software and the Inbox program on your HP Jornada To send pictures by e mail 1 In Review mode tap a thumbnail to select the picture you want to send 2 On the Send menu tap E mail 3 The Inbox application starts and opens a new e mail message The selected picture is attached to the message as a file attachment 4 Enter the recipient s name in the To field and enter...

Страница 18: ... PC or Infrared Equipped Device The infrared port on your HP Jornada enables you to share pictures with other Pocket PCs or mobile devices that use the IrDA protocol To send a picture by infrared 1 In Review mode tap a thumbnail to select a picture 2 On the Send menu tap Infrared 3 Align the infrared port on your HP Jornada with the infrared port on the receiving device 4 If the receiving device i...

Страница 19: ...ol 1 In Review mode tap a thumbnail to select a picture 2 On the Send menu tap IrOBEX 3 Align the infrared port on your HP Jornada with the infrared port on the receiving device 4 Wait until the picture has been sent You can usually send a picture using IrOBEX or IrDA without removing the camera from the CompactFlash slot of your HP Jornada however if you have difficulty sending a picture try remo...

Страница 20: ...tap Copy or tap Resize and Copy and then select a scale factor 3 Open the document or note into which you want to paste the picture 4 On the Edit menu tap Paste The Notes section of a contact appointment or task has a maximum size limit of 64 KB Pictures copied to the clipboard are stored uncompressed and may exceed this size limit For a 640 x 320 picture resize and copy to 12 5 For a 320 x 240 pi...

Страница 21: ...il the LED ring on the camera shines steady green before you remove the camera To exit the HP pocket camera software On the View menu tap Exit Exiting the HP pocket camera software turns off power to the camera even if the camera is still inserted in your HP Jornada If you switch to another application on your HP Jornada while the HP pocket camera software is in Capture mode you can still snap pic...

Страница 22: ... HP pocket camera software to speed up the other applications To take a picture while you are running another application first check that the LED ring on the camera shines steady green If the LED is blinking slowly press the shutter button on the camera once to wake the camera from Standby mode Press the shutter button again to take a picture ...

Страница 23: ...und has bright lights either frame the subject so that the bright lights do not appear in the picture or use the Spot Metering feature to move the spot metering box onto the subject for correct exposure For more information see Metering Options in the Features and Usage section When taking pictures indoors or in darker conditions select Slow or Night for the exposure mode If possible rest the came...

Страница 24: ...rn out take the same picture using different settings and compare the results The Camera Log feature helps you keep track of the exposure settings used for each picture For more information see Camera Log in the Advanced Options section For close up pictures distances of 10 110 cm 4 46 in use the digital viewfinder on the screen of your HP Jornada and turn the focus ring on the camera to get the b...

Страница 25: ...nd shoot photography your pocket camera includes many other features This section describes the features that can help you take better or more creative pictures Features include timer delay exposure mode settings picture quality settings picture size digital effects light meter ...

Страница 26: ...ton displays the timer symbol This symbol indicates the timer is active During timer countdown the time remaining is shown on the shutter button When you have set a delay with the timer and you press the shutter button the shutter button displays a countdown timer your HP Jornada beeps and the green LED ring on the camera blinks During the last 2 seconds of the countdown the beeping and blinking b...

Страница 27: ...ncreasing the gain can make your pictures look fuzzy or washed out the software adjusts the shutter speed first and then increases the gain value The Slow Action and Night exposure modes specify the mini mum shutter speed For example if you take a picture outdoors on a cloudy day with the exposure mode set to Night the soft ware may slow the shutter speed to 1 20 second while keeping the gain set ...

Страница 28: ...you want full control of shutter speed and gain Slowest shutter speed 1 2 second Note that at slower shutter speeds greater than 1 15 second it may be difficult to hold the camera steady Place the camera on a solid surface if possible to ensure that the picture is not blurry To select an exposure mode In Capture mode tap the mode setting on the display to cycle through all the mode settings or On ...

Страница 29: ...n Lower quality pictures require less storage space on your HP Jornada and may take less time when sending by e mail or infrared The four quality settings are Normal Fine default Super Fine Best To select the quality setting On the Settings menu tap Quality and select an option from the pop up list or Tap the JPEG quality display on the touch screen to cycle through the available settings ...

Страница 30: ... pixels default size The larger size 640 x 480 requires more storage space It may also take longer to process and send To select a picture size On the Settings menu tap Size and select an option from the pop up list or Tap the size setting display on the touch screen to cycle through the available settings ...

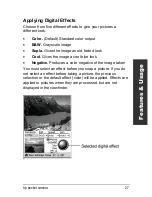
Страница 31: ... Gives the image an old faded look Cool Gives the image a cool blue look Negative Produces a color negative of the image taken You must select an effect before you snap a picture If you do not select an effect before taking a picture the previous selection or the default effect color will be applied Effects are applied to pictures when they are processed but are not displayed in the viewfinder ...

Страница 32: ... settings After using an effect remember to set the effect back to your favorite setting If you later snap a picture without looking at the display or if you cannot see the display clearly you may not notice that a different effect is selected Grayscale pictures result in smaller file sizes and require less storage space on your HP Jornada Picture color depends on your HP Jornada color display cap...

Страница 33: ...er or much darker than its surroundings or if the subject is not centered in the frame To select metering options 1 On the Settings menu tap Metering and then tap Spot or Center Weighted 2 If you choose Spot metering a green box displayed in the digital viewfinder represents the area that will be used to determine exposure settings In the digital viewfinder tap the area of the image on which you w...

Страница 34: ...s Review mode allows you to view and edit your pictures To select Review mode On the View menu tap Review or Tap on the Command bar Viewing Pictures You can view pictures on your HP Jornada in three ways Preview window default Image Viewer Slideshow ...

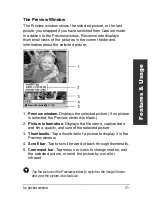
Страница 35: ...ays the selected picture If no picture is selected the Preview window is blank 2 Picture information Displays the file name capture date and time quality and size of the selected picture 3 Thumbnails Tap a thumbnail of a picture to display it in the Preview window 4 Scroll bar Tap to scroll forward or back through thumbnails 5 Command bar Tap menus or icons to change modes edit the selected pictur...

Страница 36: ...saved in the My Documents folder on your HP Jornada You can display and save pictures in the My Documents folder or any subfolder you create in My Documents To view pictures in a different folder 1 On the View menu tap Options and then tap the Filename tab 2 Under Save view pictures in folder select a folder from the drop down list If you change the folder you are viewing any new pictures that you...

Страница 37: ...picture in the Preview window or On the View menu tap Actual Size To close the Image Viewer Tap OK or Press the Action button If the picture is too large to fit on your HP Jornada screen you can pan across the picture by dragging the stylus on the touch screen to display other parts of the picture You can also pan up or down by rocking the Action button on your HP Jornada ...

Страница 38: ...enu tap Slideshow or Press the Action button To stop the slideshow Press the Action button or Tap the screen Create a fun animation by snapping a sequence of pictures and playing them back with the slideshow feature Set the slideshow options for a forward or reverse sequence with a short or zero delay The animated motion is smoothest when the images have been captured at a size of 320x240 For best...

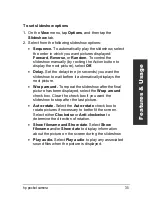
Страница 39: ...it before it automatically displays the next picture Wrap around To repeat the slideshow after the final picture has been displayed select the Wrap around check box Clear the check box if you want the slideshow to stop after the last picture Auto rotate Select the Auto rotate check box to rotate pictures if necessary to better fit the screen Select either Clockwise or Anti clockwise to determine t...

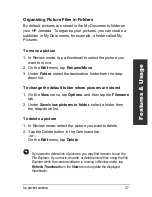
Страница 40: ... rename The current file name is displayed below the Preview window 2 On the Edit menu tap Rename Move 3 In the Filename box enter a new name for the file You do not need to include the file name extension e g jpg To set a file naming convention for captured pictures 1 On the View menu tap Options and then tap the Filename tab 2 In the Filename prefix box enter a word or sequence of characters tha...

Страница 41: ...drop down list To change the default folder where pictures are stored 1 On the View menu tap Options and then tap the Filename tab 2 Under Save view pictures in folder select a folder from the drop down list To delete a picture 1 In Review mode select the picture you want to delete 2 Tap the Delete button in the Command bar or On the Edit menu tap Delete If you want to delete lots of pictures you ...

Страница 42: ...es to ensure that they appear properly when they are displayed on your HP Jornada screen or copied to a note or document To rotate a picture 1 In Review mode tap a thumbnail to select the picture 2 On the Edit menu tap Rotate Anti clockwise or Rotate Clockwise ...

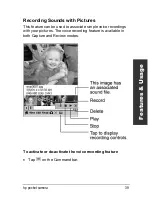
Страница 43: ...nds with Pictures This feature can be used to associate simple voice recordings with your pictures The voice recording feature is available in both Capture and Review modes To activate or de activate the voice recording feature Tap on the Command bar ...

Страница 44: ...in Capture mode are associated with the last picture you snapped Voice recordings created in Review mode are associated with the selected picture In Review mode the thumbnail for a picture with an associated sound file is displayed with a musical note icon Displaying the picture in the Preview window the Image Viewer or a slideshow also plays the associated sound You can also associate a prerecord...

Страница 45: ...various settings 320x240 pixels 640x480 pixels Quality Color Gray scale Color Gray scale Normal 12 8 36 30 Fine 18 12 55 46 Super Fine 27 18 86 74 Best 64 45 221 177 File sizes may vary significantly depending on the picture content and camera settings The HP pocket camera software keeps track of available storage memory and displays the approximate number of pictures that can be captured and stor...

Страница 46: ...nformation on transferring files from your HP Jornada to your desktop PC via ActiveSync or to a CompactFlash card refer to your HP Jornada User s Guide Alternatively you can also free up storage memory by deleting pictures from your HP Jornada For information on deleting pictures see Organizing Pictures in Files and Folders in the Viewing and Editing Pictures section ...

Страница 47: ...power and to prevent your HP Jornada from running out of power Typically your fully charged HP Jornada will power the camera for up to 2 hours To save power the pocket camera will turn off suspend after a period of inactivity The camera will suspend at the same time as your HP Jornada depending on the options you have set in the Power control panel For information on setting your HP Jornada to sus...

Страница 48: ...n further conserve power by setting your camera to suspend when not in use In Suspend mode the pocket camera is off and does not use any power When the camera is in Suspend mode the green LED ring on the camera is not lit and the shutter button on the pocket camera does not respond when you press it By default your camera will not suspend you must set this option as described below To set the dela...

Страница 49: ...a uses power only when the HP pocket camera software is in Capture mode You can save power by switching to Review mode or by closing the HP pocket camera software You can save power by disabling the LED ring on the camera and or disabling sound playback features Capture related sounds are made by the HP pocket camera software in Capture mode such as the shutter button sound and the timer beeping s...

Страница 50: ... RGB value Displays the RGB value of the selected pixel as indicated by the red crosshairs on the center of the screen Tap the screen to move the spot metering region and or to zoom in or out Timer Shows the time elapsed since Capture mode was activated regardless of whether the camera has been running or not Histogram Displays the RGB channels to determine if the picture has been exposed correctl...

Страница 51: ...ou used for a particular picture or compare the results of different exposure settings The log is stored as a text file called Camlog txt in the My Documents folder To enable the camera log 1 On the View menu tap Options and then tap the Advanced tab 2 Select the Log capture information check box To view the camera log 1 On the View menu tap Options and then tap the Advanced tab 2 Tap View Log The...

Страница 52: ...48 hp pocket camera ...

Страница 53: ...the View menu Have you installed the HP pocket camera software You must install the software before you can use the camera If you have restored your HP Jornada to the factory default settings or lost power thereby erasing all information on your HP Jornada you will need to reinstall the software Is something blocking the lens Check to be sure your finger or another object is not in front of the le...

Страница 54: ...d mode you must tap the onscreen shutter button in the HP pocket camera software to turn on the camera Was the pocket camera ready Be sure the LED ring on the pocket camera is shining steady green before you snap a picture After you take a picture you may need to wait a few moments for your HP Jornada to process and save the picture before you can take another one The green LED ring blinks rapidly...

Страница 55: ...closer turn the focus ring until the image in the digital viewfinder is focused You can also zoom in to help focus the image and then zoom out again before taking the picture Did you move the camera It may be difficult to hold the camera steady especially at slow shutter speeds below 1 15 second Try to place your HP Jornada on a solid surface before snapping the picture Is the subject moving To ca...

Страница 56: ...CompactFlash interface of the camera carefully with the CompactFlash slot of your Jornada Be sure the camera is oriented correctly before inserting it into the slot Use quality cleaning products designed for use on photographic lenses to keep your camera lens dirt and smudge free Do not use excessive force on the lenses when cleaning to prevent damage to the lens Support Each HP Jornada offers 90 ...

Страница 57: ... in the viewfinder Exposure compensation EXP A setting that allows you to manually correct scenes that are too dark or bright Exposure values range from 0 0 to 2 0 Setting a higher EXP value makes the picture brighter a lower EXP makes the picture darker Gain The amount of brightness applied by the camera to compensate for low light conditions The gain value ranges from 1 to 25 For best picture qu...

Страница 58: ...r speeds while moving subjects require faster shutter speeds The shutter speed on your HP pocket camera ranges from 1 2 second slowest to 1 8000 second fastest Spot metering A way to override center weighted metering the camera s default method of measuring the brightness of a picture Use spot metering to identify the part of a picture that you want the light meter to use to calculate exposure for...

Страница 59: ... software status See status storing 17 Capture mode timer 46 capture related sounds 45 53 capturing pictures See snapping pictures center weighted metering See light meter CompactFlash card 42 49 cool picture effect 27 D delay timer canceling 22 countdown 22 setting 22 deleting pictures 37 42 displaying pictures See viewing pictures documents adding pictures to 16 E exposure See also snapping pict...

Страница 60: ...tware IrDA protocol 14 15 IrOBEX protocol 15 L lens 3 7 49 50 52 cleaning 52 light meter center weighted metering 29 53 spot metering 19 29 46 54 lighting bluish 20 indoor 19 20 24 low light 10 19 23 24 moving between dark and light 51 night 24 outdoor 23 24 white 20 yellowish 20 log of camera settings about 20 enabling 47 file name of 47 viewing 47 M memory conserving 18 28 41 42 effect of qualit...

Страница 61: ...uresSee also snapping pictures adding to documents 16 adding to Notes 16 associating sound files with 40 browsing 11 deleting 37 42 displaying See viewing pictures file naming convention for 36 log of settings for 20 47 moving 37 printing 15 renaming 36 rotating 35 38 sending in e mail 13 sending via infrared 14 15 storing in folders 37 51 transferring 42 pocket camera software exiting 17 45 insta...

Страница 62: ...posure 19 23 24 29 46 51 applying special effects 27 28 53 at night 24 camera ready for 10 51 focusing 3 4 20 51 in low light 10 19 24 indoors 19 20 24 of bright backgrounds 19 of close up subjects 3 4 20 51 of colorful scenes 19 of detailed scenes 19 of distant subjects 3 4 8 10 51 of fast moving subjects 24 51 of yourself with delay timer 22 outdoors 23 24 using digital viewfinder 8 using optica...

Страница 63: ...ining steadily 3 7 10 17 18 45 49 50 Suspend mode about 43 44 canceling 17 45 50 setting delay 44 waking from 45 T taking pictures See snapping pictures timer See Capture mode timer or delay timer transferring pictures 15 42 troubleshooting See picture problems V viewing pictures at actual size 31 33 changing default folder for 32 in a slideshow 34 in Image Viewer 31 33 in Preview window 12 31 32 ...

Страница 64: ...60 hp pocket camera ...

Отзывы: