background image

GB

21

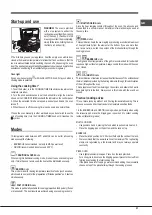
Start-up and use

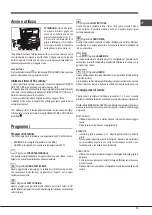
WARNING! 

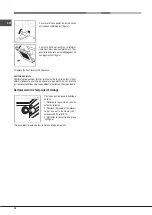
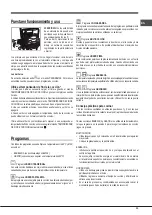
The oven is provided 

with a stop system to extract the 

racks and prevent them from coming 

out of the oven (1).As shown in the 

drawing, to extract them completely, 

simply lift the racks, holding them on 

the front part, and pull (2).

!

 The first time you use your appliance, heat the empty oven with its door 

closed at its maximum temperature for at least half an hour. Ensure that the 

room is well ventilated before switching the oven off and opening the oven 

door. The appliance may emit a slightly unpleasant odour caused by protective 

substances used during the manufacturing process burning away.

Oven light

It goes on when selecting   with the SELECTOR knob. It stays on when a 

cooking mode is selected.

Using the cooking timer*

1. To set the buzzer, turn the COOKING TIMER knob clockwise almost one 

complete revolution.

2. Turn the knob anticlockwise to set the desired time: align the minutes 

shown on the COOKING TIMER knob with the indicator on the control panel.

3. When the selected time has elapsed, a buzzer sounds and the oven 

turns off.

4. When the oven is off the cooking timer can be used as a normal timer.

!

 To use the oven manually, in other words when you do not wish to use the 

end of cooking timer, turn the COOKING TIMER knob until it reaches the 

 symbol.

Modes

!

 A temperature value between 60°C and MAX can be set for all cooking 

modes except the following:

•  BARBECUE (recommended: set only to MAX power level)

•  GRATIN (recommended: do not exceed 200°C).


TRADITIONAL OVEN 

mode

When using this traditional cooking mode, it is best to use one cooking rack 

only. if more than one rack is used, the heat will be distributed unevenly.


BAKING

 mode

This mode is ideal for baking temperature sensitive foods (such as cakes, 

which need to rise) and for the preparation of “bitesize pastries” on 3 shelves 

simultaneously.


FAST COOKING

 mode

This mode is particularly suitable for cooking pre-packed food quickly (frozen 

or pre-cooked). The best results are achieved using one cooking rack only.


MULTI-COOKING

 mode

Since the heat remains constant throughout the oven, the air cooks and 

browns food in a uniform manner. A maximum of two racks may be used at 

the same time.


PIZZA

 modes

This combination heats the oven rapidly by producing a considerable amount 

of heat, particularly from the element at the bottom. If you use more than 

one rack at a time, switch the position of the dishes halfway through the 

cooking process.

 / 


BARBECUE

 mode

The high and direct temperature of the grill is recommended for food which 

requires a high surface temperature. Always cook in this mode with the oven 

door closed.

 / 


GRATIN

 mode

This combination of features increases the effectiveness of the unidirectional 

thermal radiation provided by the heating elements through forced circulation 

of the air throughout the oven. 

This helps prevent food from burning on the surface and allows the heat to 

penetrate right into the food. Always cook in this mode with the oven door 

closed.

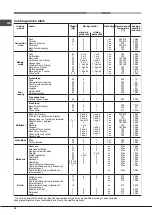
Practical cooking advice

!

 Do not place racks in position 1 and 5 during fan-assisted cooking. This is 

because excessive direct heat can burn temperature sensitive foods.

!

 In the BARBECUE and GRATIN cooking modes, particularly when using 

the rotisserie spit, place the dripping pan in position 2 to collect cooking 

residues (fat and/or grease).

MULTI-COOKING

•  Use positions 2 and 4, placing the food which requires more heat on 2.

•  Place the dripping pan on the bottom and the rack on top.

BARBECUE

•  Place the rack in position 3 or 4. Position the food in the centre of the rack.

•  We recommend that the power level is set to maximum. The top heating 

element is regulated by a thermostat and may not always operate 

constantly.

PIZZA OVEN

•  Use a light aluminium pizza pan. Place it on the rack provided.

  For a crispy crust, do not use the dripping pan as it prevents the crust from 

forming by extending the total cooking time.

•  If the pizza has a lot of toppings, we recommend adding the mozzarella 

cheese on top of the pizza halfway through the cooking process.

Содержание FT 820.1 /HA S

Страница 1: ...d use 21 Modes 21 Precautions and tips 23 Maintenance and care 23 Sommaire Mode d emploi 1 Avertissements 4 Assistance 7 Description de l appareil 9 Description de l appareil 11 Installation 25 Mise e...

Страница 2: ...ma regeln und Hinweise 47 Reinigung und Pflege 47 Inhoud Gebruiksaanwijzing 2 Belangrijk 6 Service 8 Beschrijving van het apparaat 10 Beschrijving van het apparaat 12 Het installeren 49 Starten en geb...

Страница 3: ...sia spento prima di sostituire la lampada per evitare la possibilit di scosse elettriche Quando si inserisce la griglia assicurarsi che il fermo sia rivolto verso l alto e nella parte posteriore della...

Страница 4: ...r au remplacement de l ampoule afin d viter tout risque d lectrocution Lors de l introduction de la grille s assurer que l arr t est bien tourn vers le haut et se trouve dans la partie arri re de l en...

Страница 5: ...e o bloqueioestejavoltadoparacimaenaparteposterior da cavidade Hinweise ZUR BEACHTUNG Bei Gebrauch wird dieses Ger t und alle zug nglichen Teile sehr hei Es ist darauf zu achten dass die Heizelemente...

Страница 6: ...Bij het inbrengen van de grill erop letten dat de bevestigingsklemomhooggerichtisenzichachterin de oven bevindt Ostrzezenia UWAGA To urz dzenie oraz jego dost pne cz ci silniesi rozgrzewaj podczasu y...

Страница 7: ...18 30 il Sab dalle 08 00 alle 13 00 e di 5 58 centesimi di Euroalminuto ivainclusa dalLun alVen dalle18 30alle08 00 ilSab dalle 13 00 alle 08 00 e i giorni festivi per chi chiama dal telefono fisso P...

Страница 8: ...identifica o situada no aparelho Kundendienst Wenden Sie sich auf keinen Fall an nicht autorisierte Techniker Geben Sie bitte Folgendes an die genaue Beschreibung des Fehlers das Ger temodell Mod die...

Страница 9: ...POSITION 4 5 POSITION 5 6 GUIDES for the sliding racks 7 DRIPPING PAN 8 GRILL 9 Control panel Description de l appareil Vue d ensemble 1 NIVEAU 1 2 NIVEAU 2 3 NIVEAU 3 4 NIVEAU 4 5 NIVEAU 5 6 GLISSIER...

Страница 10: ...SCHUBH HE 4 5 EINSCHUBH HE 5 6 GLEITF HRUNGEN f r die Einsch be 7 Einschub FETTPFANNE 8 Einschub BACKOFENROST 9 Bedienfeld Beschrijving van het apparaat Algemeen aanzicht 1 POSITIE 1 2 POSITIE 2 3 POS...

Страница 11: ...anel 1 SELECTOR knob 2 COOKING TIMER knob 3 THERMOSTAT knob 4 OVEN INDICATOR Description de l appareil Tableau de bord 1 Bouton PROGRAMMES 2 Bouton PROGRAMMATEUR FIN DE CUISSON 3 Bouton THERMOSTAT 4 V...

Страница 12: ...RAMME 2 Drehknopf TIMER ZUR EINSTELLUNG DES GARZEITENDES 3 Drehknopf THERMOSTAT 4 BACKOFEN BETRIEBSKONTROLLEUCHTE Beschrijving van het apparaat Bedieningspaneel 1 Knop PROGRAMMA S 2 Knop TIMER EINDE K...

Страница 13: ...e i tacchetti C a battuta nelle staffe A In particolare se lo spessore della fiancata del mobile di 16 mm montare il tacchetto in modo che il numero 16 riportato sullo stesso sia rivolto verso di voi...

Страница 14: ...gano rispettate Solo per modelli con guide imbutite Solo per modelli con guide in filo TARGHETTA CARATTERISTICHE Dimensioni larghezza cm 43 5 altezza cm 32 4 profondit cm 40 6 Dimensioni larghezza cm...

Страница 15: ...ontemporaneamente Programma FAST COOKING Questo programma particolarmente indicato per cotture veloci di cibi preconfezionati surgelatioprecotti Irisultatimigliorisiottengonoutilizzando un solo ripian...

Страница 16: ...2 1 e 2 e 4 1 e 2 e 4 1 1 e 2 e 4 1 1 1 1 1 1 1 1 1 1 1 1 1 e 3 1 e 3 1 e 3 1 e 3 1 1 1 1 e 3 1 e 3 1 e 3 1 e 3 1 1 3 3 3 3 2 o 3 3 3 3 3 2 2 2 2 2 Posizione dei ripiani Alimenti Anatra Pollo Arrosto...

Страница 17: ...sistema di comando a distanza separato Smaltimento Smaltimento del materiale di imballaggio attenersi alle norme locali cos gli imballaggi potranno essere riutilizzati La direttiva Europea 2012 19 CE...

Страница 18: ...guarnizione attorno alla porta del forno IncasorisultidanneggiatarivolgersialCentroAssistenzapi vicino vedi Assistenza consigliabile non usare il forno fino all avvenuta riparazione Sostituire la lamp...

Страница 19: ...ion tabs C against brackets A If the thickness of the cabinet side panel is 16 mm thick place the tab so that the number 16 written on it is facing you is 18 mm thick place the tab so that the part wi...

Страница 20: ...y liability should these safety measures not be observed APPLIANCE SPECIFICATIONS Dimensions width 43 5 cm height 32 4 cm depth 40 6 cm Volume 58 l Dimensions width 45 5 cm height 32 4 cm depth 40 6 c...

Страница 21: ...pre packed food quickly frozen or pre cooked The best results are achieved using one cooking rack only MULTI COOKING mode Since the heat remains constant throughout the oven the air cooks and browns...

Страница 22: ...4 4 2 2 2 2 2 sliding guide rails 1 1 1 1 1 1 1 or 2 1 or 2 1 or 2 1 and 3 1 or 2 1 2 and 4 1 2 and 4 1 1 2 and 4 1 1 1 1 1 1 1 1 1 1 1 1 1 and 3 1 and 3 1 and 3 1 and 3 1 1 1 and 3 1 and 3 1 and 3 1...

Страница 23: ...ternal timer or separate remote control system Disposal When disposing of packaging material observe local legislation so that the packaging may be reused The European Directive 2012 19 EC on Waste El...

Страница 24: ...the seals Check the door seals around the oven regularly If the seals are damaged pleasecontactyournearestServiceCentre seeAssistance Werecommend that the oven is not used until the seals have been r...

Страница 25: ...equ ellesbuttentcontrelescales support du four B 2 Positionner les taquets C contre les pattes A Attention l paisseur des joues du meuble si elle est de 16 mm monter le taquet de mani re ce que le chi...

Страница 26: ...c glissi res embouties Uniquement pour les mod les avec glissi res en fil PLAQUE SIGNALETIQUE Dimensions largeur 43 5 cm hauteur 32 4 cm profondeur 40 6 cm Volume L 58 Raccordements lectriques tension...

Страница 27: ...s par ex et certains petits fours sur trois niveaux en m me temps Programme FAST COOKING Pas besoin de pr chauffage Ce programme est tout particuli rement recommand pour les cuissons rapides de plats...

Страница 28: ...1 ou 2 1 ou 2 1 et 3 1 ou 2 1 et 2 et 4 1 et 2 et 4 1 1 et 2 et 4 1 1 1 1 1 1 1 1 1 1 1 1 1 et 3 1 et 3 1 et 3 1 et 3 1 1 1 1 et 3 1 et 3 1 et 3 1 et 3 1 1 3 3 3 3 2 ou 3 3 3 3 3 2 2 2 2 2 Niveau enf...

Страница 29: ...mballages pourront ainsi tre recycl s LaDirectiveEurop enne2012 19 CEEsurlesD chetsdesEquipements Electriques et Electroniques DEEE exige que les appareils m nagers usag s ne soient pas jet s dans le...

Страница 30: ...l tat du joint autour de la porte du four S il est ab m s adresser au service apr s vente le plus proche de son domicile voirAssistance Mieux vaut ne pas utiliser le four tant qu il n est pas r par Re...

Страница 31: ...en una instalaci n de este tipo Aireaci n Paragarantizarunabuenaaireaci nesnecesarioeliminarlaparedposterior del hueco para el horno Es preferible instalar el horno apoyado sobre dos listeles de made...

Страница 32: ...s El cable no debe sufrir pliegues ni compresiones El cable debe ser revisado peri dicamente y sustituido s lo por t cnicos autorizados verAsistencia La empresa declina toda responsabilidad cuando est...

Страница 33: ...jas simult neamente Programa COCINA R PIDA Elprogramanonecesitaprecalentamiento Esteprogramaesparticularmente indicadoparacoccionesvelocesdealimentoscongeladosoprecocidos Los mejores resultados se obt...

Страница 34: ...1 1 e 3 1 e 3 1 e 3 1 e 3 1 1 3 3 3 3 2 o 3 3 3 3 3 2 2 2 2 2 Posici n de las bandejas Alimentos Pato Pollo Asado de ternera o de vaca Asado de cerdo Bizcochos de pastaflora Tortas glaseadas Tortas g...

Страница 35: ...externo o de un sistema de mando a distancia Eliminaci n Eliminaci ndelmaterialdeembalaje respetelasnormaslocales deesta manera los embalajes podr n ser reutilizados En base a la Norma europea 2012 19...

Страница 36: ...las juntas Controleperi dicamenteelestadodelajuntaquerodealapuertadelhorno Si seencontrarada adallamealCentrodeAsistenciaT cnicam scercano ver Asistencia Esaconsejablenousarelhornohastaquenohayasidore...

Страница 37: ...s caracter sticas foram medidas com este tipo de instala o Ventila o Para garantir uma boa ventila o necess rio eliminar a parede traseira do v o prefer vel instalar o forno de maneira que apoie se so...

Страница 38: ...es nem tomadas m ltiplas Depois de ter instalado o aparelho o acesso ao cabo el ctrico e tomada da corrente deve ser f cil O cabo n o deve ser dobrado nem comprimido O cabo deve ser verificado period...

Страница 39: ...ograma de FAST COOKING Este programa especificamente indicado para cozeduras r pidas de alimentospreviamentepreparados congeladosoupreviamentecozidos Os melhores resultados s o obtidos se utilizar ape...

Страница 40: ...e 2 e 4 1 e 2 e 4 1 1 e 2 e 4 1 1 1 1 1 1 1 1 1 1 1 1 1 e 3 1 e 3 1 e 3 1 e 3 1 1 1 1 e 3 1 e 3 1 e 3 1 e 3 1 1 3 3 3 3 2 ou 3 3 3 3 3 2 2 2 2 2 Posi o das prateleiras Alimentos Pato Franco Carne de...

Страница 41: ...comando dist ncia separado Elimina o Elimina o do material de embalagem obede a as regras locais de maneira que as embalagens possam ser reutilizadas Adirectiva Europeia 2012 19 CE relativa aos res du...

Страница 42: ...o das guarni es Verifique periodicamente o estado da guarni o ao redor da porta do forno Se houver danos contacte o Centro de Assist ncia T cnica mais pr ximo vejaaAssist nciat cnica aconselh veln ou...

Страница 43: ...schrankwand von 16 mm das Eckst ck so angebracht wird dass die darauf gedruckte Zahl 16 vor Ihnen liegt 18mm dasEckst cksoangebrachtwird dassderunbeschrifteteTeil vor Ihnen liegt 20 mm das Eckst ck ni...

Страница 44: ...ung ab falls diese Vorschriften nicht eingehalten werden sollten TYPENSCHILD Abmessungen Breite 43 5 cm H he 32 4 cm Tiefe 40 6 cm Nutzvolumen Liter 58 Elektrischer Anschluss Spannung 220 230V oder 22...

Страница 45: ...ichzeitig Programm FAST COOKING BeidiesemProgrammistkeinVorheizenn tig Eseignetsichbesonderszum schnellen Garen von Fertiggerichten tiefgek hlt oder auch nicht Optimale Resultate werden bei Verwendung...

Страница 46: ...benen auf Backblech Brath hnchen Kartoffeln Lamm Makrelen Lasagne Windbeutel auf 2 Ebenen Geb ck auf 2 Ebenen Mit K se gef lltes Bl tterteiggeb ck auf 2 Ebenen Quiche 1 1 1 1 1 2 und 4 2 und 4 2 und 4...

Страница 47: ...eine f r ihre Sicherheit verantwortlichePersonbeaufsichtigtwerdenoderzuvorAnleitungenzum Ger tegebrauch erhalten haben Dieses Ger t kann nicht mit einem externen Timer oder einem getrennten Fernsteuer...

Страница 48: ...en u eren Seitenundschlie enSiesielangsam jedoch nichtganz ZiehenSiedieT rdannzusichhin ausihrerLagerungheraus sieheAbbildung In umgekehrter Reihenfolge wird die Backofent r wieder angebracht Dichtung...

Страница 49: ...op de steunranden B van de oven 2 Plaats de klampen C aansluitend op de beugels A Als de dikte van de zijkant van het meubel 16 mm is monteer de klamp zodanig dat het nummer 16 dat erop staat naar u...

Страница 50: ...normen niet worden nageleefd Alleen voor modellen met diepgetrokken geleiders Alleen voor modellen met uitstekende geleiders TYPEPLAATJE Afmetingen breedte 45 5 cm hoogte 32 4 cm diepte 40 6 cm Inhoud...

Страница 51: ...AST COOKING Bijditprogrammawordtdeovennietvoorverwarmd Ditprogrammaisvooral geschiktvoorhetsnelkokenvankantenklaregerechten diepvriesproducten en voorgekookte gerechten De beste resultaten verkrijgt u...

Страница 52: ...Pizza op 2 roosters Vruchten taarten op 2 roosters Cake op 2 roosters op lekplaat Gebraden kip aardappels Lamsvlees Makreel Lasagne Soesjes op 2 roosters Koekjes op 2 roosters Kaaskoekjes op 2 rooster...

Страница 53: ...eem Afvalverwijdering Verwijdering van het verpakkingsmateriaal houd u aan de plaatselijke normen zodat het verpakkingsmateriaal hergebruikt kan worden De Europese Richtlijn 2012 19 EC over Vernietigi...

Страница 54: ...de afdichtingen Controleer regelmatig de staat van de afdichtingen rondom de ovendeur In het geval de afdichtingen beschadigd zijn dient u zich tot de dichtstbijzijnde Technische Dienst te wenden zie...

Страница 55: ...askoczy y 2 Ustawi stopki C we wspornikach A tak aby zaskoczy y Je li grubo bocznej cianki mebla wynosi 16 mm zamontowa stopk w taki spos b aby umieszczona na niej liczba 16 by a zwr cona w stron osob...

Страница 56: ...powy szych zalece Tylko dla modeli z wyt aczanymi prowadnicami Tylko dla modeli z drucianymi prowadnicami TABLICZKA ZNAMIONOWA Wymiary l 58 Wymiary l 60 32 4 cm 40 6 cm 45 5 cm 32 4 cm ENERGY LABEL Dy...

Страница 57: ...trawdrobnych np ciasteczek na trzech poziomach jednocze nie Program FAST COOKING Ten program nie wymaga wcze niejszego nagrzania piekarnika Program jest w szczeg lno ci wskazany do szybkiego pieczenia...

Страница 58: ...izza na 2 p kach Kruche ciasta na 2 p kach ciasta na 2 p kach Ciasto biszkoptowe na 2 p kach na brytfannie Kurczak pieczony ziemniaki Jagni cina Makrela Lasagne Ptysie na 2 p kach Herbatniki na 2 p ka...

Страница 59: ...iedzialnej za ich bezpiecze stwo jak r wnie przez osoby kt re nie otrzyma y instrukcji wst pnych na temat eksploatacji urz dzenia Urz dzenie nie jest przeznaczone do tego aby by o w czane przy u yciuz...

Страница 60: ...ecz nie ca kowicie Nast pniepoci gn drzwiczkido siebie i wyj je z zawias w patrz rysunek Zamontowa ponowniedrzwiczkiwykonuj copisaneczynno ciwodwrotnej kolejno ci Sprawdzanie uszczelek Copewienczasnal...

Отзывы: