background image

Backup and Restoration

Data Backup: Prevent Data Loss

Ever worry that your Phone will stop working and cause you to lose important data? Back up your
data regularly to prevent data loss and increase your peace of mind.

There are four ways to back up your Phone's data:

l

microSD card: If your Phone supports microSD cards, you can back up your data to a microSD card
at any time, giving you a convenient way to prevent data loss.

l

Device internal storage: You can back up smaller files to your device's internal storage.

l

USB storage device: If you are running out of space in your Phone's internal storage, you can
connect your Phone to a USB storage device using a USB OTG cable to back up your data.

l

Computer backup: You can back up important data, pictures, and large files from your Phone to a
computer to prevent data loss and free up your Phone's internal storage.

Select a Backup Method

By backing up the data on your Phone, you can then use the created backups to restore your data if
your device is lost or damaged, or need to be replaced, or restored to factory settings. Your data will
be securely and completely stored and restored, and your privacy will be protected throughout the
process.

Before backing up your data, it's recommended that you understand Huawei's different backup
methods and select the most appropriate one for you.

The following backup methods are provided for you:

l

Back up data to HUAWEI Cloud (Cloud backup)

l

Back up data to your computer using HiSuite

l

Back up data to internal storage

l

Back up data to a USB storage device

Internal storage and USB backup

You can choose to back up data, such as images, audios, videos, and documents, to either your
internal storage or USB storage device.

l

Internal storage: You can back up smaller files to your device's internal storage.

l

USB storage device: If you're running out of internal storage space on your device, connect your
device to a USB storage device using a USB OTG cable to back up your data.

Huawei Backup

Huawei Backup has the following features:

l

All data can be backed up, including contacts, SMS messages, call logs, system settings, clock,
browser bookmarks, calendar, weather, photos, videos, recordings, and other app data on your
Huawei Phone.

92

Содержание 10

Страница 1: ...User Guide ...

Страница 2: ... Panel and Status Bar 19 Screen Lock and Unlock 22 Go Back to Basics with Simple Mode 23 Home Screen Management 24 Contacts Managing Business Cards 28 Search Contacts 30 Managing Contacts 31 Merging Third party App Contacts 32 Dialing Basic Calling Functions 34 Block Nuisance Calls Get the Peace and Quiet You Deserve 36 VoLTE 37 Message Basic Messaging Functions 38 Camera Basic Camera Functions 40...

Страница 3: ...Center 70 Navigate the Calendar 70 Import To Dos to Keep Your Work Organized 71 View Global Holidays 71 Clock Use the Clock 72 Notepad Manage Your Notes to Keep Your Records in Order 74 Utilities Check Additional Weather Forecasts 75 Use Recorder to Make Audio Notes 75 Multiple Users Multiple Users Create Separate User Accounts on Your Phone 76 Set and Use Multiple Users 76 Device Connection Bluet...

Страница 4: ...ting to the Internet 100 Share Your Mobile Network with Other Devices 100 Apps and Notifications App Twin Log in to Two Social Media Accounts at Once 102 Sound and Display Configure Do Not Disturb Mode 103 Configure Your Sound Settings 103 Enable Eye Comfort Mode to Prevent Eye Strain 104 More Display Settings 105 Storage Storage Cleaner 108 Smart Assistance Navigation Bar and Navigation Dock 109 ...

Страница 5: ...ur Phone This feature offers intuitive suggestions for specific usage scenarios which should help you get more out of your Phone Access Phone Functions from Anywhere with Navigation Dock In order to close an app or return to the home screen you must use the navigation bar at the bottom of your Phone You can enable the Navigation dock feature on your Phone to avoid using navigation buttons and to c...

Страница 6: ...ttom of the page capturing all of the information on the page in a single screenshot Use shortcuts to take a scrolling screenshot Swipe down from the status bar to open the notification panel then touch to take a scrolling screenshot Touch within three seconds of taking the screenshot and the screen will automatically scroll down and keep taking the screenshot During the scrolling process touch th...

Страница 7: ...wing you to keep your work and private life separate The App twin feature is currently limited to WeChat QQ Messenger LINE Facebook Snapchat WhatsApp and Messenger Please download and install the latest version of these apps before using the App twin feature Touch Settings and go to Apps notifications App twin Enable App twin as required When App twin is enabled for an app two app icons are displa...

Страница 8: ...black and white Use 3D Panorama to Take 360 degree Photos Try the 3D panorama function to capture a 360 degree view of a scene or person There are three shooting modes for the 3D panorama function l Shoot objects Open Camera More 3D panorama Touch and hold then follow the onscreen prompts to slowly move your Phone around your subject in one direction Release to stop shooting After shooting touch t...

Страница 9: ... hold then follow the onscreen prompts to slowly move your Phone around your subject in one direction Release to stop shooting After shooting touch the camera thumbnail and then touch 3D above the photo to generate a 3D panoramic photo Exciting Features 5 ...

Страница 10: ...ide aperture mode Exit this mode and enter other shooting modes When shooting touch the screen to select a focal point and then touch to take the photo l For optimal results ensure that the subject is positioned no more than 2 m 6 ft away from the camera l Touch and drag the slider bar to the left or right to adjust the aperture level The smaller the aperture value the more blurred the background ...

Страница 11: ...ighlights albums will not be created if there are insufficient photos or videos less than 7 photos in Gallery You can use Highlights to do the following l Automatically create theme based albums Highlights automatically creates albums of photos based on time or location such as a birthday party or graduation ceremony A push notification will be sent to your Phone when a new album is created Touch ...

Страница 12: ...Exciting Features 8 ...

Страница 13: ... phone before installing or removing a SIM card 1 2 New Device Configuration Connecting to the Internet Connect to WLAN networks effortlessly with your device Connecting to a WLAN network 1 Swipe down from the status bar to open the notification panel 2 Touch and hold to open the WLAN settings screen 3 Switch on WLAN Your device will list all available WLAN networks at your location 4 Select the W...

Страница 14: ...ect Pattern PIN or Password and then follow the onscreen instructions to set an unlock password 3 Once you have set an unlock password touch New fingerprint to enroll a fingerprint 4 Place your fingertip on the fingerprint sensor Press down lightly on the sensor until your device vibrates Repeat this step using different parts of your fingertip 5 After enrollment is complete touch OK To unlock the...

Страница 15: ...New Device 11 ...

Страница 16: ...shot Swipe down from the status bar to open the notification panel then touch to take a scrolling screenshot Touch within three seconds of taking the screenshot and the screen will automatically scroll down and keep taking the screenshot During the scrolling process touch the scrolling area to end the screenshot Use knuckle gestures to take a scrolling screenshot Tap the screen with one knuckle an...

Страница 17: ...one at the same time then you can select either System or None from Sound source l If you have selected Microphone from Sound source then your Phone will pick up all sounds and actions including that which is produced by you touching the screen It is recommended that you only record your screen in a quiet environment with no ambient noise Use shortcut to start recording Swipe down from the status ...

Страница 18: ... press the Power button and the Volume up button to begin recording Select Microphone System or None from Sound source based on your needs To end the recording simultaneously press the Power button and the Volume up button again Gestures and Operations 14 ...

Страница 19: ...ngs in Gallery Take a Screenshot of Your Entire Screen Use combo key to take screenshot Simultaneously press and hold the Power button and the Volume down button to take a screenshot of the full screen Use shortcut switch to take screenshot Swipe down from the status bar and open the shortcuts panel then touch to take a screenshot of the full screen Use knuckle to take screenshot Use a knuckle to ...

Страница 20: ...After taking the screenshot touch or to edit or share the screenshot The screenshot will be saved in Gallery by default Gestures and Operations 16 ...

Страница 21: ... navigation bar Then touch Settings to select the navigation key combination you want Hide or show navigation bar On the Virtual navigation bar screen touch Settings to enable Navigation bar Then you can touch on the navigation bar to hide the bar After the navigation bar is hidden swipe up from the bottom of the screen to show the navigation bar again l Back key Touch to return to the previous sc...

Страница 22: ...ng app l Close all apps Touch to close all apps l Lock an app If you want an app to continue running in the background and not be closed you can lock the app After an app is locked it cannot be closed by touching Touch in the upper right corner of the app tab When an app is locked you can unlock it by touching in the upper right corner of the app tab Quick Switch Use Shortcut Switches to Quickly E...

Страница 23: ...of the panel to the hidden area then touch BACK Notification Panel and Status Bar Notification and Status Icons and Descriptions The icons in the status bar give you a quick view of the overall status of your Phone including its network connection battery level and any new messages received when your Phone is in Silent mode Status icons By checking the status icons you can quickly learn the status...

Страница 24: ...rk connected Roaming Receiving location data from GPS Bluetooth enabled Silent mode enabled Wi Fi network detected Charging Vibration mode enabled Battery level low Alarm enabled No SIM card detected Battery fully charged Headset plugged in Notification icons When there is a new message notification or reminder on your Phone the relevant icon will be displayed in your status bar Missed call New em...

Страница 25: ...Access notification panel when the screen is unlocked Swipe down from the status bar to open the notification panel You can turn on or off shortcut switches or touch notifications to view the details Want the notification and status bar to display only the number of notifications or to display no notifications Touch Settings and go to Apps notifications Notifications status bar Notification method...

Страница 26: ... required each time you unlock your Phone A lock screen password helps to protect your private information if your Phone is lost or accessed by an unauthorized user Set a lock screen password Open Settings go to Security privacy Screen lock passwords and set the type of lock screen password you prefer l Set a PIN A PIN number is a sequence of digits Entering a PIN to unlock your device is quick an...

Страница 27: ... Lock your screen when you are not using your Phone to protect your privacy and prevent mistaken inputs Set a lock screen password to help protect your privacy You can lock your device in the following ways Lock the screen instantly with the Power button Press the Power button to lock the screen at any time Lock the screen with one touch screen lock Pinch two fingers together on the home screen to...

Страница 28: ...and hold an app icon until your Phone vibrates then drag it to any position on the home screen Delete an app From the home screen touch and hold the icon of the app you want to uninstall until your Phone vibrates and then drag it to Follow the onscreen prompts to delete the app To ensure that the system runs normally some preinstalled system apps cannot be uninstalled Create a folder From the home...

Страница 29: ... from the folder Another way to remove an app icon from a folder is to touch and hold the icon in the folder until your Phone vibrates and then drag it to the home screen Manage Your Home Screen Too many icons on your home screen You can add a new page to your home screen and customize it to your liking Touch and hold an empty area on the home screen to enter home screen editing mode You can do th...

Страница 30: ... instructions to select Lock screen Home screen or Both l Randomly switch wallpaper Enable Randomly change home screen wallpaper and set the Interval and Album to display Set a photo as your wallpaper from Gallery Have a great photo you want to set as your wallpaper In Gallery open the photo that you like go to Set as Wallpaper and follow the onscreen instructions to set the photo as your home scr...

Страница 31: ...p Drawer to Store Apps Want to store your apps in one location on your home screen to make your home screen look cleaner You can enable app drawer on your home screen to store all your apps and free up space on your home screen Open Settings go to Display Home screen style and select Drawer If you want to switch back to a standard home screen select Standard Add an app icon from app drawer to the ...

Страница 32: ...r business cards into your contacts Simply place a paper business card in front of the camera to save the information including name telephone number and title to your contacts l Scan QR code to add a contact Scan the QR code on a business card to quickly save the information to your contacts l Share your personal business card Create your personal business card in your contacts and your device wi...

Страница 33: ...tomatically converted into contact information and saved in Business cards in your Phone To view a business card you have saved open Contacts select scanned contacts then go to Details View business card Share Contacts Using Electronic Business Cards Share your business card Open Contacts and touch Me to set your profile picture and enter your name work address telephone number and other informati...

Страница 34: ...ods For most accurate search results ensure your device is displaying all contacts On the contacts list screen go to Display preferences and touch All contacts l Drag the index on the side to quickly scroll through the list l In the search bar at the top of the contacts list enter the contact name initials telephone number or email address and the search results will be displayed below the search ...

Страница 35: ...tacts list you can use the Merge duplicate contacts function to merge duplicate contacts From the contacts list Go to Organize contacts Merge duplicate contacts select the contacts you want to merge and then touch Display contacts for different accounts Want to only view contacts on your Phone or SIM card Go to Display preferences and select the accounts that you want to display You can also l Ena...

Страница 36: ... Contacts Integrated Social Networks Bring People Together Want to expand your social network Want to sync information from a social media account to your contacts You can log in to a social media account such as LinkedIn and sync your contacts information including company title and email to your local contacts and enrich your social network Associate Contact Information with Your Social Account ...

Страница 37: ... do You can associate a social media account such as LinkedIn with your email contacts The job information of email senders will then be displayed on the email details screen From the Email inbox open an email you have received Go to email details then touch the sender s profile picture and select View LinkedIn profile Contacts 33 ...

Страница 38: ...red on and within the service area you can make emergency calls even if the screen is locked or there is no mobile reception The emergency call feature is subject to your local regulations and Internet service provider Network issues or environmental interference may lead to failed emergency calls In emergency situations do not rely on your Phone as your only method of communication Open Dialer or...

Страница 39: ...l forwarding is enabled your device will automatically forward eligible calls to the preset number Delete Call Logs You can delete call logs that you no longer need Open Dialer and touch to hide the dialpad You can now perform one of the following l Delete a single record Touch and hold an entry then touch Delete entry l Delete multiple records Touch select the entries you want to delete or touch ...

Страница 40: ... the SIM 1 or SIM 2 section touch Additional settings then go to Voicemail Voicemail number and enter the voicemail number provided by your carrier Check voicemail messages On the dialer touch and hold 1 to call the voicemail and listen to messages Activate International Roaming for Borderless Communication When you travel abroad for work or a holiday you can make calls when your Phone is roaming ...

Страница 41: ...he Internet while making HD calls l Dual VoWiFi Both of your Phone s SIM card slots support VoWiFi which allows calls to be made using Wi Fi You can use VoWiFi to make calls even in Airplane mode Some carriers may not support this feature Enable VoLTE to Enjoy HD Calls Only dual SIM phones support both SIM card slots enabling 4G VoLTE and VoWiFi Open Settings and go to Wireless networks Mobile net...

Страница 42: ... deleting an important message Touch and hold a message and then touch to archive the message Delete a message Tired of the clutter created by too many messages Delete unneeded conversations or messages to clean up your Messaging list To delete conversations or messages touch and hold the conversations or messages to enter the editing screen select the conversation or message and touch Deleted mes...

Страница 43: ...ge Open Messages and touch Go to Settings Advanced From here you can configure the following Whether to retrieve MMS messages automatically Disable Auto download MMS to prevent your device from automatically downloading MMS messages Whether to retrieve MMS messages automatically when roaming Disable Auto download MMS when roaming to prevent your device from automatically downloading MMS messages i...

Страница 44: ...From the viewfinder touch to select one of the following flash modes l Auto The camera automatically enables or disables flash depending on the ambient light level l Off Disable flash l On Enable flash l Always on Flash is always on while you are in the viewfinder Enable geolocation Your geographic location will be recorded when you take a picture to allow you to search through your pictures by lo...

Страница 45: ...ro mode touch to enter the Settings screen and enable RAW format Now when you take a picture the picture will be saved in RAW format as well as the standard picture format and stored in a special folder in Gallery Mute photography From the Settings screen enable Mute RAW format pictures take up more storage space than traditional pictures Please check that you have enough free storage space availa...

Страница 46: ...Spiral composition method Use either Fibonacci spiral left or Fibonacci spiral right Place the subject of your photo within the center of the spiral Camera 42 ...

Страница 47: ...e Perfect selfie and your Phone will create a custom beauty plan for you The higher the beautification level the more pronounced the effects When the front camera is used to take photos at night or in other dark environments and the flash is set to Auto if the Phone detects that the current environment is too dark it will automatically enable light compensation to enhance screen brightness This im...

Страница 48: ...d by moving the lens or focusing too slowly l Blur the background to highlight the subject Unable to pick out the focus in a crowd Enable Wide aperture mode to blur the background so you can stand out with ease even on a crowded street l Capture moments with ease even at night Are your photos dark when taken at night or in low light Enable Wide aperture mode to customize your photo brightness so y...

Страница 49: ...will automatically take another picture 5 Follow the onscreen instructions again and pan your Phone in the opposite direction until the blue frame overlaps with the square screen frame Your camera will automatically take the last picture 6 Once complete the camera will automatically combine the three pictures into a wide angle 3D selfie Use Panorama Mode to Take Panoramic Photos Panoramas provide ...

Страница 50: ...life 3D panorama gives you a great way to liven up your panoramas You can tilt your Phone or drag your photos to view the 3D effect Panorama is a pre installed camera mode in your Phone You can use 3D panorama to create moving panoramic shots of objects people and landscapes Camera 46 ...

Страница 51: ...move your Phone around your subject in one direction Release to stop shooting After shooting touch the camera thumbnail and then touch 3D above the photo to generate a 3D panoramic photo l Shoot scenery Open Camera More 3D panorama Touch and hold then follow the onscreen prompts to slowly move your Phone around your subject in one direction Release to stop shooting After shooting touch the camera ...

Страница 52: ...in your Phone In Pro camera mode you can adjust various parameters to produce photos and videos with results comparable to professional cameras Use Pro Mode to Take Scenic Photos Want to make your scenic photos more vibrant and interesting Use Pro mode to take unique and personalized scenic photos Open Camera More Select a metering mode based on the shooting subject On the Pro mode screen touch an...

Страница 53: ... the Pro mode screen touch 7 slide on the EV slider and drag the selected value to the center Adjust AWB On the Pro mode screen touch 8 slide on the AWB slider and drag the selected value to the center l When shooting under sunlight you can select In a weak light environment you can select l Touch to adjust the color temperature If you want to give your photo a cozy nostalgic tone increase the K v...

Страница 54: ...nments Shooting Environment Recommended ISO Outdoors Between 100 and 200 Indoors Around 400 Night scenes Between 400 and 800 l Adjust shutter speed The shutter speed should be slow if the ambient light is low and fast when the ambient light is strong The recommended shutter speed for static portraits is between 1 80 and 1 125 To shoot moving subjects select a shutter speed at or above 1 125 l Adju...

Страница 55: ...tion and strength of light l A strong sense of history Black and white photos seem to belong to the past and are unaffected by changes in time or location giving your photos a classic and timeless touch l Subtle imagery that evokes nostalgia Monochrome provides an expression of sentiment especially when it comes to portraits It strengthens the impact of facial details and gives your subject a sens...

Страница 56: ...stunning photos that have an ethereal quality Light painting mode offers four creative shooting modes for different subjects and light conditions l Traffic trails Captures light trails created by cars at night l Light graffiti Captures trails created by a moving light source in low light conditions l Silky water Captures silky smooth photos of waterfalls and flowing water l Star trails Captures st...

Страница 57: ...ct for best results Ensure that car headlights do not point directly at the camera as this can overexpose the image l Place your device on a tripod or solid surface so that it does not move during the exposure Open Camera More Traffic trails Hold your Phone steady and then touch to start shooting A preview of the image is displayed in the viewfinder Touch when you are finished Camera 53 ...

Страница 58: ...at the subject s silhouette is not visible Choose a suitably bright light source of an appropriate color such as a small torch or glow stick l Place your device on a tripod or solid surface so that it does not move during the exposure Open Camera More Light graffiti Hold your Phone steady and then touch to start shooting A preview of the image is displayed in the viewfinder Touch when you are fini...

Страница 59: ...etter results find a stream or waterfall with lots of water l Place your device on a tripod or solid surface so that it does not move during the exposure 1 Open Camera More Silky water 2 Hold your Phone steady and then touch to start shooting 3 A preview of the image is displayed in the viewfinder Touch when you are finished Camera 55 ...

Страница 60: ...ation free of light pollution with an unobstructed view of the sky and on a clear night l Place your device on a tripod or solid surface so that it does not move during the exposure 1 Open Camera More Star trails 2 Hold your Phone steady and then touch to start shooting 3 A preview of the image is displayed in the viewfinder Touch when you are finished Camera 56 ...

Страница 61: ...gher the beautification level the more pronounced the effects When the front camera is used to take photos at night or in other dark environments and the flash is set to Auto if the Phone detects that the current environment is too dark it will automatically enable light compensation to enhance screen brightness This improves the quality of photos taken by the front camera Custom Shooting Modes Wa...

Страница 62: ...icture and sound Take moving pictures Open Camera touch on the top of your screen then touch to capture View moving pictures The captured moving picture will be saved to Gallery in JPG format Go to Gallery Albums Camera Touch pictures with icon and touch on the top of the picture to view the dynamic effect The moving picture automatically stops after a complete playback You can also touch the scre...

Страница 63: ...create the album Highlights albums will not be created if there are insufficient photos or videos less than 7 photos in Gallery You can use Highlights to do the following l Automatically create theme based albums Highlights automatically creates albums of photos based on time or location such as a birthday party or graduation ceremony A push notification will be sent to your Phone when a new album...

Страница 64: ...touch and check that GPS tag is enabled l Ensure that your Phone is connected to the Internet l When your Phone is charging in sleep mode and has more than 50 battery it will automatically sort and create a Highlights album It may take a while for your device to finish the analysis Your device will not automatically create a Highlights album if there are insufficient photos or videos less than 7 p...

Страница 65: ...eo in the album touch select a sharing mode and complete the sharing as prompted l Rename a Highlights album Touch and enter the new name l Delete a Highlights album Touch and then touch Delete Photo Management Search for Photos Quickly by Category Want to quickly find a photo in Gallery Photo search which intelligently sorts and recognizes photos in Gallery allows you to search for photos in the ...

Страница 66: ...os Crop a video Open Gallery select the video you want to edit and touch to enter the video editing screen You can drag the slider in the crop area to select the segment you want to keep and touch to finish cropping the video Adjust the video resolution As you drag the slider to select the video segment you want to keep you can touch to preview the cropped video You can also touch the video resolu...

Страница 67: ... brush and color to add graffiti to photos l Add watermarks Touch and select a watermark such as Time Location Weather or Mood to personalize your photos l Add a tag Touch and select an annotation style and font format to enrich your photos Browse and Share Photos and Videos Browsing through old photos or videos can bring back some of your most precious memories Your photos and videos are stored i...

Страница 68: ...s by albums in the Albums tab Some photos and videos are stored in default albums specified by the system For example videos recorded with the camera are saved in the All videos album Screenshots and screen recordings are saved in the Screenshots album Play slideshows From the Photos tab go to Slideshow and the system will automatically play a photo slideshow Touch the screen to stop playing Organ...

Страница 69: ...den Delete photos and videos Touch and hold a photo or album until the symbol appears select the files you want to delete then go to Delete Deleted photos or videos are kept in the Recently deleted album along with a tag indicating the number of days remaining until the item is permanently removed from the system To permanently delete a photo or video before it expires from the Recently deleted al...

Страница 70: ...check for security risks optimize power consumption and monitor and intercept unknown phone numbers and harassing calls Manage Mobile Data Usage Manage mobile data usage to avoid incurring extra charges Go to Phone Manager and touch Mobile data to view data usage statistics or enable Data saver l Data usage ranking View data usage for each app l Networked apps Manage Internet access permissions fo...

Страница 71: ...afe from new threats l Quick scan Select Quick scan The system will quickly scan key locations and apps on your device during routine maintenance l Full scan Select Full scan The system will then comprehensively scan your device for any malware or harmful files at regular intervals This process takes longer but covers a wider range and ensures your device is fully protected from any threats l Viru...

Страница 72: ...er settings After configuration the system will open the Inbox screen by default Manage Email Accounts You can add one or more email accounts Open Email You can Check emails On the Inbox screen touch and then select an email account to view the list of your emails Swipe down to refresh the list of emails Open an email to read reply forward or delete it Swipe left or right on the screen to view the...

Страница 73: ... Settings VIP contacts From the VIP list screen go to Add Create or Add from contacts Add or remove VIP contacts On the VIP list screen touch or to manage VIP contacts Change email notification for VIP contacts From your email home screen go to Settings VIP notifications Set Auto Response for Exchange Email Unable to reply to emails on vacation Enable auto responses to automatically reply to email...

Страница 74: ... receive a reminder from your Phone before the meeting begins l Share events Want to share your schedule and invite your friends to an event There are multiple sharing methods to choose from Navigate the Calendar Go to today Search events Week number Today Currently displayed day Events for the day Events for the currently displayed day Switch between month week day and schedule view Add new event...

Страница 75: ... Exchange account in calendar to check meeting reminders Share an event Touch an event on the calendar or under schedule then touch and follow the onscreen prompts to share the event using any of the multiple methods View Global Holidays Traveling overseas for work or holiday Download your destination country s holiday information ahead of time to better plan your work and schedule Open Calendar g...

Страница 76: ...a timer View the time all over the world Go to Clock touch on the World clock tab and enter the name of a city or select a city from the list of cities Touch to set the date and time Display the time in two different regions Go to Clock then go to Date time in the World clock tab Enable Dual clocks touch Home city and select your city of residence from the city list 72 ...

Страница 77: ...Network provided date and time Time and date in your selected city If the time in your current region is the same as that of your home city the lock screen will only display one time Clock 73 ...

Страница 78: ...pad swipe left on a note then touch Alternatively touch and hold a note to view options select the note s you want to delete and touch Search notes Want to quickly find a note Touch the search bar on the list page of Notepad and enter the keywords of your search Alternatively swipe down on the home screen to access the search bar and enter the keywords of your search Generate a to do list Want to ...

Страница 79: ...website where you can view the weather forecast for the next 15 days Use Recorder to Make Audio Notes Don t have enough time to write down all the important details during a meeting Need to sort out a pile of notes from an interview or class Recorder lets you record audio files that you can conveniently play back later l Play recording from tag Touch Recordings and then touch a recording to switch...

Страница 80: ... Guests can only perform a limited number of actions Set and Use Multiple Users Want to have more than one user account on your Phone to keep your work and personal life separate You can add multiple users to your Phone and switch between them with a single touch Add Users or Guests A maximum of three users and one guest can be added Add a user Touch Settings and go to Users accounts Users Touch A...

Страница 81: ...m the status bar and then go to More settings Select the desired user and touch Delete user DELETE To delete a guest touch Settings Go to Users accounts Users and then touch Guest Delete guest DELETE Switch Between the Owner Account User and Guest Modes To switch between the owner account user and guest modes select one of the following methods l Swipe down from the status bar and touch Then touch...

Страница 82: ...you drive You can also connect your Phone to Bluetooth wearables to record and manage fitness data Connecting Bluetooth devices to your Phone does not increase power consumption significantly 0 0 Bluetooth protocols used by Huawei devices and their functions HFP HSP Make calls A2DP Play music AVRCP Control music playback OPP Transfer files PBAP Sync contacts MAP Sync text messages 78 ...

Страница 83: ...her device over Bluetooth to share data import and export contacts and set up Internet tethering Use Bluetooth to send files Ensure that your Phone is within Bluetooth range of the other device 10 m or 32 ft You can then establish a Bluetooth connection and share multimedia files web pages contacts documents and apps between the two devices Open Files touch and hold the file that you want to send ...

Страница 84: ...wo devices can transfer data in real time when they are within 10 cm 4 inches of each other Photos networks and apps can all be quickly shared using this method NFC read write mode lets you check product information contained in NFC tags NFC card emulation mode allows your device to act as a bank card for quick and easy payments NFC 1 2 3 4 5 6 7 8 9 Use NFC to Share Data Quickly NFC lets you shar...

Страница 85: ...e the NFC detection areas of both devices close together Once a connection is established the transmitting device will play an audio prompt After the prompt please wait for the file transfer to complete Received files are saved by default to the Beam folder of your Files If there is an option to enable Read and write P2P on the NFC screen ensure that it is enabled Features may vary depending on yo...

Страница 86: ...structions and touch the screen on the sending device to establish a Bluetooth connection If there is a Read and write P2P switch on the NFC screen ensure it is also enabled Features may vary depending on your carrier Multi screen Share Your Device s Content on a Larger Screen Connect your Phone and your TV streaming box to the same Wi Fi network to use multi screen sharing When you look at pictur...

Страница 87: ...at supports Miracast like a TV projector or other display Directly connect over Wi Fi and turn on the screen sharing function like Miracast on the external device Everything displayed on your device will be shared to the display on the external device When playing music and videos only the image will be shown on your device no audio will play Device Connection 83 ...

Страница 88: ...des and patterns to unlock your screen Use your fingerprint to quickly and securely unlock your screen with a single touch l Access your private files Afraid of forgetting your password for the Safe or app lock or having it fall into the hands of someone you don t trust Set fingerprint access for the Safe and app lock to keep your files and apps secure and accessible by only you Enroll a Fingerpri...

Страница 89: ...an also delete or rename your fingerprints 1 Open Settings 2 Go to Security privacy Fingerprint ID 3 Enter the screen unlock password and then follow the onscreen instructions to enter the fingerprint configuration screen 4 In the Fingerprint list section you can l Enroll a new fingerprint Touch New fingerprint to enroll a new fingerprint l Rename or delete a fingerprint Touch a previously enrolle...

Страница 90: ...are enabled you can also set the appropriate positioning mode When location services are disabled aside for pre installed software such as Find my Device your Phone will stop all apps and services from collecting and using your location information The system will ask you to enable location services when you attempt to use these apps l Use Wi Fi and mobile networks Calculates your Phone s location...

Страница 91: ...es you with the following features l Hide the entrance to your PrivateSpace Want to keep all traces of your PrivateSpace hidden from other people You can hide the entrance to your PrivateSpace in the MainSpace keeping your PrivateSpace hidden and secret l Quickly switch between MainSpace and PrivateSpace From the lock screen you can quickly switch between spaces using different fingerprints or pas...

Страница 92: ... PrivateSpace for the first time open Settings go to Security privacy PrivateSpace Enable and follow the onscreen instructions to create your PrivateSpace You can only create one PrivateSpace Quickly switch between MainSpace and PrivateSpace From the lock screen you can quickly switch between spaces using your fingerprint or password After you restart your Phone you are required to first enter the...

Страница 93: ... because microSD cards are blocked in PrivateSpace Files stored in the cloud cannot be transferred between your PrivateSpace and your MainSpace Not all devices support microSD cards By default transferred image files are stored at Gallery Shared photos video files are stored at Gallery Shared videos and audio files are stored at Files Audio Transfer Your PrivateSpace Data to Your New Device You ca...

Страница 94: ...estart your Phone or unlock the Phone screen you will be asked to enter your App lock password when initially opening the apps App lock enhances the protection of your private information and prevents unauthorized access to important apps on your device Enable App lock Open Settings Go to Security privacy App lock and follow the onscreen instructions to set a password then enable App lock for the ...

Страница 95: ...tection capability of the hardware This works together with your lock screen password to protect your private data When you use PrivateSpace Multi user encrypted microSD files or other features to encrypt photos personal information or other personal data the only way your data can possibly be decrypted is if the trusted root key lock screen password and security chip are simultaneously cracked No...

Страница 96: ... damaged or need to be replaced or restored to factory settings Your data will be securely and completely stored and restored and your privacy will be protected throughout the process Before backing up your data it s recommended that you understand Huawei s different backup methods and select the most appropriate one for you The following backup methods are provided for you l Back up data to HUAWE...

Страница 97: ...ble space l Encrypted backups are also supported though they are unencrypted by default Back Up Your Data to Your Device s Internal Storage You can back up your Phone s data to internal storage to prevent data loss It is recommended that you only back up relatively small files to your internal storage such as contacts SMS messages call logs and calendar 1 Open Backup then select Back up 2 Select I...

Страница 98: ...and select Back up 2 Select USB storage to back up your data then touch Next 3 Select the data you want to back up and touch Back up You can then touch Select all in the bottom right corner to back up all data or select individual data files for backup After your selection the system automatically calculates the capacity required for the backup 4 On the Set password screen follow the onscreen inst...

Страница 99: ...ings reset and follow the onscreen instructions to reset the settings Restore all settings This will restore your device s initial network settings and the fingerprint and lock screen passwords It won t reset settings for Find my Phone or HUAWEI ID nor will it delete any data or files First open Settings go to System Reset Reset all settings touch Reset all settings and follow the onscreen instruc...

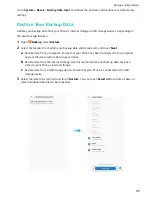
Страница 100: ...d touch Next a Restore data from a computer Ensure that your Phone has been connected to the computer and use HiSuite to restore data to your device b Restore data from the internal storage Use this method when your backup data has been stored in your Phone s internal storage c Restore data from a USB storage device Ensure that your Phone is connected to the USB storage device 3 Select the data to...

Страница 101: ...in Backup management 1 First open Backup 2 Then touch the icon at the top of screen and then touch Backup management 3 Select a backup storage medium and touch Next to find the location of the backup file 4 To delete the backup data or any files contained on the storage medium touch Delete Media files must also be deleted from the Multimedia backup Backup and Restoration 97 ...

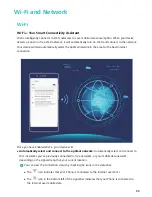
Страница 102: ...ction Once you have enabled Wi Fi your device will l Automatically select and connect to the optimal network Automatically select and connect to Wi Fi networks you ve previously connected to free networks or your mobile data network depending on the signal strength at your current location You can view the connection status by checking the icons in the status bar l The icon indicates that your Pho...

Страница 103: ...to rapidly transfer data between Huawei devices Wi Fi Direct is faster than Bluetooth and does not require devices to be paired It is better suited to transferring large files over short distances Send files with Wi Fi Direct Open Files touch and hold a file you want to send and go to More Share Wi Fi Direct When another device is detected touch its name to establish the connection and begin file ...

Страница 104: ...et Connect to WLAN networks effortlessly with your device Connecting to a WLAN network 1 Swipe down from the status bar to open the notification panel 2 Touch and hold to open the WLAN settings screen 3 Switch on WLAN Your device will list all available WLAN networks at your location 4 Select the WLAN network you want to connect to If you select an encrypted network you will also need to enter the...

Страница 105: ...share mobile data Establish a Bluetooth connection and pair the devices before using Bluetooth to share your mobile data Open Settings go to Wireless networks Tethering portable hotspot and enable Bluetooth tethering On the paired device Bluetooth screen touch next to the paired device and enable Internet access to establish an Internet connection and share your mobile data Use USB to share mobile...

Страница 106: ...fe separate The App twin feature is currently limited to WeChat QQ Messenger LINE Facebook Snapchat WhatsApp and Messenger Please download and install the latest version of these apps before using the App twin feature Touch Settings and go to Apps notifications App twin Enable App twin as required When App twin is enabled for an app two app icons are displayed for the app on the home screen This m...

Страница 107: ...me third party apps may continue to ring when Do not disturb mode is enabled Configure the in app settings to mute notifications from these apps Time rule Prevent interruptions at set times such as weekends or evenings Touch Time to configure the time period and repeat interval then toggle on the Time switch Event rule Prevent interruptions during meetings or events Touch Event to enable Do not di...

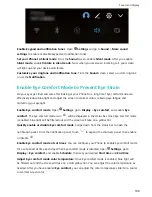
Страница 108: ... comfort and enable Eye comfort The Eye comfort mode icon will be displayed in the status bar Once Eye comfort mode is enabled blue light will be filtered out and the screen will take on a yellow tint Quickly enable or disable Eye comfort mode Swipe down from the status bar to open the notification panel From the notification panel touch to expand the shortcuts panel then enable or disable Enable ...

Страница 109: ...to take a selfie touch and hold the camera icon and then touch Selfie in the pop up menu Add shortcuts to your home screen Touch and hold an app icon on your home screen to bring up the menu Touch and hold the desired feature and then drag it to your home screen to create a shortcut For example you can add a shortcut for the camera s selfie feature for quick access to the selfie camera Modify the ...

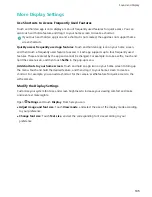
Страница 110: ... the notification panel and quickly enable l Adjust screen color temperature Touch Color mode temperature Color temperature and select the system recommended Default Warm or Cold option You can also touch or drag the dots on the color temperature ring to manually adjust the color temperature When Eye comfort is enabled the color temperature setting cannot be adjusted in Eye comfort l Adjust screen...

Страница 111: ...Sleep mode Touch Screen saver enable Screen saver You can set the Picture source and Duration Once the setting is complete if your Phone is charging and enters Sleep mode the screen will automatically play screensavers Sound and Display 107 ...

Страница 112: ...ly free up memory and internal storage space without affecting your Phone usage Deep clean Scan for redundant files including WeChat files large files videos images app residual files music files unnecessary installation packages unused files and files that take up a lot of space and obtain cleaning suggestions based on the scan results This helps you free up storage space without accidentally del...

Страница 113: ...navigation bar at the bottom of your Phone You can enable the Navigation dock feature on your Phone to avoid using navigation buttons and to comfortably operate your device with one hand Open Settings Go to System System navigation Navigation dock and enable Navigation dock The Navigation dock will appear on the screen You can then drag it to your preferred location The Navigation dock can perform...

Страница 114: ...UAGES All languages to download other languages for the input method Disable keypress vibration Go to Enter Typing Sounds Vibration and disable keypress vibration Swipe through letters to write words Delete text Configure input method Switch to numbers and symbols Touch to enter a space swipe left or right to change input language The image shows the layout of the American English keyboard The lay...

Страница 115: ...wer button until your device vibrates and then touch the screen with two fingers for at least three seconds Learn TalkBack Gestures TalkBack uses a special set of gestures for Phone operation When TalkBack is enabled these gestures are required to interact with the device If you accidentally enable TalkBack press and hold the Power button until your device vibrates and then touch the screen with t...

Страница 116: ... help visually impaired users interact with their devices Open Settings go to Smart assistance Accessibility and enable Text to speech output Configure your preferred engine and speech rate to enable this feature Enable Color Correction The color correction setting enables your device to compensate for the effects of color blindness When color correction is enabled users with normal color vision m...

Страница 117: ...ns After you have used your new Phone for a while the smart suggestion feature will be automatically enabled on your Phone This feature offers intuitive suggestions for specific usage scenarios which should help you get more out of your Phone Change Your System Language Want to change your Phone s system language This can be done with ease Open Settings go to System Language input Language and sel...

Страница 118: ... your Phone s time zone with your mobile network Disable Automatic time zone to set your time zone manually l Change the time format Enable 24 hour time to set your time format to 24 hours Disable 24 hour time to set your time format to 12 hours l Set dual clocks on your lock screen If you are overseas your Phone will automatically display the local time and date provided by the local mobile netwo...

Страница 119: ...onnection Printing default print service and check that default print service is enabled Select a printer from the search results and follow the onscreen instructions to manually add a printer 3 You can now print directly from your Phone l Print an image Go to Gallery Open the image that you want to print go to MORE Print or export to PDF and then follow the onscreen instructions to send the image...

Страница 120: ... You can use your Phone to manage and update in real time multiple email and app accounts on a variety of other devices including Phones computers and others l Third party app accounts can only be created if the third party app is installed on your device l The type of information that can be synced depends on the account type Open Settings and touch Users accounts From here you can l Add an accou...

Страница 121: ...gle SIM Phones have one IMEI number while dual SIM Phones have two IMEI numbers Change device name Open Settings and go to System About phone Device name to change the device name of your Phone System 117 ...

Страница 122: ...close your personal information For best results update your system using the online update feature or take your Phone to your nearest Huawei service center l Always back up your data before updating your Phone to avoid potential data loss l Some third party apps may be incompatible with the new system version such as online banking apps or games Please wait for a new version of the third party ap...

Страница 123: ... Some features of the product and its accessories described herein rely on the software installed capacities and settings of local network and therefore may not be activated or may be limited by local network operators or network service providers Thus the descriptions herein may not exactly match the product or its accessories which you purchase Huawei reserves the right to change or modify any i...

Страница 124: ...UT NOT LIMITED TO THE IMPLIED WARRANTIES OF MERCHANTABILITY AND FITNESS FOR A PARTICULAR PURPOSE ARE MADE IN RELATION TO THE ACCURACY RELIABILITY OR CONTENTS OF THIS MANUAL TO THE MAXIMUM EXTENT PERMITTED BY APPLICABLE LAW IN NO EVENT SHALL HUAWEI BE LIABLE FOR ANY SPECIAL INCIDENTAL INDIRECT OR CONSEQUENTIAL DAMAGES OR LOSS OF PROFITS BUSINESS REVENUE DATA GOODWILL SAVINGS OR ANTICIPATED SAVINGS ...

Страница 125: ...services off when they are not in use l Install device security software and regularly scan for viruses l Be sure to obtain third party applications from a legitimate source Downloaded third party applications should be scanned for viruses l Install security software or patches released by Huawei or authorized third party application providers l Using unauthorized third party software to update yo...

Страница 126: ...t limited to the color size and screen layout may vary All statements information and recommendations in this guide do not constitute a warranty of any kind express or implied Note Remember the Google account your phone last logged in to During an untrusted factory settings restoration Google s anti theft mechanism requires you to enter the Google account your phone last logged in to on the startu...

Отзывы: