Rev. (a)
2. Pull the release tab to separate the protective backing from the rear of the protective film. Avoid touching the rear side of
the protective film while removing the liner.
3. Place the rear side of the protective film against the Thor VM2CG display, roughly centering the protective film over the
display.
4. Slide the protective film until one corner can be slid back between the touch screen and the display housing as the
protective film is re-centered on the display. It may be necessary to press the edges of the protective film against the
display to ensure the entire edge slides under the display housing. It is easiest to start with one of the bottom corners.
5. Slide the protective film away from the other bottom corner. The film may bulge sligthly away from the User's Guide as it
is being slid. Only slide the protective film enough so that the protective film can slide under the display housing on that
corner when the protective film is returned to center.
6. Repeat with each of the top corners, sliding the protective film away from the corner just enough that the protective film
can slide under the display housing when the protective film is returned to center.
7. It may be necessary to flex the protective film during the install, however use care not to flex the protective film so much
that the protective film kinks.
8. Once all corners are secure under the display housing, adjust the protective film, if necessary, so it is centered on the
touch screen.
Removal
1. To remove the protective film, slide the protective film in one direction until the edge clears.
2. Lift up on the edge of the protective film so it does not slide between the touch screen and display housing when the
protective film is slid back to the center.
3. Repeat until all edges are free and remove the protective film.
Contact
about protective film packs designed specifically for your Thor VM2CG touch screen.
2-18
Содержание Thor VM2C02
Страница 1: ...Thor VM2CG Vehicle Mount Computer Microsoft Windows Embedded CE 6 Operating System User s Guide ...
Страница 6: ...Rev 01 iv ...
Страница 8: ...Rev a Components Front View 1 Power Button 2 Speakers 3 Microphone 1 2 ...
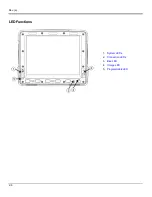
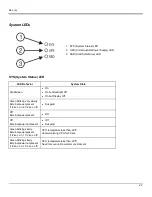
Страница 18: ...Rev a LED Functions 1 System LEDs 2 Connection LEDs 3 Blue LED 4 Orange LED 5 Programmable LED 2 6 ...
Страница 38: ...Rev 01 2 26 ...
Страница 58: ...Rev 01 3 20 ...
Страница 66: ...Rev 01 4 8 ...
Страница 69: ...Rev a 5 3 ...

