T775U SERIES 2000 ELECTRONIC STAND-ALONE CONTROLLER
62-0255—07
12
Up and Down Arrow Buttons (
S
and
T
)
Use these buttons to move your selection up and down
through a menu or list.
• When the desired item is highlighted, you press the
X
arrow button to display that item’s content.
• When a value is displayed (e.g. 70°F), the up and
down arrows increase and decrease the value.
NOTE: Once you select an item from a list or enter a
value, pressing the
W
or
X
or
HOME
button
accepts your selection or value and stores it in
the controller’s memory.
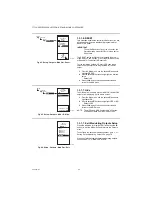
Home Screen
In the normal run state, the LCD home screen displays
the current sensed temperatures, the modulating outputs
status, the active status of the output relays, and error and
status codes.
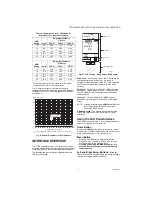
When using Reset, the Heat/Cool setpoint(s) display on
the home screen for the Mod and Relay outputs; see
Fig. 21.
Active relays are indicated by the small black square (
)
just below the relay number. Fig. 21 shows the home
screen with relay 2 energized.
Pressing the
W
and
X
buttons from the home screen
cycles through each modulating output that is paired with
the sensor it controls and the active output relays.
Fig. 21. LCD Display - Home Screen Displaying
Sensors, Mod Outputs, and Active Relays.
NOTES:
1.
The modulating output home screen and the
relay home screen do not dynamically update
the active relay status, sensor values, and
modulating output percentages. The informa-
tion is a snapshot taken when you press the
W
or
X
button to display the screen.
2.
In Reset mode, the home screen displays the
effective setpoint.
IMPORTANT
After four minutes of inactivity (no buttons
pressed), the LCD display reverts to the home
screen display.
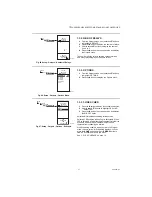
Accessing the Menus
Menus are used for programming, scheduling, viewing the
summary settings, and setup of advanced options.
Program, Schedule, and Summary
Menus
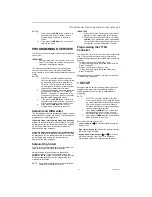
To access these menus from the home screen, press the
MENU button. See Fig. 22.
Fig. 22. Menus.
Depending on whether scheduling is enabled or not, the
LCD displays one of two menus as shown in Fig. 22.
Scheduling is enabled from the Setup menu’s Output
settings (see “1.3.3.1. USE SCHED” on page 21).
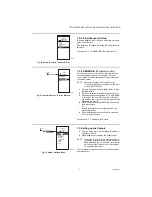
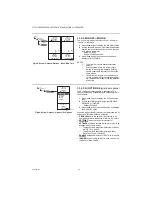
Setup Menu
To access the Setup menu, press and hold the MENU
button for five seconds. See Fig. 23.
Fig. 23. Setup Menu.
Using the Menus
When you are working with the menus, use the:
• Left arrow button
(
W
) to scroll backward through the
menus
• Right arrow button
(
X
) to select the highlighted menu
item and display its content
• Up and Down arrow buttons
(
S
and
T
) to scroll up
and down through a list of items or to increase or
decrease the value of a displayed parameter
MOD1 40%
MOD2 60%
DI ON
HOME
RELAYS 1 2
ON
SENSORS
SENSOR A
78
SENSOR B
84
o
o
F
F
MOD1 40%
MOD2 60%
DI ON
HOME
RELAYS 1 2
ON
o
F
o
F
REL 2 ON
HEAT
SETPOINT
60
SENSOR A
62
RT 12345 HRS
DI ON
HOME
RELAYS 1 2
ON
MOD 1 40%
COOL
SETPOINT
74
SENSOR A
62
o
o
F
F
MOD1 40%
MOD2 60%
M24564
MENU
PROGRAM
EXIT
home
menu
OR
MENU DISPLAY WHEN
SCHEDULING IS NOT SET
MENU DISPLAY WHEN
SCHEDULING IS SET
MENU
MOD1 40%
MOD2 60%
DI ON
HOME
RELAYS 1 2
ON
F
o
F
o
SENSORS
SENSOR A
78
SENSOR B
84
PROGRAM
SCHEDULE
SUMMARY
EXIT
M24565
home
menu
SETUP
MOD1 40%
MOD2 60%
DI ON
HOME
RELAYS 1 2
ON
FIVE
SECONDS
F
o
F
o
SENSORS
SENSOR A
78
SENSOR B
84
SENSORS
OUTPUTS
EXIT
M24566
Содержание T775U Series
Страница 39: ...T775U SERIES 2000 CONTROLLER 39 62 0255 07 ...


