Caution: Risk of electric shock!
Do not attempt to disassemble or modify the unit or its acces-
sories. In case any part is damaged, immediately power off the unit and seek the assistance of
a specialist.
In the event that the power cable should become damaged, it should only be replaced by the
manufacturer, its service facility or similarly qualified personnel.
FEATURES
suitable for making 8 cups of coffee • 1 l water tank • glass carafe with thermally insulated handle • washable, plastic permanent filter • usable with paper filter as well • heated, warming plate • automatically
closing valve by removing the carafe • easy cleaning • non-slip silicone soles • overheating protection
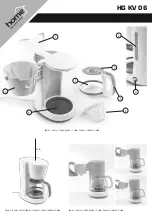
STRUCTURE (Figure 1.)
1.
water tank lid •
2.
water tank with water level marking •
3.
openable, removable scalding funnel, with closing valve •
4.
permanent plastic filter (HG KV 06/S) •
5.
glass carafe lid •
6.
glass carafe carrying
handle •
7.
glass carafe (HG KV 06/K) •
8.
warming plate •
9.
main switch with indicator light
INSTALLATION
1. Before installation, carefully remove packaging, and make sure not to damage the unit or the connecting cable. If you find any damage, the unit must not be operated!
2. The unit is intended for use in dry, indoor spaces only!
3. Stand the unit on its base on a hard, flat surface!
4. For proper operation, minimum location distances around the product, shown
on Figure 2.
have to be ensured!
5. Wash the permanent plastic filter (4), openable, removable scalding funnel (3) and glass carafe (7) thoroughly in running water with dishwashing liquid, then rinse them with clean water.
6. After the washed components get dried, put them together.
7. Check on the switched off appliance if the water tank is filled with clean, cold drinking water, and the lid of the water tank and the scalding funnel is closed.
8. Place the glass carafe onto the warming plate.
9. Plug the unit into a standard grounded wall socket. Now the unit is ready for operation.
10. Switch on the unit with the main switch (9).
11. Allow water to flow in to the glass carafe, then turn off the appliance.
12. After the appliance got cool down (10 minutes), repeat steps from 7. to 12.
13. Then the appliance is ready for use.
MAKING COFFEE
1. Fill clean, cold drinking water to the glass carafe, and pour it to the water tank of the unit. Don’t fill the water tank over the maximum marking.
2. Open the scalding funnel.
3. Put ground coffee to the permanent plastic filter, approx. 7 g per cups. You can use paper filter as well, instead of the plastic one.
4. Close the scalding funnel to its place, and check if it is on its place totally.
5. Put the glass carafe with closed lid onto the warming plate, under the scalding funnel.
6. Switch on the appliance with the main switch. Hot water will be dripping on the ground coffee, then the coffee will flow to the glass carafe.
7. WARNING! If you remove the glass carafe and the scalding funnel is filled up, then the liquid will flow out to the warming plate. It has to be avoided, so remove the glass carafe while making coffee only
when the water level is only up to level 4 maximum.
8. At the end of making coffee, switch off the coffee maker with the main switch (9). If you leave it switched on, then the appliance will keep the coffee warm for more 40 minutes, then switches off.
9. Allow the appliance to cool down for at least 10 minutes before the next usage.
CLEANING, MAINTENANCE
1. Switch off and power off the unit by unplugging it from the electric outlet before cleaning!
2. Allow the appliance to cool (for at least 10 minutes).
3. Always remove the coffee ground after use. Wash up scalding funnel, plastic filter and glass carafe.
4. Use a slightly moistened cloth to clean the unit’s outer surface. Do not use any aggressive cleaners. Avoid getting water inside of and on the electric components of the appliance! Appliance must not be
immersed to water!
To remove lime scale
It is recommended to remove lime scale once a month in case of hard water, and once in every two months in case of medium-hard water or soft water.
1. For that purpose, prepare a solution by mixing one part of 10% vinegar with 2 parts of water.
2. Fill the water tank with the solution up to the MAX marking, then boil the liquid.
3. According to points 7 - 12 of INSTALLATION, rinse the appliance 2 – 3 times. Let it cool down for 10 minutes between the rinsing sections.
TROUBLESHOOTING
Malfunction
Solution
Appliance is not making the coffee.
Check the power supply and the main switch.
Check the water level in the tank.
Glass carafe must be at its place properly.
Valve is clogged.
Clean the appliance.
Waste equipment must not be collected separately or disposed of with household waste because it may contain components hazardous to the environment or health. Used or
waste equipment may be dropped off free of charge at the point of sale, or at any distributor which sells equipment of identical nature and function. Dispose of product at a
facility specializing in the collection of electronic waste. By doing so, you will protect the environment as well as the health of others and yourself. If you have any questions,
contact the local waste management organization. We shall undertake the tasks pertinent to the manufacturer as prescribed in the relevant regulations and shall bear
any associated costs arising.
TECHNICAL DATA
power supply: . . . . . . . . . . . . . . . . . . . . . . 230 V~ / 50 Hz
output: . . . . . . . . . . . . . . . . . . . . . . . . . . . . 730 - 870 W
size of the appliance: . . . . . . . . . . . . . . . . 21 x 28,5 x 16 cm
capacity of water tank: . . . . . . . . . . . . . . . 1 liter
weight: . . . . . . . . . . . . . . . . . . . . . . . . . . . . 1,25 kg
length of power cable: . . . . . . . . . . . . . . . . 75 cm
Содержание HG KV 06
Страница 19: ......

