Hobby People BATFLY Скачать руководство пользователя страница 18

BATFLY


250 FPV QUAD RACER USER'S GUIDE

18

USInG ThE FPV SYSTEm

moUnTInG ThE FPV RECEIVER monIToR (READY-To-FLY VERSIon)

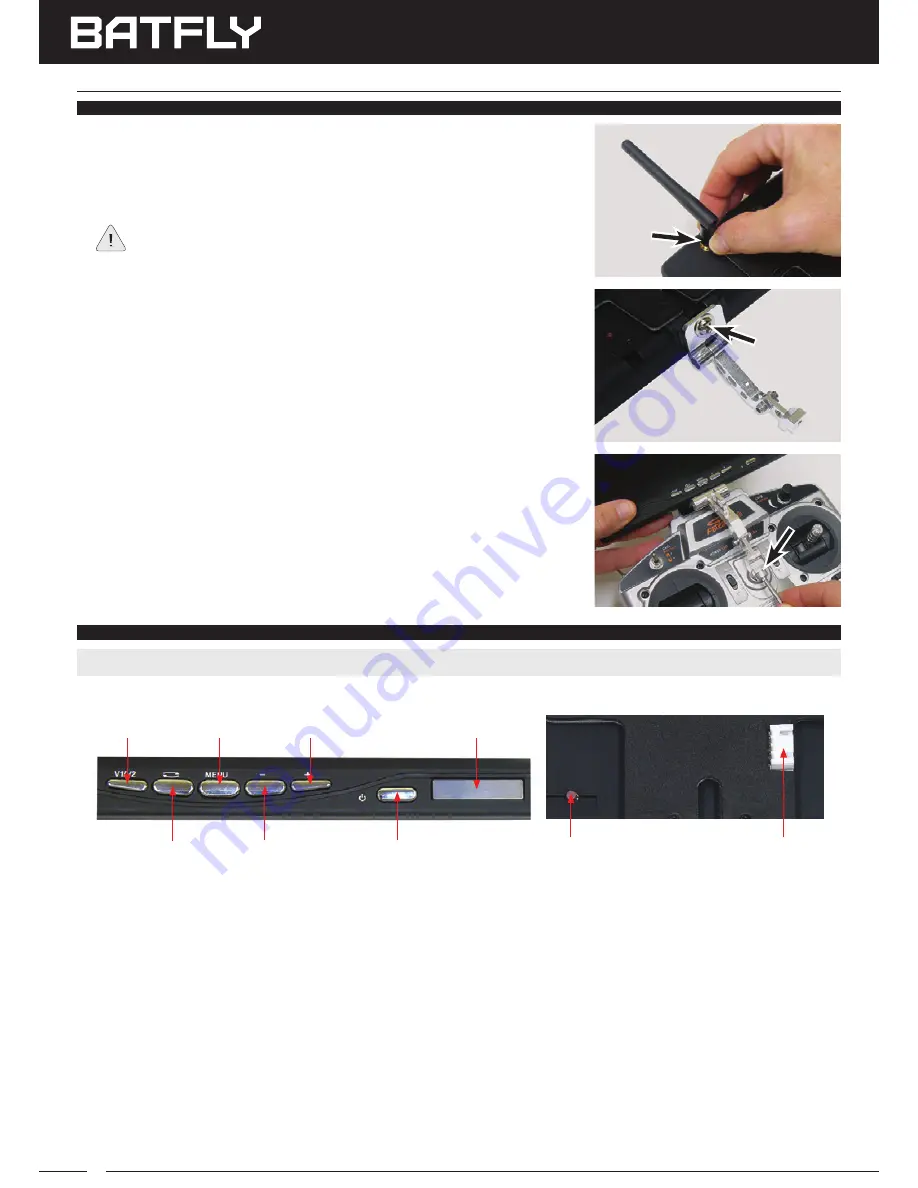
1) Carefully thread the 5.8GHz FPV Receiver Monitor Antenna onto the 

antenna mount on the back of the FPV Receiver Monitor and tighten 

it gently.

During use, the antenna should be pivoted into the vertical position.

2) Assemble  the  aluminum  mounting  arm  using  the  illustration  on  the 

separate sheet included with it as a guide.

3) Secure the aluminum mounting plate to the bottom of the FPV Receiver 

Monitor, using the M5 x 8mm pan-head screw included. 

The pivot joint 

should be toward the front of the FPV Video Monitor.

4) Secure the aluminum mounting arm (with FPV Receiver Monitor attached) 

to  the  transmitter  neck  strap  mount,  using  the  M3  x  10mm  socket-cap 

screw and aluminum bushing included.

5) Adjust  the  aluminum  mounting  arm  to  angle  the  FPV  Receiver  Monitor 

viewing angle to suit, then firmly tighten the two adjustment screws to lock 

the FPV Receiver Monitor securely in position.

USInG ThE FPV SYSTEm (READY-To-FLY VERSIon)

Prior to using the FPV system, familiarize yourself with the features of the FPV Receiver Monitor.

Channel Scan Button

 - Press to manually select channels. Press and HOLD for 3 seconds to begin an automatic 

scan of all available channels for the best, most reliable picture. 

Decrease

 - Press to decrease Menu values.

Increase

 - Press to increase Menu values.

V1/V2 Key

 - Press to swap video inputs. In most cases, this should be set to AV1.

Menu Key

 - Press to change various options, such as Brightness, Contrast, Color, Zoom Mode, Screen Mode, 

Language and Reset.

On/Off Key

 - Press to power the FPV Receiver Monitor ON and OFF. 

Power Input Port

 - Used to plug the 3S LiPo battery’s XH balance connector into to power the FPV Receiver Monitor.

Power LED

 - Indicates when the FPV Receiver Monitor is receiving power (LiPo battery plugged in). If the LiPo battery 

is plugged in and the FPV Receiver Monitor is turned OFF, the Power LED will still illuminate Green. This is normal.

Swap Key

 - Press to cycle through the four Screen Modes (how the picture is displayed on the FPV Receiver 

Monitor), either UP or DOWN, or NORMAL or REVERSED.

Channel Scan

Increase

Decrease

Menu

Swap

V1/V2

ON/OFF

Power LED

Power Input Port

IMPORTANT:

 Before using the FPV system, make sure to remove the lens cover from over the FPV camera!

Содержание BATFLY

Страница 1: ...s The Hobby People Batfly 250 FPV Quad Racer is a 250 class racing drone designed for extreme maneuverability and high speeds Designed for 4S LiPo power it comes complete with a carbon fiber frame wit...

Страница 2: ...in a safe and legal manner only By operating your Quad Racer the user accepts full responsibility for its safe and legal use Follow all privacy laws and property laws when operating your Batfly 250 F...

Страница 3: ...nce 250mm Dimensions 220 x 233 x 50mm Weight w o Battery Approximately 400g Propeller Size Type 5030 Plastic Clover Paddle Flying Time 10 to 14 Minutes FEATURES AnD SPECIFICATIonS SPECIFICATIonS ALL V...

Страница 4: ...Plug Set Female for Battery Power Connector P N 118539 Hobby People LiPo Battery Low Voltage Alarm P N 118531 Hobby People Find It Locator with Light and Sound P N 163470 LiPo Flight Battery We recomm...

Страница 5: ...ansmitter OFF Because the Quad Racer is operated by radio control it s important to make sure you are always using fresh transmitter batteries Never allow the transmitter batteries to run low or you m...

Страница 6: ...of exploding or is starting to show signs of exploding Do Not Handle Directly The material spitting out if it comes to that is spitting out at as much as 2000 F Try to Contain the Fire We recommend a...

Страница 7: ...wITCh TonES READY To FLY VERSIon When the transmitter is turned ON and you press a trim switch a short audible tone is heard When a Trim Switch is centered a longer audible tone will sound Antenna Tra...

Страница 8: ...Transmitter Antenna Mount Used to connect the 5 8GHz Clover Leaf FPV Video Transmitter Antenna to send video signals to the FPV Receiver Monitor Battery Strap This Velcro battery strap is used to hold...

Страница 9: ...ro receiver Receiver Antenna Receives the RF signal from the transmitter The receiver antenna should be left extended as straight as possible Don t repeatedly bend or kink the antenna or you could dam...

Страница 10: ...mount into the matching notches in the lower mounting plate 5 Plug the other end of the video cable into the FPV Video Transmitter then plug the Power Connector into the FPV Video Transmitter Power Po...

Страница 11: ...mal wing normal tail one aileron servo etc and ensure all programming values are set to their default values to start Trim and sub trim should be zero all mixing controls should be turned off throttle...

Страница 12: ...nd initialize the Flight Controller then arm the motors and fly your Quad Racer using the Beginner Flight Mode We strongly recommend flying your Quad Racer in the Beginner Flight Mode for at least the...

Страница 13: ...ower left and lower right corners and HOLD them in those positions for 3 seconds then release the control sticks The motors are now armed 2 Within 30 seconds push the throttle control stick forward to...

Страница 14: ...nsmitter is in the Beginner Flight Mode position Plug your LiPo battery in and allow the gyros to calibrate and the Flight Controller to initialize This takes approximately 10 seconds The Condition LE...

Страница 15: ...the Trim Switches until they are If you have the Kit or Receiver Ready version center the Trim Switches on your transmitter Re arm the motors and continue flying B Land and unplug the LiPo battery Set...

Страница 16: ...s to the various switch positions of the 2 or 3 position switch or dial that you ve designated to control Flight Mode switching The following Flight Modes are available Beginner Mode This mode is reco...

Страница 17: ...L color HD camera with 5 8GHz Video Transmitter Ready to Fly and Receiver Ready versions and a 7 TFT color LCD Receiver Monitor Ready to Fly version only The FPV Receiver Monitor features One Touch Au...

Страница 18: ...e FPV system familiarize yourself with the features of the FPV Receiver Monitor Channel Scan Button Press to manually select channels Press and HOLD for 3 seconds to begin an automatic scan of all ava...

Страница 19: ...ce the Quad Racer right side up on a flat level surface then plug your LiPo battery into the Power Connector The Condition LED will flash Blue rapidly while a series of audible tones sound Do not move...

Страница 20: ...e propellers carefully hold the propeller in one hand be careful not to cut yourself on the sharp blade edge and use the carbon fiber wrench included to loosen and remove the spinner nut Remember the...

Страница 21: ...urce software that s designed specifically for use with the CC3D Digital Flight Controller used in the Batfly 250 FPV Quad Racer This section details connecting your Quad Racer to your PC or laptop an...

Страница 22: ...er Powered or Won t Take Off Propellers installed incorrectly Check and reinstall propellers Page 11 Damaged propeller and or motor Replace damaged component Page 20 Your LiPo battery is depleted Char...

Страница 23: ...63463 Brushless ESC 12A 3S to 4S 163461 CC3D Flight Controller w Wire Harness 163460 Outrigger Arm 1 Piece 163464 LED Headlight 163465 LED Tail Light 163466 Screw Set 10 of Each Size 163467 External C...

Страница 24: ...Contents are Subject to Change Without Notice 2016 Hobby People All Rights Reserved Made in China Revision 1 02 23 2016 P N 163100 Batfly 250 FPV Quad Racer RTF Version P N 163102 Batfly 250 FPV Quad...

Отзывы: