Hitachi C2144S Скачать руководство пользователя страница 12

GB

- 11 -

The

CHILD LOCK

feature can be set by “ ” or “ ” button to

either

ON

or

OFF

. When

OFF

is selected, there will be no differ-

ence in the operation of your TV. When

ON

is selected, the TV

can only be controlled by the remote control handset. In this
case, the front panel buttons (except the Switch On/Off button)
will not work.

ûÿýý÷ üùþýú

ùÿ ÿ

ÿ

ý

ý ÿùû

Selecting Menu Language

Menu language can be chosen by pressing “ ” or “ ” button
on

LANGUAGE

item.

ûÿýý÷ üùþýú

ùÿ ÿ

ÿ

ý

ý ÿùû

To Store Settings

In Feature menu all settings are stored automatically.
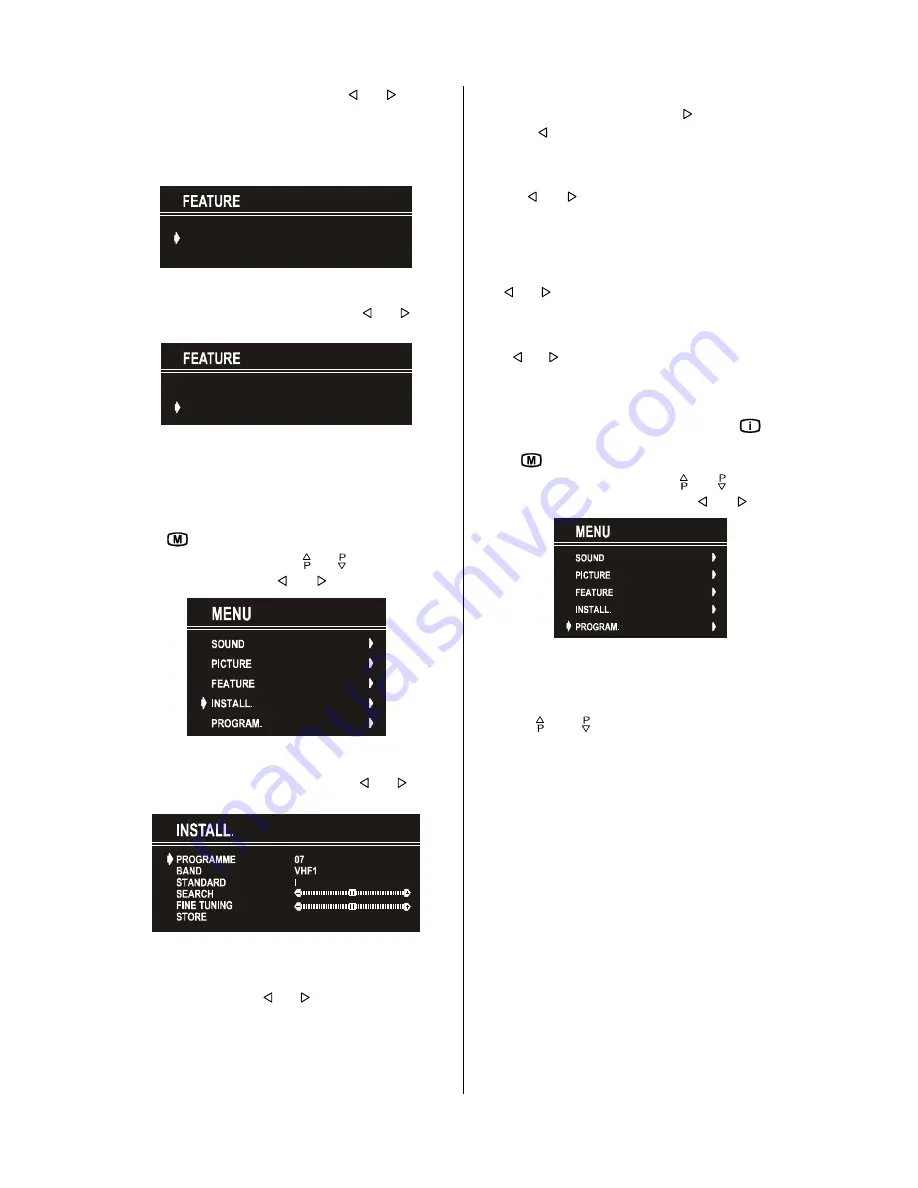
Install Menu

• To enter the Install menu directly, press the

BLUE

button, or

• Press "

" button, now you are in Main menu. In the Main

menu, select “

INSTALL.

” using “ “ or “ ” button. Then enter

the Install menu pressing “ ” or “ ” button.

Selecting Programme

To select programme number, you can use “ ” or “ ” button,
Digit Buttons or The Double Digit button with digit buttons.

Selecting Band

BAND, can be chosen either,

• VHF1, VHF3 or UHF by “ ” or “ ” button.

Selecting Standard

The "

Standard

" setting is fixed to "

I

". You cannot change this

item's setting.

Selecting Search

To start the search process, press “ ” button for forward
search or “ ” button for backward search.

SEARCH

item

blinks during search process, since the process is stopped
or signal is found. During search process the semi-transpar-
ent menu background becomes "

BLUE

". To stop the search

process “ ” or “ ” button must be pressed again.

Selecting Fine Tuning

You can use the Fine Tuning process for fine adjustment (af-
ter coarse adjustment), if you are not happy about the image
on the screen.

Use “ ” or “ ” button on

FINE TUNING

item, until getting the

best image on the screen.

To Store Settings

Press “ ” or “ ” button on

STORE

option to store Install menu

settings.

Programme Menu

• To enter Programme menu directly, press the "

" button,

or

• Press "

" button, now you are in Main menu. In the Main

menu, select “

PROGRAM.

” using “ “ or “ ” button. Then

enter the Programme menu pressing “ ” or “ ” button.

By moving the cursor in four directions you can reach 30 pro-
grammes in the same page. By scrolling the pages up or down
by pressing the navigation buttons you can select all the pro-
grammes in TV mode (except the AV mode).

In menus, “ “ and “ ” buttons are working like "Direction Up"
and "Direction Down".
By cursor action, programme selection is done automatically.
Selected programme is displayed with

“CYAN”

characters. In

order to select programme is also possible by using digit or
double-digit button. In this way programme selection is auto-
matic and after selection the selected programme is displayed
with cyan characters. The TV Status is changed by the pro-
gramme selection too. When using double-digit button in
order to select a programme, the Programme Number in TV
Status OSD is displayed in "

P --

" form, and by pressing digit

buttons they are displayed in it.
Programme Number is between 00 and 99. Programme
Name has a name string with 5 characters. After autostore
process the Programme Names are set to "

PR01

" (pro-

gramme number),
At the bottom of the menu there is a programme sort functions
section. Each function is activated by color button (seen below).

NAME

allows changing the programme name. By

DELETE

you

can delete programmes if you wish.

INSERT

section is for

inserting programmes into another programme spaces. By
selecting

AUTOSTORE

section, Autostore menu will be avail-

able.

Содержание C2144S

Страница 1: ...GB Instructions for use C2144S ...

Страница 2: ... set 7 Operating with Remote Control 7 Menu System 8 Sound Menu 8 Picture Menu 9 Feature Menu 10 Install Menu 11 Programme Menu 11 Other Features 12 TV Status 12 Programme Swap P P 12 Double digit 12 Personal Preferences PP 12 Sound Indicator 13 Picture Mode 13 Sleep Timer Last Minute Indicator 13 Mute Indicator 13 No Signal 13 Blue Background During No Signal 13 Volume Bar 13 AV Modes 13 Teletext...

Страница 3: ... Up Cursor Up Cursor Right VOL VOL Volume Volume Yellow FEATURE Feature Menu Blue INSTALL Installation Menu External Source AV 1 F AV RGB Teletext Buttons Teletext Update Hold Index Page Reveal Expand Time Mix TV Quit Menu Red SOUND Sound Menu Green PICTURE Picture Menu Programme Down Cursor Down Cursor Left Menu Change Picture Preset Mute ...

Страница 4: ...udio left white right red VIDEO VCR yellow ConnectPeripheralEquipment There is a wide range of audio and video equipment that can be connected to your TV The connection diagrams show the back of the TV where the different equipment should be connected DECODER FORSATELLITERECEIVER VIDEO AUDIO CAMERA ýüÿûþ ù ÿ ù REARPANEL ...

Страница 5: ...ur decoder has a SCART connector you can obtain better picture quality if you connect a SCART lead toEXTERNAL Then select the appropriate AV mode by pressing the ÿþ button TV and Video Recorder If your video recorder has a SCART socket please connect it to the TV using a SCART lead Your TV should also be connected to your video recorder using the aerial RF output socket Please note using a SCART l...

Страница 6: ...it may contain a special radio interference fil ter the removal of which could lead to impaired performance If you wish to extend the lead obtain an appropriate safety ap proved extension lead or consult your dealer Observe the manufacturers instructions when connecting ex tension leads to the TV Check the fuse rating on the new plug this should be fitted with a 5 Amp fuse which conforms to ei the...

Страница 7: ...age during a storm lightning or when going on holiday disconnect the power lead and aerial from the wall outlet and disconnect the aerial plug from the back of the tele vision 5 Ventilation The slots and openings on the receiver are intended for ven tilation and to ensure reliable operation To prevent overheat ing these openings must not be blocked or covered in anyway 6 Replacement Part When repl...

Страница 8: ...e TV turns on 2 To switch on the TV from stand by mode either Press a digit button on the remote control so that a programme number is selected or Press Programme Up or Down buttons on the front of the TV or on the remote control so that last switched off programme is selected In either case the TV will switch on and the RED LED will turn toGREEN To switch the TV off Press the stand by button on t...

Страница 9: ...le on the screen All the selected items in this menu system is indicated with CYAN characters and with an arrow on the leftside of items To select a sub menu use or button and press or button Each option can also be selected with the coloured button and button on the remote control MAIN MENU The menu system is described below The short way in order to enter the menus press Button Main Menu Red But...

Страница 10: ...tions These are USER CLASSIC JAZZ ROCK POP and FLAT The predefined options can not be changed by the user If you change one of the frequency values of the predefined options the MODE is switched automatically to USER option The USER option may be adjusted by the user The 5 items below the MODE are available to adjust the sound settings in 5 frequency values 120 Hz 500 Hz 1 5 kHz 5 kHz and 10 kHz T...

Страница 11: ...sed in TV and F AV modes For the Pic ture Mode selection in AV 1 the pin 8 of Scart value is used In RGB modes the Picture Mode can be 4 3 or 16 9 Auto mode is not available To Store the Settings Press or button on STORE option to store Picture menu settings The stored picture mode setting will be valid only in current program However the other stored values in Picture Menu will be valid for all t...

Страница 12: ...r button on FINE TUNING item until getting the best image on the screen To Store Settings Press or button on STORE option to store Install menu settings Programme Menu To enter Programme menu directly press the button or Press button now you are in Main menu In the Main menu select PROGRAM using or button Then enter the Programme menu pressing or button By moving the cursor in four directions you ...

Страница 13: ...ores all channels automatically on your TV according to the transmission of programme systems in your area øÿþýûþ ýúü ø ý þÿ PROGRAMME item is used in order to store the channels af terAutostore as from a required programme In default the pro gramme number is set to the following programme after the last set programme By using or button the number can be changed in addition to change number digit ...

Страница 14: ...command is accessed The indicator is displayed in 3 seconds when there is no valid signal After an Remote Control command if No Signal Timer is active the timer stops and if no signal detected again the timer is initialized to 5 minutes and starts 3 seconds later again to count down It is not valid in AV mode Blue Background During No Signal In case no valid signal is detected AV mode Blue Backgro...

Страница 15: ...y pressing four digit buttons e g 0001 If the selected subcode page is not displayed in a short time press button TV programme will be displayed on the screen Teletext page number will be displayed on the upper left corner of the screen when the selected page is found Press button to display the selected Teletext page To exit Teletext Press þÿ button The screen will switch to TV mode To Display th...

Страница 16: ...enu No solution Switch your TV set off and on If this does not work call the service personnel never attempt to repair it yourself Specifications TVBROADCASTING PALI I RECEIVINGCHANNELS VHF BAND I III UHF BAND U HYPERBAND CABLE TV S1 S20 S21 S41 NUMBEROFPRESETCHANNELS 100 CHANNELINDICATOR On Screen Display RFAERIALINPUT 75 Ohm unbalanced OPERATINGVOLTAGE 220 240V AC 50 Hz AUDIOOUTPUT Nicam Stereo ...

Страница 17: ...intained or modified by any person other than an Hitachi authorised engineer iii The product serial number has not been removed or altered This guarantee does not apply to product acquired second hand or for commercial or communal use This guarantee does not cover the replacement of exhausted batteries the adjustment of user controls or aerial alignment Any parts replaced under this guarantee shal...

Страница 18: ...47 Milano Italia ITALY Tel 39 02 487861 Tel 39 02 38073415 Servizio Clienti Fax 39 02 48786381 2 Email customerservice italy hitachi eu com HITACHI Europe AB Box 77 S 164 94 Kista SWEDEN Tel 46 0 8 562 711 00 Fax 46 0 8 562 711 13 Email csgswe hitachi eu com HITACHI EUROPE S A S Lyon Office B P 45 69671 BRON CEDEX FRANCE Tel 04 72 14 29 70 Fax 04 72 14 29 99 Email france consommateur hitachi eu co...

Отзывы: