background image

GB

19

Playing MP3’s from a USB Device

When a USB device is connected to the unit, turn the FUNCTION dial on the unit or press 

the USB button on the remote control to select the USB mode.

•  The unit can only play MP3 and WMA file formats in USB operation.
•  If your USB device is loaded with MP3’s but the display keeps showing ‘NO DATA” on the display, the 

format of your USB device might not be compatible with the unit.

•  The unit can support USB devices with up to 32GB of memory.
•  The unit may not be compatible with all USB devices, this is not an indication of a problem with the unit.

MODE

CLOCK

EQ

iR

AXM950E_IB_01GB_RC_130510_Michelle.indd   19

10/5/13   3:13 PM

Содержание AXM950E

Страница 1: ...iPad iPhone and iPod not included Instruction Manual AXM950E Wireless Hifi with Docking for iPad iPhone iPod GB AXM950E_IB_01GB_RC_130510_Michelle indd 1 10 5 13 3 13 PM ...
Страница 2: ...AXM950E_IB_01GB_RC_130510_Michelle indd 2 10 5 13 3 13 PM ...

Страница 3: ...ting to the Mains Supply 18 Playing MP3 s from a USB Device 19 General Operation 20 Powering ON OFF 20 Selecting Modes 20 Adjusting the Volume 20 Adjusting the Sound Effect 20 Adjusting the Bass 20 Adjusting the Brightness 20 Time Display 20 Auto Setting the Clock 21 Manual Setting the Clock 21 Setting the Daily Timer 21 Setting the Sleep Timer 22 DAB Operation 23 DAB Auto Scan 23 Secondary Servic...

Страница 4: ... Another Track 30 Random Playback 30 Repeat Playback 30 Programme Setting 30 Programme Cancel 31 Intro Playback 31 iPod iPhone iPad Operation 32 Inserting the iPhone iPod and Selecting iPhone iPod Mode 32 iPod iPhone iPad Playback 32 Control iPhone iPod menu 33 Charging your iPod iPhone iPad 33 Bluetooth Operation 34 USB Operation 34 AUX Operation 35 Maintenance 36 Cleaning the Unit 36 Handling Di...

Страница 5: ...s such as vases DON T place hot objects or naked flame sources such as lighted candles or nightlights on or close to equipment High temperatures can melt plastic and lead to fires DON T use makeshift stands and NEVER fix legs with wooden screws To ensure complete safety always fit the manufacturer s approved stand or legs with the fixings provided and according to the instructions DON T use equipm...

Страница 6: ...eries may leak and cause damage Store unused batteries in their packaging and away from metal objects which may cause a short circuit resulting in leakage or in extreme cases fire or even an explosion Never dispose of batteries in fire as this can cause them to explode Please recycle dead batteries do not put with the normal household waste Supervise children if they are replacing batteries themse...

Страница 7: ...plug and consult your dealer Ventilation To prevent the risk of electric shock or fire hazard due to overheating ensure that curtains and other materials do not obstruct the ventilation vents Do not install or place this unit in a bookcase built in cabinet or in another confined space Ensure the unit is well ventilated Safety Always disconnect the unit from the mains supply before connecting disco...

Страница 8: ...owhead symbol within an equilateral triangle is intended to alert the user to the presence of uninsulated dangerous voltage within the unit s enclosure that may be of sufficient magnitude to constitute a risk of electric shock The exclamation point within an equilateral triangle is intended to alert the user to the presence of important operating and maintenance servicing instructions in the manua...

Страница 9: ...e hints and tips to help you resolve any issues Read all the safety instructions carefully before use and keep this instruction manual for future reference The Amplifier The Main Unit Speakers x 2 Remote Control Quick Start Guide Instruction Manual iPhone Docking Connection Cable Mains Cable 2 AAA size batteries DAB Aerial MENU REPEAT DISPLAY SHUFFLE VOL DISC USB DOCK BT FM DAB AUX CLOCK TIMER SLE...

Страница 10: ...Y mode Indicator lights off when the unit is on 8 Disc Compartment 9 Display 10 Remote Control Sensor 11 USB Socket 12 Button Skips backwards to the beginning of the track or to the previous track Allows fast reversing of the current track Searches for a radio station going backwards through accessible radio frequencies 13 Button Skips forwards to the next track Allows fast forwarding of the curre...

Страница 11: ...GB 11 Rear View CABLE 1 Control Cable Connector 1 AXM950E_IB_01GB_RC_130510_Michelle indd 11 10 5 13 3 13 PM ...

Страница 12: ... CABLE SPEAKER OUT 1 Control Cable Connector 2 DAB Aerial Socket Connect to a DAB Aerial 3 AUX IN Sockets Connect to an external audio device 4 iPod iPhone iPad Socket Connect to iPod iPhone iPad 5 SPEAKER Sockets Connect to speakers 6 AC IN Socket Connects the mains cable to the mains socket 1 2 3 4 5 6 AXM950E_IB_01GB_RC_130510_Michelle indd 12 10 5 13 3 13 PM ...

Страница 13: ...ts bass level 10 PAIR Button Plays pauses resumes playback Access Bluetooth function to pair with Bluetooth device 11 Button Stops playback 12 VOLUME Buttons Increases or decreases the volume 13 MENU Button Displays menu screen 14 REPEAT Button Repeats a CD track or a music file 15 Buttons Navigates to select an item on a menu screen 16 ENTER Button Confirms the selection on a menu screen Remote C...

Страница 14: ...ion 20 SHUFFLE Button Random playback of CD tracks or music files 21 DISC Button Selects CD mode 22 USB Button Selects USB mode 23 FM DAB Button Selects between TUNER and DAB mode 24 DOCK BT Button Selects between DOCK and Bluetooth mode 25 AUX Button Selects AUX mode 26 CLOCK Button Displays the time 27 SLEEP Button Sets up a sleep timer 28 TIMER Button Selects an alarm timer 29 INTRO SCAN Button...

Страница 15: ... of your fingernails when removing the battery cover and the battery Do not drop the remote control Do not allow anything to impact the remote control Do not spill water or any liquid on the remote control Do not place the remote control on a wet object Do not place the remote control under direct sunlight or near sources of excessive heat Remove the battery from the remote control when not in use...

Страница 16: ...kers to the SPEAKER OUT L R Sockets at the rear of the unit Connecting Control Cable Connect the control cable between the CD player and the amplifier Rear of the Amplifier Rear of the Amplifier Rear of the CD Player Control Cable AC L R L R DAB AUX CABLE SPEAKER OUT CABLE AXM950E_IB_01GB_RC_130510_Michelle indd 16 10 5 13 3 13 PM ...

Страница 17: ...IN sockets Connecting to the iPod iPhone iPad Dock Connect one end of the cable included to the socket at the rear of the unit Auxiliary Equipment RCA stereo audio cables Not included CABLE AC L R L R DAB AUX CABLE SPEAKER OUT DOCK Rear of the Amplifier Rear of the Amplifier Rear of the CD Player AXM950E_IB_01GB_RC_130510_Michelle indd 17 10 5 13 3 13 PM ...

Страница 18: ...ith an AC 230V 50Hz power supply Connecting the unit to any other power source may cause damage to the unit Unwind the mains cable to its full length Connect the mains plug to a mains socket Make sure the mains plug is fully inserted into the mains socket The unit is now connected and ready to use To switch the unit off completely remove the mains plug from the mains socket To the mains socket Ens...

Страница 19: ... formats in USB operation If your USB device is loaded with MP3 s but the display keeps showing NO DATA on the display the format of your USB device might not be compatible with the unit The unit can support USB devices with up to 32GB of memory The unit may not be compatible with all USB devices this is not an indication of a problem with the unit MODE CLOCK EQ iR AXM950E_IB_01GB_RC_130510_Michel...

Страница 20: ... automatically switch off within 15 minutes Please turn the unit off completely to save energy when not in use Adjusting the Volume Turn the VOLUME dial on the unit or press the VOLUME buttons on the remote control to adjust the volume If you wish to turn the sound off press the MUTE button on the remote control Press the MUTE button again or press the VOLUME button on the remote control or turn t...

Страница 21: ...ct USB TUNER DOCK DAB or DISC mode and then press the ENTER or TIMER buttons on the remote control to confirm 3 The display will show volume level and flash Press the buttons on the remote control to adjust the volume no less than Vol 5 and then press the ENTER or TIMER buttons on the remote control to confirm 4 The hour digits will flash on the display Press the buttons on the remote control to a...

Страница 22: ...lay in this sequence SLEEP 120 SLEEP 90 SLEEP 00 SLEEP 10 SLEEP 15 SLEEP 60 SLEEP 30 2 The system is now set to turn off after the number of minutes you have set The display will show SLEEP e g SLEEP 10 means the unit will switch itself off after 10 minutes SLEEP 15 means the unit will switch itself off after 15 minutes and so on 3 Press the SLEEP button to show the reminding time till the unit sw...

Страница 23: ...his indicates that there are secondary services available to that station These secondary services contain extra services that are related to the primary station e g a sports station may want to add extra commentaries The secondary services are inserted directly after the primary station in the station list To select the secondary station press the buttons until you find the secondary service and ...

Страница 24: ...he stored stations will be saved into the memory and power off will not erase it Storing a new station in a preset location will erase the previously stored station in that location System Reset There may be times when you need to reset your unit back to the factory settings especially when you have moved house If you experience reception problems you may want to reset and try again If you move to...

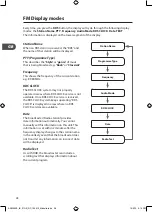
Страница 25: ...and transmitted on one frequency There are national and local multiplexes Local ones contain stations that are specific to that area Ensemble Name Frequency Error in signal Signal Strength DLS Programme Type Bitrate Clock Mode Date DAB unlike normal radio groups together several radio stations and transmits them on one frequency Frequency The frequency of the present station will be displayed Erro...

Страница 26: ... the remote control repeatedly Each press will adjust the frequency by 0 05MHz If reception is still poor adjust the position of the aerial or try moving the radio to another location Audio Mode Press the MENU button on the remote control the press the buttons on the remote control to select Stereo or Mono Press the ENTER button to confirm the selection The unit will automatically switch between s...

Страница 27: ...in that location System Reset There may be times when you need to reset your unit back to the factory settings especially when you have moved house If you experience reception problems you may want to reset and try again 1 Press the MENU button then press the buttons to select SYSTEM Press the ENTER button to confirm 2 Press the buttons to select Y to reset Otherwise select N to cancel After the s...

Страница 28: ...te information automatically You cannot manually set this information on this unit This information is set within 2 minutes after the frequency display changes to the station name In the unlikely event that the broadcaster does not transmit any information an incorrect date will be displayed Radio Text As with DAB the broadcaster can include a scrolling text that displays information about the cur...

Страница 29: ...lay Compatible Disc Types Disc Types Disc Logo Recorded Content CD R CD Recordable AUDIO CD RW CD Rewritable AUDIO AUDIO CD Compact Disc Digital Audio AUDIO CD MP3 WMA Operation Turn the FUNCTION dial on the unit or press the DISC button on the remote control to select DISC mode Playback 1 Press the button on the unit or the remote control and the disc tray will open automatically 2 Place the CD M...

Страница 30: ...ing SHUFFLE playback Normal playback will resume Repeat Playback 1 Press the REPEAT button once on the remote control RPT ONE will show on the display The unit will play the current track repeatedly 2 Press the REPEAT button twice RPT ALL will show on the display The unit will play all tracks repeatedly 3 Press the REPEAT button once more again RPT OFF will show on the display The REPEAT function ...

Страница 31: ...eatedly Press the REPEAT button twice RPT ALL will show on the display The CD will play all tracks repeatedly Press the REPEAT button once more again RPT OFF will show on the display The REPEAT function will turn off Intro Playback Press the INTRO SCAN button on the remote control The unit will play the first 10 seconds of each track Press the INTRO SCAN button on the remote control again to resum...

Страница 32: ...splay will show iPOD it will take around 5 seconds for the unit to identify the iPod iPhone iPad 4 Press the button on the unit or the remote control to playback the current track 5 Select your desired music or videos etc and play the connected iPod iPhone iPad as usual iPod iPhone iPad Playback You can use either the iPod iPhone iPad or the remote control Press the button on the unit or the remot...

Страница 33: ...od iPhone iPad MENU mode 2 Press the buttons on the remote control to navigate in the iPod iPhone iPad menu 3 Press the ENTER button on the remote control to confirm selection 4 Press the MENU button on the remote control to return to the previous iPod iPhone iPad menu Charging your iPod iPhone iPad 1 Your iPod iPhone iPad has an internal non removable battery The battery may need to be charged if...

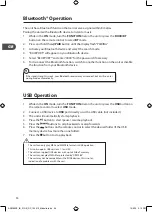
Страница 34: ...enter pairing mode automatically USB Operation 1 While in the ON mode turn the FUNCTION dial on the unit or press the USB button on the remote control to select USB mode 2 Connect a USB device to USB port directly or with a USB cable not included 3 The unit will automatically starts playback 4 Press the button to start pause resume playback 5 Press the buttons to skip backwards or skip forwards 6 ...

Страница 35: ...he AUX IN L R sockets via a RCA stereo audio cable not included 2 While in the ON mode turn the FUNCTION dial on the unit or press the AUX button on the remote control to select AUX mode 3 Turn the VOLUME dial on the unit or press the VOLUME buttons to adjust the volume to your desired level 4 In AUX mode operate your audio device directly for playback features AXM950E_IB_01GB_RC_130510_Michelle i...

Страница 36: ... outwards with a cloth Always keep the disc clean If you cannot wipe off the dust with a soft cloth wipe the disc lightly with a slightly moistened cloth and finish with a dry cloth Do not use any type of solvent such as thinner benzine commercially available cleaners or antistatic spray They may damage the disc Storing Discs Do not store discs in places subjected to direct sunlight or near heat s...

Страница 37: ...itch the unit off and then on again at the mains socket to reset the unit CD The disc does not play There is no disc inside the unit NO DISC appears on the display Insert the disc correctly with the label side facing up Clean the disc PAUSE mode may be activated deactivate it A non valid disc has been inserted Condensation may have formed inside the unit due to a sudden change in temperature Wait ...

Страница 38: ...y Standby mode may be activated press the STANDBY button again Make sure the iPod iPhone iPad is switched on Vibrations may have caused the iPod iPhone iPad to come loose from the docking station Check DOCK mode is selected Reinsert iPhone iPod USB Unable to insert USB device Insert the USB device the other way round Cannot play some files from USB device Some USB devices may not be compatible wit...

Страница 39: ... Optical Pickup 3 Beam Laser Frequency Response 100Hz 16kHz Power Supply Power Consumption AC 230V 50Hz 45W Standby Power Consumption 0 5W Output Power 80W x 2 Net Weight 8 8kg Dimensions Main Unit Amplifier Speaker 250mm W x 264mm D x 65mm H 250mm W x 277mm D x 65mm H 175mm W x 197mm D x 260mm H Features and specifications are subject to change without prior notice AXM950E_IB_01GB_RC_130510_Miche...

Страница 40: ...um or more than 0 004 Lead In the unlikely event of a problem developing please contact the store where you purchased your equipment We continually strive to improve our products specifications may change without prior notice For advice on where to purchase accessories please contact the store where you purchased your equipment IB AXM950E GB 130510V3 Importer Elkjøp Solheimsveien 6 8 PB 153 NO 147...

Отзывы: