background image

English

- 12 -

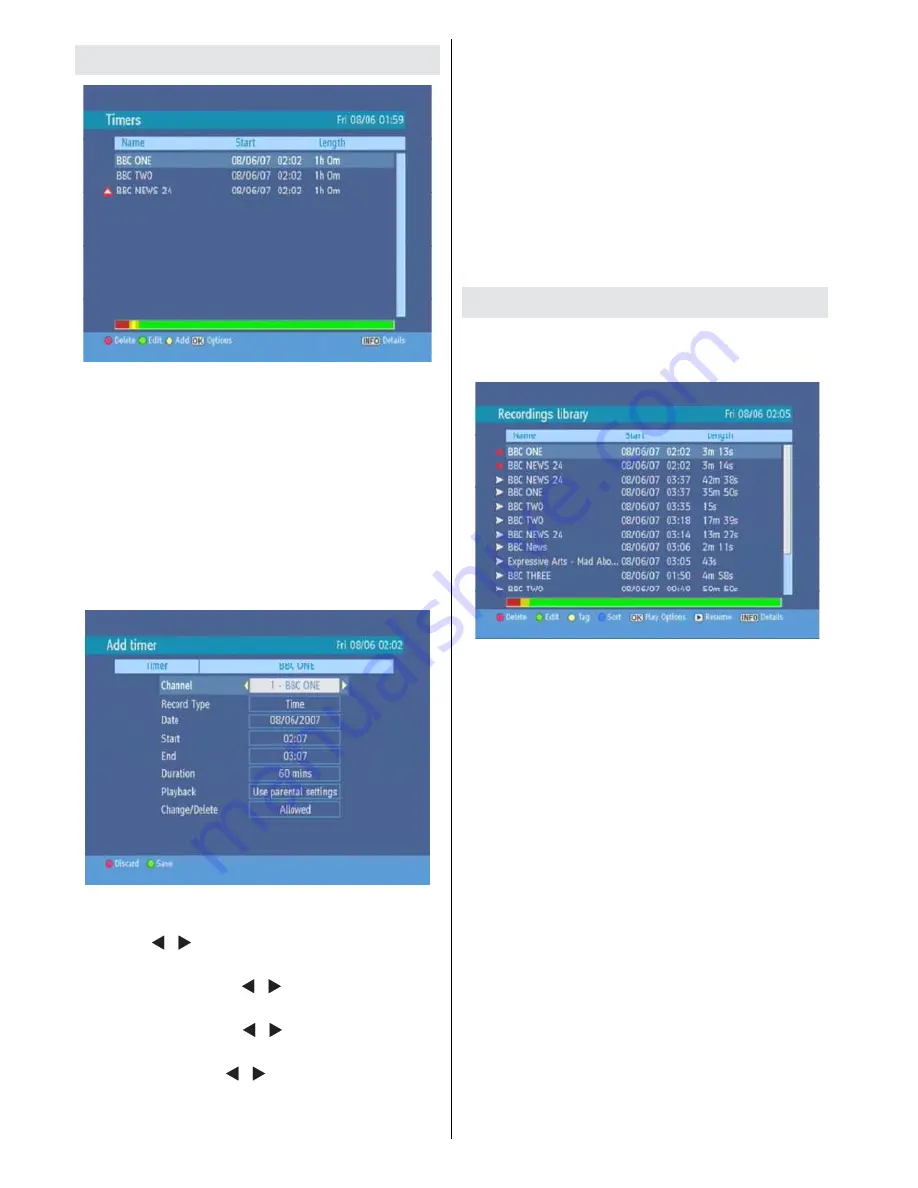
Timers

To display Timer window press either TIMERS key or
activate it from main menu. The features of this menu
are like below:

Delete:

You can delete the highlited single timer or

series timer.

Edit:

You can edit the saved timers.

Add:

By pressing this button, you will go to the “Add

Timer” menu.

Options:

If you press the OK button, you can select

the “Delete Timer”, “Delete Series Timer” and “Check
Conflicts”.

To add a Timer press

YELLOW

button on the remote

and the, “Add Timer “ windows appears.

Channel:

 “ ”/“ ” keys will navigate the user through

the TV or Radio list.

Date:

By using either “ ”/“ ” or “0,1,2…,9” keys

start date is entered.

Start:

By using either “ ”/“ ” or “0,1,2…,9” keys

start time is entered.

End:

By using either “ ”/“ ” or “0,1,2…,9” keys end

time is entered.

Duration:

Displays the duration of the recording.

This is automatically worked out after the start and
end times have been entered.

Playback:

permit or block playback for other

users.”use parental settings” is default.

Change /Delete:

permit or prohibit any modifications

for other users.

When a timer Start time is reached, the receiver
starts to record the desired program, then when
the end time is reached, the record stops. Save the
adjustments by means of

GREEN

key or cancel with

RED

button. Edit the list via

GREEN

key and delete

with the

RED

button.

Recordings Library

All the recordings are kept in list. To show the list of
recordings press either LIB button on the remote or
access it from the main menu.

RED BUTTON (DELETE)

: Erase the recordings

GREEN BUTTON (EDIT)

: make changes to the

recordings

YELLOW BUTTON (TAG)

: marks the recordings

for archiving

BLUE BUTTON (SORT)

: change the order of the

recordings

INFO (DETAILS)

: displays the short extended

programs in detail

OK BUTTON :

opens the play options menu

 (

RESUME

): recommence the recordings

Red bar:

indicates the used space of the recordings

on the hard disk.

Yellow bar:

displays the approximate capacity

required for the timers currently set.

Green bar:

shows the free space on the hard disk.

Содержание 500HDR10

Страница 1: ...Model HDR255 Digital TV Recorder ...

Страница 2: ...llation 18 Message 18 Specific Functions of Remote Control 18 Time Shifting Pause Live Recording 19 TEXT 19 WIDE 19 Notes 20 General troubleshooting 21 Features DVB 200 Channels DVB 7 days event information 7 days EPG TV scart with RGB and CVBS support Record timer via 7 day EPG Automatic search for all channels Timer can be used either for recording or as a sleep timer Timer function TV timer prog...

Страница 3: ... in a place subject to direct sun light excessive dust or mechanical shock or in a location near heat sources The set should be placed on a solid and safe base Do not place the apparatus on a soft surface such as a rug that might block the ventilation holes on the bottom A location should not be selected such as a room with high humidity as the condensation arising in the kitchen for example may c...

Страница 4: ...cts filled with liquids such as vases to be placed on the equipment DON T place hot objects or naked flame sources such as lighted candles or nightlights on or close to equipment High temperatures can melt plastic and lead to fires DON T use makeshift stands and NEVER fix legs with wood screws to ensure complete safety always fit the manufacturer s approved stand or legs with the fixings provided accord...

Страница 5: ...English 4 Overview of the Remote Control ...

Страница 6: ...BACK VIEW 1 ANTENNA IN Aerial input 2 AERIAL OUT Connect to your TV 3 OPTICAL AUDIO Optical Digital Audio Output 4 TV SCART TV SCART connection 5 POWER SUPPLY DC IN 12V Rating label NOTE The rating label is at the bottom of the device ...

Страница 7: ... as possible Please use only the leak proof batteries It is best to remove the batteries from the remote unit if you will not be using the remote control unit for long time Connection to the Tv Connect your set top box with a scart cable using the TV scart connector on the rear panel to your television s scart connector The set top box gives RGB or CVBS output If you want to get the picture via sc...

Страница 8: ...ress standby button to turn off the unit Until low power mode is activated clock will be displayed at the display When the low power mode is activated display will be shut down When you press standby button during low power mode it may take a minute until product is initialised However if you press standby button before low power mode is activated unit will be initialized in a couple of seconds Ac...

Страница 9: ... during the process Menu System Main menu is accessed by pressing the MENU key on the remote control Navigate with keys among the menus and press OK to activate menus In some sub menus press the BACK button to return to the previous menu otherwise use it to exit from the menu In all menus there is an Info banner at the bottom of the screen These are functions that can be used in the current menu T...

Страница 10: ...ing provides a password protected access to channels selected by parents In order to lock a channel you should know the parental Lock password set to 0000 in the factory and can only be changed from the Configuration Menu then highlight the channel to be locked and select the Lock button when OK is pressed a password dialog is displayed Enter the parental Lock code press OK and the Lock icon will b...

Страница 11: ...tton To cancel an already set recording highlight that programme and press the OK button and select the option Delete Timer The recording will be cancelled Record Series Delete Series Number In EPG menu after you have selected a programme press the OK button and select the Record Series option in the menu which appears and press the OK button again So a series recording is set to the selected prog...

Страница 12: ...you will see an error message INFO Pressing this button gives you detailed information about the selected programme Record Cancel Sets recordings for the selected programme If you press it again the recording will be cancelled OK Pressing this button will save the latest changings and you will leave this window and go back to the EPG window Alternatives If you press this button you will get altern...

Страница 13: ...or block playback for other users use parental settings is default Change Delete permit or prohibit any modifications for other users When a timer Start time is reached the receiver starts to record the desired program then when the end time is reached the record stops Save the adjustments by means of GREEN key or cancel with RED button Edit the list via GREEN key and delete with the RED button Rec...

Страница 14: ...options are active If you have alrady separated recording you could select any chapter to begin with the archiving and stop it If it is not separated in chapters the beginning and ending time of the recording will be automatically the beginning and ending time of the archiving Main Title If you want to display a main title select Include To do this use the buttons If not select Skip By selecting S...

Страница 15: ...ally by the broadcaster Because the PVR has a Twin Tuner it is possible to record two events and watch two programmes at the same time It is also possible to playback a recording previously made during an active recording The PVR record and playback functions are very similar to those of a VCR The buttons used for playback and recording are shown below To configure the playback recording options se...

Страница 16: ...ecorder Failure to observe precautions may cause damage to the HDD itself or its content failure of the disk to operate or recording of noise Do not subject the Recorder to any vibration or impact Do not place the Recorder in a cramped location which might block the ventilation port on the back of the Recorder Do not place the Recorder in a location with severe temperature variation If the Recorde...

Страница 17: ... the Recorder will not allow Time Shift Viewing recording display of recording lists or playback of recorded programmes Please wait until the HDD is ready Configuration You can configure the settings of your set top box Select Configuration from Setup menu and press OK to enter this menu Press the BACK button on the remote to exit Tv Type Digital terrestrial television channels can broadcast programm...

Страница 18: ...Locking Use buttons to go to Parental Lock option Press OK button to enter the menu A box asking for the lock key is displayed The key is set to 0000 initially Enter lock key If it is incorrect Wrong Pin is displayed If it is correct the Parental Control Menu is displayed Menu Lock In menu lock you can set locking for All Menus or the Installation Menu to restrict access to these menu s If the men...

Страница 19: ... cancel the operation Message When the box receives no signal e g the antenna cable is disconnected NO SIGNAL message is seen on the screen When there are no channels stored in the box he Channel List menu is not accessible Channel navigation is not allowed Therefore trying to enter these menus or navigate the channels will display an error message on the screen Specific Functions of Remote Control...

Страница 20: ...ys To terminate the Pause Live Recording press button TEXT Many digital terrestrial television channels not only broadcast pictures and sound for programmes but also pages of information on the programmes the weather news and many other topics This digital teletext can be displayed by the receiver Some channels are entirely given over to digital teletext and carry no normal TV programme at all The...

Страница 21: ...ikely to be walked on or pinched by things placed on or against them Pay particular attention to the power lead where it enters the mains plug and where it comes out of the receiver Do not connect or adjust leads when the receiver is plugged in TEMPERATURE AND MOISTURE Do not leave or use the receiver in a hot cold or humid area Do not allow the receiver to get wet from drips or splashes as this m...

Страница 22: ...l Check the Aerial and scart connections The remote control is not working The digital set top box was unplugged without first going to stand by Remote control is incorrectly aimed Battery exhausted Press the standby key Check if anything is obstructing the front panel Change the batteries Password forgotten Make contact with the nearest service center Record does not start No or weak Aerial input ...

Страница 23: ...PEG2 DEMODULATION COFDM with 2K 8K FFT mode FEC for all DVB Modes Automatically found VIDEO ALL MPEG 2 MP ML Video Decoder Aspect Ratio 4 3 16 9 with pan vector RGB analogue outputs BW 5MHz at 0 5 to 5 MHz sweep signal CVBS analogue output AUDIO MPEG1 Layer 1 and 2 Sampling frequencies supported 32 kHz 44 1 kHz or 48 kHz Output can be programmed as STEREO LEFT only or RIGHT only on both outputs Th...

Страница 24: ...k capacity 250 GB FRONT PANEL Display 7 segment led display Remote Control Keys On Off PR PR AUDIO Output 2 Vrms 0 dBfs Z 10 kohm DIGITAL AUDIO Output Optical SPDIF A V DATA IN OUT Scart TV scart RGB Video Output TV scart CVBS Video Output TV scart Analog Audio Output TV scart Digital Audio Output Optical output ...

Страница 25: ...English 24 ...

Страница 26: ...MERS Programmes can also be recorded by means of Timers menu Select Timers from Main Menu and press OK Press YELLOW button to add a new recording Select what you want to record Press GREEN button to store it When the programme starts it will be automatically recorded RECORDINGS LIBRARY All the recordings are kept in Recordings library To show the list of recordings press either LIB button or acces...

Страница 27: ...emote control ensuring that they are the correct way round some time Then you can turn on your digital set top box by pressing the STANDBY button on the remote control Accessories 1 Remote Control 2 x AAA batteries 1 Operation Manual 1 Scart Cable 21 pin cable 1 RF Cable DIGITAL TV RECORDER HDR 255 OK TEXT BACK MENU INFO PR VOL 2 3 5 6 7 8 9 0 ABC DEF GHI JKL MNO LIB P P SUBT 1 4 PQRS TUV WXYZ FAV...

Страница 28: ...www hitachidigitalmedia com ...

Отзывы: