HISCO DVR series Скачать руководство пользователя страница 26

Hisco® DVR Series                                                               User’s Manual 


26 

Chap 2.


Setting up the DVR System


2-7.BASIC


CONFIGURATION


SETTING 

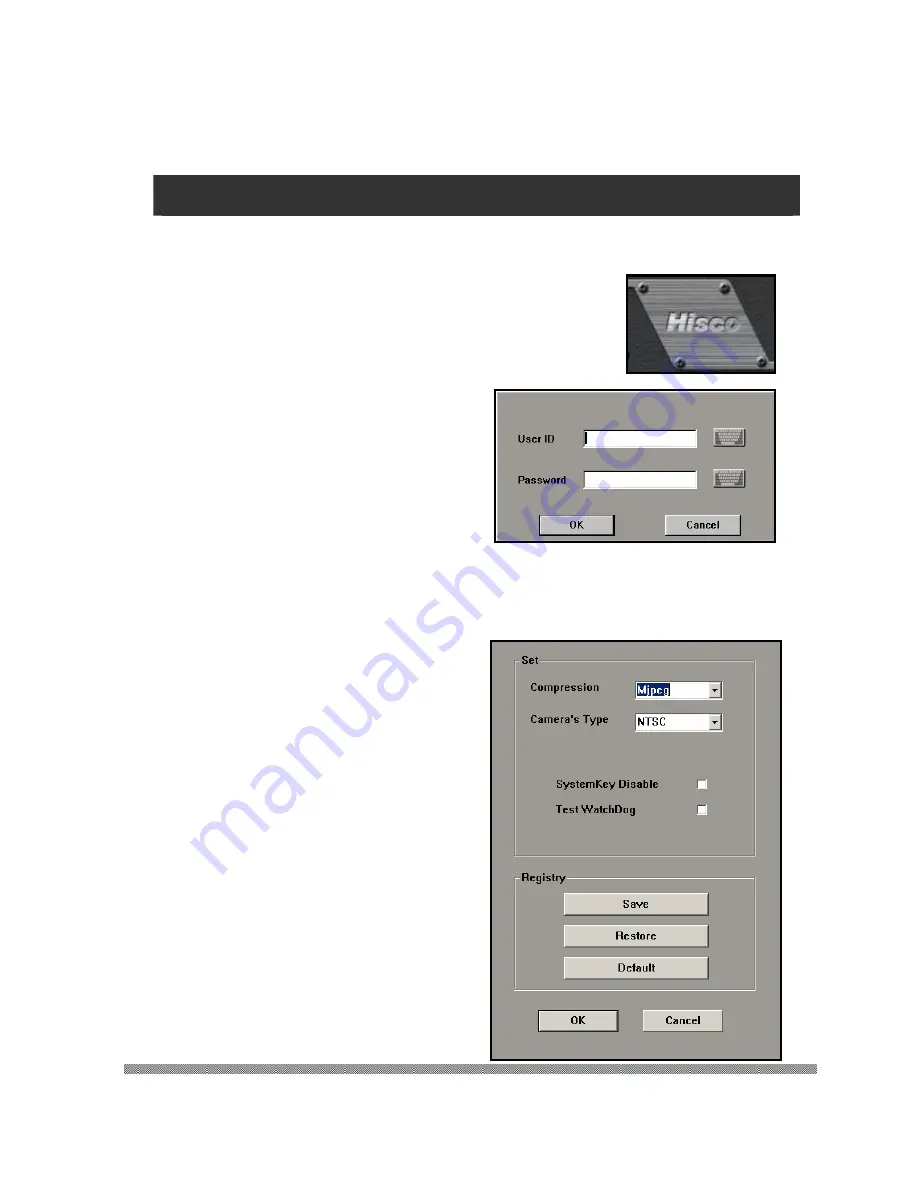
In this section, users can select the input camera format (NTSC/PAL) and change some initial 
setting. 
 
Double click ‘Hisco’ logo at the bottom center of main interface. 


When ID/PASSWORD prompt appears, enter 
Administrator’s  ID and Password, and then click 
OK.  
 
Basic Configuration dialog will appear 
 (as shown  right).   


SET

Compression type :  

Choose M-JPEG or Wavelet 

Camera type: 

Choose NTSC or PAL 

System Key Disable

: If this is clicked, keyboard will be disabled for secure the DVR from anyone 

to getting into Windows OS 

Watch-dog test function:

 For testing watch dog function. 


Содержание DVR series

Страница 1: ...Hisco DVR Series User s Manual 1 HISCO DIGITAL VIDEO RECORDER USER S MANUAL DVR VERSION 5...

Страница 2: ...s missing or if damage is evident DO NOT INSTALL OR OPERATE THIS PRODUCT Contact your dealer for assistance Warnings WARNING TO REDUCE THE RISK OF FIRE OR ELECTRIC SHOCK DO NOT EXPOSE THIS PRODUCT TO...

Страница 3: ...as direct sunlight or heating appliances Surfaces rugs blankets etc or near materials curtains draperies that may block the ventilation holes Moisture dust and smoke Magnetic fields or electrical wave...

Страница 4: ...to the back of the DVR power supply There is a small switch at the back turn it ON I Now plug the power cord into the outlet This will start the Hisco s DVR security software Cleaning Clean the unit w...

Страница 5: ...nd into video monitor or equipment through openings as they may touch dangerous voltage points or short out parts that could result in a fire or electric shock Never spill liquid of any kind on the pr...

Страница 6: ...VI file format About 650MB of space is allocated to Drive D By default D Backup is created so that users can save backed up images on that folder By default Drive E space is being use for capturing im...

Страница 7: ...G 14 CAMERA SETTING 17 MOTION DETECTION SETTING 19 SENSOR AND DIGITAL OUTPUT SETTING 20 USER SETTING 22 ALARM SETTING 24 BASIC CONFIGURATION SETTING 26 BUILDING FILE SYSTEM 28 CHAPTER 3 USING DVR SYST...

Страница 8: ...RECEPTION FUNCTION 86 SYSTEM LOGVIEWER FROM CLIENT SYSTEM 87 CHAPTER 6 TROUBLE SHOOTING 89 CHAPTER 7 CD BURNING INSTRUCTION 94 CHAPTER 8 SECURING HISCO DVR 99 CONNECTING UNINTERUPT POWER SUPPLY 102 C...

Страница 9: ...Hisco DVR Series User s Manual 9 Introduction to DVR System...

Страница 10: ...as BMP file which can be printed out with the PC printer Archived Images can be backed up on to CD RW DVD RAM for long term storage Image recording directory managing specify the recording directory...

Страница 11: ...fps 1030 60fps 2060 120fps 2120 240fps 2240 480fps 2480 with 16 cameras NTSC Max 25fps 1030 50fps 2060 100fps 2120 200fps 2240 400fps 2480 with 16 cameras PAL Recording Speed Max 30fps Hisco 1030 3030...

Страница 12: ...input 4 digital output ports type Multi Tasking Providing access to Monitoring Recording Searching simultaneously Backup Function Manual Backup by using DVD RAM or CD RW USB HDD Scheduled Backup avail...

Страница 13: ...Hisco DVR Series User s Manual 13 Setting up DVR System...

Страница 14: ...Tilt control enable disable Watch dog function and initial screen split mode etc If a user clicks the SETTING button user authentication prompt will be displayed Fill in the User ID and password Use...

Страница 15: ...ity and specify the Server port address default 5823 Use Bandwidth Setting to limit bandwidth usage by DVR when a user to access the DVR remotely by PSTN LAN WAN including ADSL System Overwrite Use Im...

Страница 16: ...o Switch Interval Time it takes for cameras to rotate Also the display time of camera image shown on external composite monitor when connected is same Etc ID PW Use Enable Disable ID and Password auth...

Страница 17: ...Z control Clicking use allows a user to setup the PTZ camera s type and protocol communication port parameter Select the control type Panasonic vicon pelco etc Specify the Communication Port Baud Rat...

Страница 18: ...0X480 resolution will result in large file size Quality Specify the recording image quality Wavelet Setting 10 1 20 1 40 1 60 1 80 1 100 1 NOTE 10 1 will result in good quality picture but large file...

Страница 19: ...changes in a given area Select the motion rate between 1 100 1 is most sensitive and 100 is least sensitive Area setting Set up motion sensitive area motion grid Add area Click and drag to add a moti...

Страница 20: ...me delay time Select Sensor Select installed sensor Selected sensor user to setup a sensor type co work camera co work output Relay or Digital out and Dwell time Individually Set Location Type Enable...

Страница 21: ...Select Digital In Select installed Sensor input 1 16 Manual DO Manually activate Digital Out Schedule DO Schedule to activate Digital Out at a certain time Relay DI Assign a camera that would record w...

Страница 22: ...R SETTING In User setting user can add modify or delete users with different access privileges ADD User can add a new user MOD Choose a user from the list and click MODIFY button to change any setting...

Страница 23: ...D and Password Select Level and Authority User can only watch Power User has limited privilege Administrator has full privilege Level Authority Enable Disable following feature to Power Users Local PT...

Страница 24: ...armed camera Select Camera Select a camera that would trigger alarm feature Alarm Schedule Dwell time specify duration of alarm from 2 sec to 60 sec Use UnUse enable disable Alarm on the schedule tabl...

Страница 25: ...work See page 67 and 85 for working with client Click to use Connect List ADD MODIFY or DELETE a client who will be notified Click the ADD button on the Connect List area ADD dialog will appear see be...

Страница 26: ...bottom center of main interface When ID PASSWORD prompt appears enter Administrator s ID and Password and then click OK Basic Configuration dialog will appear as shown right SET Compression type Choos...

Страница 27: ...ting up the DVR System REGISTRY User can save or restore the setting value SAVE Exporting SETTING value as desired file name with cnp extension RESTORE Importing Hisco Registry Value cnp file from sav...

Страница 28: ...that it is ready for recording Making a new file system If you installed a new Hard Drive To make a file system run the file manager program from the Start Menu All Programs HISCODVR File Manager Fil...

Страница 29: ...dd EyeDat Scroll down and select the number of EyeDat s you wish to create Once user selected number of desired EyeDat files click Start to create the file system EyeDat s onto the HDD Then Click the...

Страница 30: ...Hisco DVR Series User s Manual 30 Using the DVR System...

Страница 31: ...r P T Z control panel area Log Viewer button Display Mode button Functions button area Power button And camera button area Functional operation button SEARCH For retrieving the recorded images in the...

Страница 32: ...te display indicates no remote connection Black display indicates remote connection Record Indicator White display indicates that the system is not recording red display indicates that the system is r...

Страница 33: ...ge usage indicator Click on the HDD Usage indicator to display the HDD Usage Information dialog Overwrite Information Displays overwritten number Hard drive Display Mode Show HDD Usage click to indica...

Страница 34: ...n buttons as shown left This will change the display to single 4 6 9 10 16 split screen views On the single camera mode you can select individual camera by clicking on the camera number Quick change f...

Страница 35: ...ne camera s position with the other on the display click the screen of one camera then drag and drop it to a camera where you want to switch with Digital Zoom function On a single view some areas may...

Страница 36: ...without interface as shown below Double click anywhere on the screen to show previous screen with interface AUTO Sequence When AUTO button is pressed camera view will sequentially change The default i...

Страница 37: ...el on the main screen As shown on the below Make sure the PTZ settings for each camera is correctly configured in the system Camera control P T Z Function The Pan Tilt button will control PTZ pan tilt...

Страница 38: ...to use Alarm notification recording mode has to be either Motion Sensor Motion Sensor or Event By marking notify use and setting connection type and client location alarm notification function will b...

Страница 39: ...ystem Log contains all DVR operation and changes as well as entire remote connection history Click on LOG icon on the DVR Main Screen or press the CONTOL L key on the keyboard Verification dialog will...

Страница 40: ...m Information If you click on the top left corner of main monitoring program you can see the Information window as below Program Information Version Program s version Build Program built date Board Ty...

Страница 41: ...R Program Stops the DVR recording program 2 Shut down System Will completely shut down the DVR 3 Reboot System Restart the DVR system If the password protection feature is enabled the user must enter...

Страница 42: ...on the record status table on bottom center and click the PLAY button Player button Continuous play column 3 row 2 Continuous reverse play column 1 row 2 1 frame forward play column 3 row 1 1 frame r...

Страница 43: ...uentially on 9 split screen Click PANO button The first frame will be viewed on the first division second frame on the second division and etc The tenth frame will be viewed on the first division comp...

Страница 44: ...how the remaining hours in a day Record status table consists of recording status camera label and time label The Timeline gives a brief overview how the image was recorded throughout the day The red...

Страница 45: ...ck speed Left faster Right slower This adjusts the speed when you play back the recorded images If you drag the tab to the left the footage will play faster if you drag the tab to the right the footag...

Страница 46: ...ded data Image Playback recorded image only Sound Playback recorded sound only For sound record system Image Sound Playback recorded image with sound For sound record system Display Specify the On Scr...

Страница 47: ...that exact time date and camera of current image At any time you can go back to this point by clicking index and then double clicking that time and date stamp Save Function Save current image as a BMP...

Страница 48: ...se AVI To continue with saving a full motion name the file in the File name text box this can be done using a virtual keyboard default file name is recorded date and time And then clicking on Save wil...

Страница 49: ...double click may be used to magnify the image An image may be magnified no more than three times Specific areas may be selectively zoomed by holding the right click of the mouse and dragging it to cre...

Страница 50: ...E SEC MODE Search is a function that enables the user to search by each s econd from record information windows table When click this button will be appears SEC MODE record information window table GO...

Страница 51: ...may be created by dragging the left click of the mouse The created boxes detect motion within its frame Maximum 3 areas can be selected for detection The first box indicates green second red and the l...

Страница 52: ...meters may be input in the top window to refine a search The right window indicates the camera in which the information was received from as well as the date and time of activity The SAVE icon may be...

Страница 53: ...skette or HDD using DVR save function can be verified by this function Retrieve Saved JPEG file Click on EyeViewer icon on the DVR folder Eye Viewer program window will be displayed as shown below Cli...

Страница 54: ...py Time DVR Site Location Windows Organization Windows Owner and System Windows Serial Number will be displayed Printing in the back up viewer If you want to print out current image click Print Button...

Страница 55: ...Hisco DVR Series User s Manual 55 Using the Backup Program...

Страница 56: ...te e If you want to backup onto the CD RW you must do a manual backup as CD RW writing speed is max 8X speed Its write speed is insufficient for the scheduled backup to backup Images while running th...

Страница 57: ...as it is indicated The device assignment backup Choosing Backup Device Select Media The backup destination may be chosen by browsing the desired drives and files The device assignment window will app...

Страница 58: ...to verify the selected imaged size by clicking Size Choosing Backup Device Select Media Choosing the backup device is identical to Tree mode when prompted with the backup device alert select and Brows...

Страница 59: ...Since the Eye viewer is burnt onto backed up CD you are able to retrieve the image from any of your Window based System Once you insert the Backed up CD into computer the EyeViewer will automatically...

Страница 60: ...era number and recorded hour and click OK The selected backup image will be displayed on the image display area on the Eye Backup Viewer window Next click the PLAY button backup data will be playback...

Страница 61: ...er System Windows Serial number Printing in the Backup Viewer If you want to print out current image click Print button Then print size dialog will appear After select a print size click OK Save Image...

Страница 62: ...ble backup drive where the Eye Data Backup will be placed Click the Make button Make EyeBackup window appears It will show you the available number of file to be created To create EyeBackup files choo...

Страница 63: ...drives are full the newly recorded data will overwrite previously recorded data Schedule Set Schedules may be created by deciding times and dates from the desired camera You can choose the data which...

Страница 64: ...e to run the backup program at the background By clicking the Quit button the message window will appear as shown right Clicking OK will terminate the backup program Retrieve the Schedule Backup Data...

Страница 65: ...Hisco DVR Series User s Manual 65 Using the Remote Client Program...

Страница 66: ...installed on a remote site and connected to a network Major functions are as below z Remote monitoring function z The video retrieval search function z Saving from client computers remote location fu...

Страница 67: ...ing characteristics may be configured by clicking SETTING button Network mode for LAN network or transformation network connections TCP IP address for DVR connection to a network Telephone numbers for...

Страница 68: ...ick Add to insert a new directory entry This DVR information may be edited or deleted using the Edit or Delete button You can erase the DVR information before adding by clicking the Clear button Syste...

Страница 69: ...the server of the multiplex link Connect ID User ID Connect PW Password Connect Type IP mode LAN Fixed IP Connect Address DVR server IP address Connect Port DVR server port number Connect Camera Choo...

Страница 70: ...hoose the one entry and then click OK DVR ID and PASSWORD will also be required and confirmed in order to establish the connection Dial up Network User To begin click the CONNECT button to establish a...

Страница 71: ...Monitoring The multiplex server remote monitoring must set each server individually at Multi Connect setting and Local network LAN environment for operation After clicking CONNECT the connect list dia...

Страница 72: ...on Connection Button Split Screen Button Auto Switch Button Easy Connection Channel Function Button SEARCH Leads to playback mode See page 77 BACKUP Leads to backup program See page 81 VERSION Let s y...

Страница 73: ...Indicator to display the Date Time Display Option dialog Dates may be set as yy mm dd mm dd yy or dd mm yy Additionally times may be set in either 12 or 24 hour mode HDD Usage setting Overwrite infor...

Страница 74: ...t click Apply button to change Then main DVR color setting will be changed Only administrator has the authority If you click Default then Apply the main DVR color will return to default value To hide...

Страница 75: ...Camera Selection Indication of Black Camera numbers are enabled from DVR If the numbers are grayed out it indicates the cameras have been hidden or not disabled from DVR Additionally by clicking the n...

Страница 76: ...and the box will be magnified to the screen Camera Authorization when Remote Monitoring Each registered user max 10 user can have different viewable camera combination from remote software Make sure H...

Страница 77: ...am will be launched and shows the recorded data on DVR server which you are connected to Client Search is run in the same way as main DVR Search See page 41 To playback the recorded data 1 Select mont...

Страница 78: ...ain screen Connect server dialog will be appeared as shown right Select the DVR server from the entry and then click OK then verification dialog will be appeared Fill in the ID and PASSWORD and then c...

Страница 79: ...rver remotely After establishing a connection to the DVR click SETTING button Functions such as System Camera Motion Sensor User and Alarm may only be modified by the administrator Afterwards configur...

Страница 80: ...t program connected The DVR Basic Configuration dialog will be displayed as shown right With this DVR settings may be modified through the Client indirectly and takes out the necessity of modifying th...

Страница 81: ...ent is also able to record the data from the server with RECORD button Moreover the client is able to backup this recorded data The same way as the DVR Backup program Click BACKUP button on the client...

Страница 82: ...the remote client computer The remote backup program is run the same way as the regular backup program Click the BACKUP button and then click the Remote button Connect server dialog will be appeared...

Страница 83: ...me Selection modes may be used to save and create backup files See page 55 for detail Click Browse button to open destination Folder window This window will display the local client computer s directo...

Страница 84: ...gram Click BACKUP button and then click Remote Control button Connect server dialog will be appeared as shown right A server must then be chosen by the client followed by ID and PASSWORD inputs In the...

Страница 85: ...erver Choose the backup folder and then click OK Then click Start Backup button the backup program will copy the selected data to DVR server Again in the same way as the regular backup program schedul...

Страница 86: ...s process the word Alarm will appear in red at the top right corner of the visual And it starts to record the all connected camera image at client computer until clicking RECORD button The user may al...

Страница 87: ...ote System log view at the client system This viewer file located at the HiscoDVR directory in the program folder Next click the Connect button on the LogViewer window Connect server dialog will pop u...

Страница 88: ...he Remote Client program Select the log view START date and time END date and time on the Local Search area at the LogViewer window Search button on the LogViewer main dialog will retrieve and display...

Страница 89: ...Hisco DVR Series User s Manual 89 Trouble Shooting...

Страница 90: ...and all other settings Warning If you are not familiar with Windows registry please call Hisco authorized dealer or visit our web site to contact us www hiscocanada com 4 When I click the arrow on th...

Страница 91: ...ding Pelco D protocol in 5 3 5 version Version 5 6 X fixes this problem Please download newer software from the web site http www hiscocanada com download htm 10 I ve just received my system but it do...

Страница 92: ...a After Microsoft releases Windows Xp Sp2 there has been some security features added on to Internet Explorer to prevent malicious spyware downloaded without your knowledge or permission Hisco Client...

Страница 93: ...rnet Explore has blocked because it can t verify the publisher 3 Click OK and close the box 4 On the Internet Explore bar click Tool and select Internet Options 5 At the Internet Option click on the S...

Страница 94: ...Hisco DVR Series User s Manual 94 CD Burning Instruction NeroExpress...

Страница 95: ...Hisco DVR Series User s Manual 95 1 FROM THE MAIN MENU CLICK SEARCH 2 TYPE YOUR USER ID AND PASSWORD 3 SELECT THE TIME AND DATE 4 SELECT THE CAMERA...

Страница 96: ...ER IN D DRIVE SELECT A FILE TYPE AS AVI JPG OR BMP NAME THE FILE AND CLICK SAVE BUTTON 7 SAVING AS AVI NEXT CHOOSE IMAGE QUALITY WE RECOMMEND USING HIGH AND 1 TO 5 FR SEC THEN CLICK OK 8 SAVING AS AVI...

Страница 97: ...AVI AFTER STOP IS PRESSED YOU WILL SEE AVI CREATED 10 QUIT SEARCH AND QUIT DVR PROGRAM BY PRESSING QUIT BUTTON CLICK EXIT DVR PROGRAM AND THEN OK 11 DOUBLE CLICK ON NERO EXPRESS SHORTCUT ON YOUR DESK...

Страница 98: ...K NO WHEN IT ASKED YOU TO SAVE CHANGES TO ISO ONCE YOU HAVE FINISHED SEARCH AND BURNING YOU CAN NOW QUIT TO THE MAIN MENU WHICH WILL BRING YOU BACK TO LIVE CAMERA VIEW PLAYING BACK VIDEO IN CD FROM AN...

Страница 99: ...Hisco DVR Series User s Manual 99 Securing Hisco DVR...

Страница 100: ...other than those that have been installed at the factory WARNING Do not install any additional hardware on the Hisco DVR IMPORTANT When using the network capabilities of the Hisco DVR it is strongly...

Страница 101: ...Hisco DVR Series User s Manual 101 Recommended DVR installation diagram...

Страница 102: ...trical noise from wall outlets Each DVR should be configured to shut down itself safely in the event of an extended power outage IMPORTANT Only those UPS device that exhibit the Designed for Microsoft...

Страница 103: ...o DVR completely 2 Connect the UPS to the Hisco DVR using a Serial cable which comes with UPS 3 Connect power cord of the UPS to standard wall outlet 4 Connect the power cord of the Hisco DVR to UPS 5...

Страница 104: ...SC 450VA 120V APC Smart UPS SC 620VA 120V Hisco 2000 Series APC Smart UPS SC 420VA 120V APC Smart UPS SC 450VA 120V Hisco 2000 Series with multiple HDDs up to 400W APC Smart UPS SC 450VA 120V APC Sma...

Страница 105: ...n Server Used to configure and monitor the PowerChute Business Edition Agents The PowerChute Server gathers information from the PowerChute Agents and provides centralized event tracking event notific...

Страница 106: ...Chute Agent to your UPS protected DVR 1 Accept the license agreement 2 Click No for enabling Messenger service 3 Choose the destination location of the PowerChute Agent files to be installed Leave it...

Страница 107: ...nse agreement 2 Enter a user name and password This user name and password must be the same as the information chosen in STEP 1 Install the PowerChute Business Edition Agent for your PowerChute Agents...

Страница 108: ...how to set the Email Notification Click on Email Notification and Next 1 Assign your Smtp Mail server Address For telus smtp telus net For Shaw shawmail 2 Type your SMTP account name 3 Click Add and t...

Страница 109: ...the left and click Add Then click Apply After a few second you will see the Device is enlisted Click Close to complete Note The Device List Configuration dialog box automatically discovers PowerChute...

Страница 110: ...Name and Password you have created And Click on Connect Right Click on your DVR and select Properties Click on the Show advanced Items to see more detailed information Expand Shutdown category and sel...

Страница 111: ...Hisco DVR Series User s Manual 111 Shutdown Type should be set as SHUTDOWN Click Close to complete the configuration...

Страница 112: ...ect the DVR from a Remote site If the DVR has dynamic IP address the IP address will change frequently Since router needs to forward specific packets to an internal IP address of the Hisco s DVR syste...

Страница 113: ...tain an IP address automatically Refer to router user manual for detail DO NOT ASSIGN DVR IP ADDRESS WITHIN THAT RANGE Port Forwarding Hisco DVR uses 2 different ports to communicate with Eye Client T...

Страница 114: ...for your router Step 2 Open a web browser In the address bar type the ip address of your router This ip address is 192 168 0 1 by default Press enter Step 3 You should now see the Setup Wizard and it...

Страница 115: ...t Port box should be 5823 b End Port box should be 5824 c Now enter the ip address DVR static ip address you want to forward these ports to in the Server IP Address box Type a name for the service and...

Страница 116: ...ring 192 168 1 1 in the Address field and pressing the Enter key You should see the following screen Step 3 By default the username is blank so just leave the Username box empty Go ahead and enter the...

Страница 117: ...s you made on this page Now click the Forwarding button at the top of the page Step 6 On the left hand side put the name of the application you are forwarding ports for in the Customized Application b...

Страница 118: ...Hisco DVR Series User s Manual 118 APPENDIX...

Страница 119: ...EM Camera Use Camera 1 16 Site Location Admin Name Address Site Tel Number Network Use Server Port 5823 Overwrite Use Automatic System Shutdown System Schedule Reboot Date Sun Sat or Everyday Time Sho...

Страница 120: ...ss 0 63 Pan Tilt Setup Set Spot Monitor View Hide Screen Select Camera Camera 1 16 Use Pre Frames 1 60 Advanced Pre Post Set Post Frames 1 60 Resolution 320x240 640x240 640x480 Quality Wavelet 10 1 20...

Страница 121: ...amera Camera 1 16 Set DO Select Digital Digital 1 16 Manual DO Schedule DO Start Time End Time Type Relay DI Dwell Time 0 sec 10 minutes Camera 1 16 Set Select Digital In USER User List Set ID PASSWOR...

Страница 122: ...tem Setup Menu Map ALARM Select Camera Camera 1 16 Alarm dwell time 2 60 sec Use UnUse Sun Mon Tue Wed Thu Fri Sat Alarm Schedule 0 23 hours Sound Use Connection Use Network LAN DIAL ADSL IP address L...

Страница 123: ...ow Auto Switch Interval 10 15 20 30 60 120 180 Display Mode 1 4 6 9 10 16 Alarm Server Use System Alarm Server Port MULTI CONNECT Connect Server Server name Connect ID User ID Connect PW User Password...

Страница 124: ...Hisco DVR Series User s Manual 124...

Страница 125: ...Hisco DVR Series User s Manual 125...

Страница 126: ...ply even if Hisco Canada or an authorized representative has been advised of the possibility of such damages Further Hisco Canada does not warrant that the operation of the Software will be uninterrup...

Страница 127: ...Hisco DVR Series User s Manual 127...

Отзывы: