


101
Configuring Alarms and Exceptions
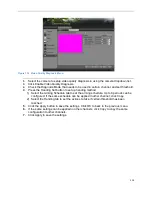
Setting up Motion Detection
Set up properly, using motion detected recording will increase the number of days your DVR is
able to record. It will only record relevant events rather than everything, which will also make
searching for events easier.
To set up motion detection:
1.
Enter the Motion Detection menu, shown in Figure 115 by going to Menu > Recording
Configuration > Motion Detection.
Figure 115 Motion Detection Settings Menu
2.
Select the camera to configure in the camera dropdown list.
3.
Check the Enable Motion Detection checkbox to enable motion detection for the
selected camera. Uncheck the checkbox to disable motion detection.
4.
Set the motion detection sensitivity by adjusting the green Sensitivity bar. The more lime
green rectangles selected in the bar, the higher the sensitivity will be to motion.
5.
Set the motion detection region in the preview screen on the right side of the menu by
left-clicking with the mouse on an open area. A red grid will be shown, designating that
the selected area is part of the motion detection region. Dragging or left-clicking on
areas that overlap the current selected motion detection area will include them into the
region. You may also click the Full Screen button to include the whole area into the
motion detection region. Left-clicking on any part of the grid will remove that section from
the motion detection region.
6.
If you’re not satisfied with the selected region, you may click the Clear button to reset the
motion detection area.
Содержание DS-7200HGHI-SH Series
Страница 15: ...14 14 eSATA Connects external SATA HDD CD DVD RW 15 RS 232 Interface Connector for RS 232 devices ...
Страница 18: ...17 Product Application Diagram Figure 7 Product Application Diagram ...
Страница 28: ...27 Figure 14 Risky Inadequate Strength Password Figure 15 Invalid Password Message ...
Страница 34: ...33 Figure 25 Password Field with Strong Strength Bar Figure 26 Confirmation Window ...
Страница 36: ...35 Figure 27 iVMS 4200 Control Panel Figure 28 Inactive DVR NVR Status NVR Status Inactive ...
Страница 38: ...37 Figure 31 Weak Adequate Password Strength Figure 32 Medium Adequate Password Strengt ...
Страница 39: ...38 Figure 33 Strong Adequate Password Strength Figure 34 Active DVR NVR Status NVR Status Active ...
Страница 43: ...42 Figure 39 Medium Acceptable Strength Password Figure 40 Strong Acceptable Strength Password ...
Страница 92: ...91 Figure 101 Main Menu ...


