background image

ID3000 Series Smart Code Reader User Manual 

57 


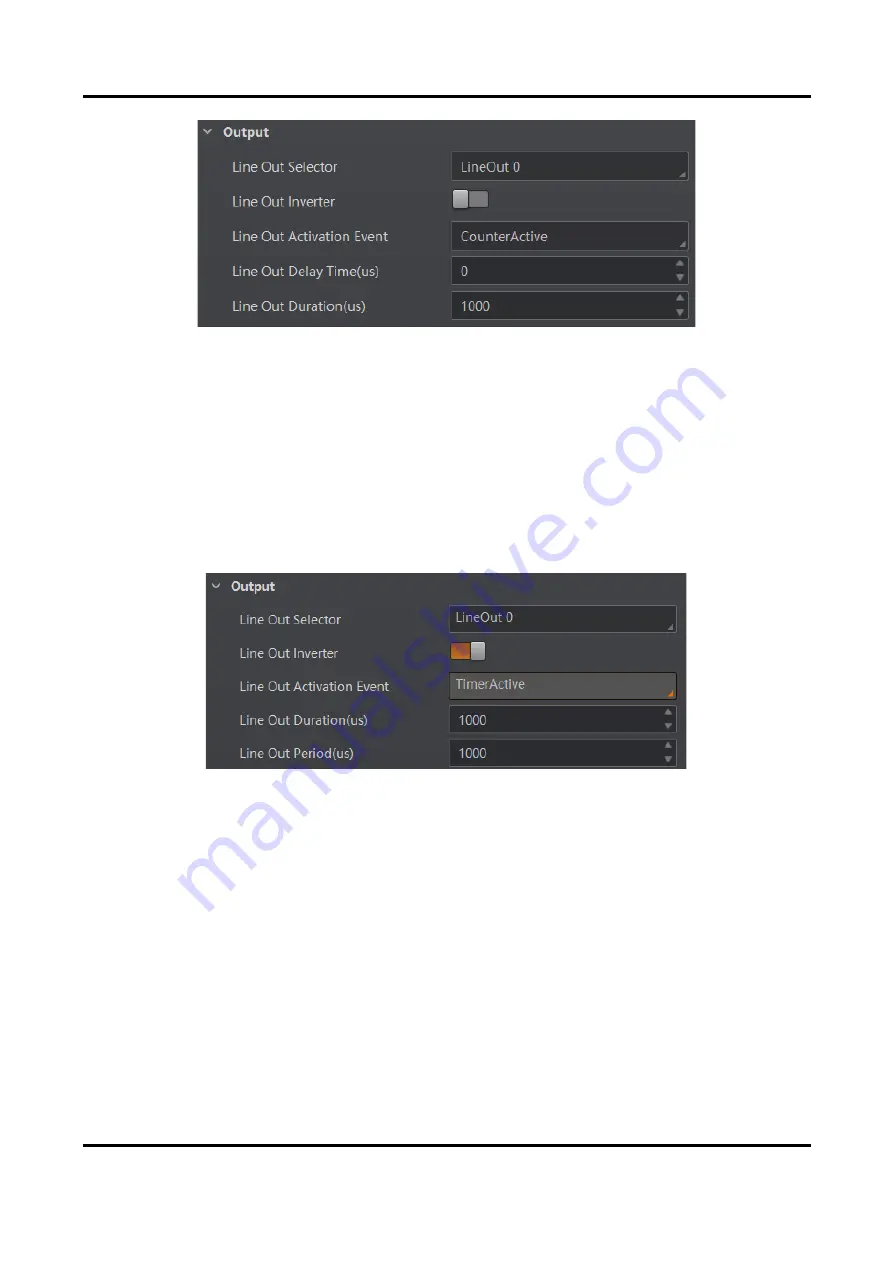
Figure 8-44 Select Counter Active 

Select Timer Active 

If you select Timer Active as Line Out Activation Event, you can set its output duration and period. 

Line Out Duration   

It sets the time duration of the output signal. 

Line Out Period   

It sets the time period of the output signal. 


Figure 8-45 Select Timer Active 

Select No Code Read 

If you select No Code Read as Line Out Activation Event, you can set its output delay time and 
duration. 

Line Out Delay Time   

It sets the delay time for outputting the output signal. 

Line Out Duration   

It sets the time duration of the output signal. 

Содержание ID3000 Series

Страница 1: ...ID3000 Series Smart Code Reader User Manual ...

Страница 2: ...AL CONSEQUENTIAL INCIDENTAL OR INDIRECT DAMAGES INCLUDING AMONG OTHERS DAMAGES FOR LOSS OF BUSINESS PROFITS BUSINESS INTERRUPTION OR LOSS OF DATA CORRUPTION OF SYSTEMS OR LOSS OF DOCUMENTATION WHETHER BASED ON BREACH OF CONTRACT TORT INCLUDING NEGLIGENCE PRODUCT LIABILITY OR OTHERWISE IN CONNECTION WITH THE USE OF THE PRODUCT EVEN IF HIKROBOT HAS BEEN ADVISED OF THE POSSIBILITY OF SUCH DAMAGES OR ...

Страница 3: ...rmful interference to radio or television reception which can be determined by turning the equipment off and on the user is encouraged to try to correct the interference by one or more of the following measures Reorient or relocate the receiving antenna Increase the separation between the equipment and receiver Connect the equipment into an outlet on a circuit different from that to which the rece...

Страница 4: ... which if not avoided could result in equipment damage data loss performance degradation or unexpected results Note Provides additional information to emphasize or supplement important points of the main text Available Model This manual is applicable to the ID3000 Series Smart Code Reader Safety Instruction These instructions are intended to ensure that the user can use the product correctly to av...

Страница 5: ...t Keep the surrounding area well ventilated to avoid heat accumulation Do not contact the radiator directly to avoid scald Electrostatic Protection Remove all conductive objects such as jewelry watch etc on the product body before touching the product and touch the grounding metal bracket by hand to release the static electricity It is suggested to wear anti static suit to prevent damage to the eq...

Страница 6: ...ease cover the image sensor with dust cover for protection Installation Please do not install the product on vibrating surface or places that are vulnerable to impact Personnel Requirement Quality requirements for installation and maintenance personnel qualification certificate or working experience in weak current system installation and maintenance and relevant working experience and qualificati...

Страница 7: ...ll Device 13 Chapter 5 Device Connection 14 5 1 Install Client Software 14 5 2 Turn off Firewall 15 5 3 Set PC Network 15 5 4 Set Device Network 16 5 5 Connect Device to Client Software 17 Chapter 6 Client Software Layout 18 Chapter 7 Device Mode Settings 20 Chapter 8 Device Settings 22 8 1 Image Quality Settings 22 8 1 1 Set Image 22 8 1 2 Set Polling 24 8 1 3 Set Light Source 26 8 1 4 Set Lens F...

Страница 8: ...ble External Trigger Mode 42 8 3 4 Stop Trigger 46 8 4 Signal Output Settings 50 8 4 1 Select Output Signal 50 8 4 2 Enable Line Inverter 50 8 4 3 Set Event Source 51 8 5 Code Reading Result Settings 58 8 5 1 Set Code Reading Result Output Mode 59 8 5 2 Set Filter Rule 59 8 5 3 Set Result Format 62 8 6 Contrast Control Settings 68 8 7 Communication Settings 70 8 7 1 Smart SDK 70 8 7 2 TCP Client 7...

Страница 9: ...it Window 84 9 6 View Reports 84 9 7 View Log 85 9 8 Set Time 85 9 9 Enable Device Auto Work 86 Chapter 10 Device Maintenance 87 10 1 Update Firmware 87 10 2 Reboot Device 87 Chapter 11 FAQ Frequently Asked Question 89 11 1 Why the image is very dark 89 11 2 Why the image s frame rate is very low in the live view 89 11 3 Why there is no device listed after I run the IDMVS client software 89 11 4 W...

Страница 10: ...00 Series Smart Code Reader User Manual 1 Chapter 1 Appearance Note Appearance here is for reference only Refer to the device s specification for detailed dimension information Figure 1 1 Appearance Type I ...

Страница 11: ...vice and cable and thus avoiding influence caused by vibration 2 Focus Knob It is used to adjust focal length manually Note The focus knob may differ by device models and some models do not have a focus knob 3 OK NG Indicator It indicates code reading result The indicator is orange when the device is starting up The indicator is red after the device is powered on The indicator is flashing green af...

Страница 12: ...the device to installation position You should use M4 screw 8 PWR Indicator It is the power indicator The indicator is green when the device operates normally Otherwise it is red 9 STS Indicator It is the device status indicator The indicator is green when the device operates normally When the device starts up or exception occurs it is red 10 LNK Indicator It is network status indicator The indica...

Страница 13: ...ent power supply positive 2 DO_2 LineOut2 signal line Output 3 Reserved 4 RS232TX RS 232 serial port output 5 RS232RX RS 232 serial port input 6 MDI0 Fast Ethernet signal MDI0 7 MDI1 Fast Ethernet signal MDI1 8 DO_0 LineOut0 signal line Output 9 DI_2 LineIn2 signal line Input 10 DO_1 LineOut1 signal line Output 11 GND Signal ground Direct current power supply negative 12 Reserved 13 Reserved 14 MD...

Страница 14: ...I_1 LineIn1 signal line Input Note You should refer to the table above and the label attached to the power and I O cable to wire the device It is recommended to use the supplied 17 pin cable The 6th 7th 14th and 15th pin have been made as RJ45 connector The lines of other pins should be wired according to the actual demands ...

Страница 15: ...ut Signal The device s LineIn 0 1 2 are input signals and their internal circuit is as follows Note The maximum input current of input signal is 25 mA The breakdown voltage is 36 VDC Keep voltage stable Figure 3 1 Internal Circuit of Input Signal Figure 3 2 Input Logic Level ...

Страница 16: ...1 VDC to 24 VDC VCC 24 VDC 7 56 VDC to 12 VDC VCC 12 VDC Input Falling Delay TDF 1 3 μs to 3 5 μs Input Rising Delay TDR 1 3 μs to 3 5 μs Note VCC stands for Volt Current Condenser and it is the device s input voltage 3 2 Output Signal The device s LineOut 0 1 2 are output signals and their internal circuit is as follows Note The maximum output current of output signal is 200 mA Figure 3 3 Interna...

Страница 17: ...l low may differ Table 3 2 Output Electrical Feature Parameter Name Parameter Symbol Value Output Logic Level Low VL 212 mV Output Logic Level High VH 11 8 VDC Output Falling Delay TDF 0 4 μs Output Rising Delay TDR 0 4 μs Output Falling Time TF 0 4 μs Output Rising Time TR 0 4 μs 3 3 Input Signal Wiring The device can receive the external input signal via I O interface and here we take LineIn 0 a...

Страница 18: ...Ω pull down resistor Figure 3 5 Input Signal Connecting to PNP Device NPN Device Note If the VCC of NPN device is 12 VDC or 24 VDC and it is recommended to use 1 KΩ pull up resistor Figure 3 6 Input Signal Connecting to NPN Device Switch Note It is recommended to use 330 Ω pull down resistor ...

Страница 19: ... introduce output signal wiring Note Output signal wiring may differ by external device types The voltage of VCC should not higher than that of PWR Otherwise the device s output signal may have exception PNP Device Note It is recommended to use 330 Ω pull down resistor Figure 3 8 Output Signal Connecting to PNP Device NPN Device Note If the VCC of NPN device is 12 VDC or 24 VDC and it is recommend...

Страница 20: ...are commonly used serial ports as shown below You can refer to the table below for the specific pin name and function Figure 3 10 9 Pin Interface Figure 3 11 25 Pin Interface Table 3 3 Description Serial Port Type Pin No Name Function 9 Pin Interface 2 RX Receive data 3 TX Send data 5 GND Signal ground 25 Pin Interface 2 TX Send data 3 RX Receive data 7 GND Signal ground ...

Страница 21: ... You can refer to the serial port wiring below to connect the device with an external device Device Power PWR Device Power Ground External Device GND RS 232 Serial Port Output TX RS 232 Serial Port Input RX GND Figure 3 12 RS 232 Serial Port Wiring ...

Страница 22: ...ion You need to purchase separately 3 Network Cable 1 It refers to a RJ45 to RJ45 fast Ethernet cable You need to purchase separately 4 M4 Screw 4 It refers to the supplied M4 screw that is used to fix the device to installation position 4 2 Install Device Before You Start Make sure the device in the package is in good condition and all the assembly parts are included Make sure that all the relate...

Страница 23: ...te operations Steps Note Check the Windows version The client software is compatible with 32 64 bit Windows XP 7 10 You can get the client software installation package from https en hikrobotics com The graphic user interface may differ by different versions of client software you use 1 Double click the installation package to start installing the client software 2 Select the language 3 Read and c...

Страница 24: ...ol Panel System and Security Windows Defender Firewall 2 Click Turn Windows Defender Firewall on or off on the left 3 Select Turn off Windows Defender Firewall not recommended Figure 5 2 Windows Defender Firewall 4 Click OK 5 3 Set PC Network To ensure stable image transmission and normal communication between the PC and the device via client software you need to set the PC network before using th...

Страница 25: ...ure 5 3 Set PC Network 5 4 Set Device Network You can set and operate the device in the client software only when the device is in the same network segment with the PC where the client software is installed Steps 1 Double click the client software to run it 2 Click to find the device 3 Right click the device to be connected 4 Click Modify IP 5 Set the IP address of the device in the same network s...

Страница 26: ... 5 5 Connect Device to Client Software Make sure that your device IP address is in the same network segment with the PC where you installed the client software before connecting the device to it Double click the device name in the device list or click to connect the device to the client ...

Страница 27: ...splays function modules including Settings Tool View and Help 2 Control Toolbar The control toolbar provides quick operations for the device You can click different icons to start or stop batch acquisition change window layout view statistics information and device log 3 Device Configuration Area You can connect or disconnect device set parameters and modify device IP address in this area 4 Live V...

Страница 28: ...o Module Name Description 1 Device Connection You can connect or disconnect device modify device IP address view device information etc 2 Image Settings You can set image parameters light parameters etc 3 Algorithm Settings You can add different barcodes set barcode number etc 4 I O Control Settings You can set parameters related with input and output 5 Data Processing You can set filter rule for ...

Страница 29: ...evice Mode Table 7 1 Device Mode Description Device Mode Description Test Mode It is used during device debugging The device outputs images that are acquired in real time and displays code information Normal Mode It is used during device normal operation After reading code in image the device outputs image and code information Raw Mode It is used during testing image data The device outputs raw da...

Страница 30: ...ID3000 Series Smart Code Reader User Manual 21 Figure 7 2 Code Reading ...

Страница 31: ...ode algorithm the 2D code algorithm etc Refer to Code Algorithm Settings for details I O Control Settings It tells you how to set the parameters related to the control of input and output signals of device Refer to Signal Input Settings and Signal Output Settings for details Data Processing It tells you how to set filter rules for reading barcodes and other data processing related parameters Refer...

Страница 32: ...se gain to improve image brightness Note To some extent increasing gain will create more image noises and impact image quality Gamma Gamma allows you to adjust the image contrast It is recommended to reduce Gamma to increase brightness in dark background Acquisition Frame Rate Acquisition frame rate refers to the image number that is acquired by the device per second Acquisition Burst Frame Count ...

Страница 33: ...e polling function After the polling enabled the device acquires images with its max frame rate Once the polling disabled the frame rate you set in Acquisition Frame Rate takes effect The polling function specific parameters as well as parameter values may differ by device models Steps 1 Go to Image Settings Image Polling Enable and select Single as Polling Enable 2 Select one parameter e g Param1...

Страница 34: ...n For example if the Param3 is the Best Polling Group Idx and Param1 Param2 Param4 and Param5 are enabled the polling order is Param3 Param1 Param2 Param4 Param5 Steps 1 Go to Image Settings Image Polling Enable and select Multiple as Polling Enable 2 Set Polling Time and Polling Period according to actual demands 3 Select 2 to 8 sets of parameters e g Param1 and Param2 from Polling Param and enab...

Страница 35: ...ighting 8 Parameter 7 Exposure Time 7 Gain 7 Gamma 7 Lighting 7 Parameter 6 Exposure Time 6 Gain 6 Gamma 6 Lighting 6 Parameter 5 Exposure Time 5 Gain 5 Gamma 5 Lighting 5 Figure 8 4 Polling Diagram 8 1 3 Set Light Source You can select different light types and set their related parameters in the light interface Note Light source parameters may differ by device models Make sure you have selected ...

Страница 36: ... aiming light enable may differ by device model Lighting Selector You can click lamps on the light source illustration to turn on or turn off lamps on different directions Note The specific lighting selector may differ by device model For devices with 4 groups of lamps you can check All to turn on all lamps For devices with 6 groups of lamps you can click All On or All Off to turn on or turn off a...

Страница 37: ...Light Type you can set the following parameters Line Out Duration The lighting duration of the external light source and the unit is μs Line Out Delay Time It sets the delay time for lighting after device outputs event source and the unit is μs Line Out Ahead Time It sets how earlier the external light starts lighting before the device outputs event source information and the unit is μs 8 1 4 Set ...

Страница 38: ...y 3 Select the position parameter from Focus Position and click Execute in Focus Position Save to save the focus position 4 Optional Select the position parameter from Focus Position and click Execute in Focus Position Load to load saved focus position Figure 8 6 Auto Focus Manual Focus 1 Go to Image Settings Auto Focus and set Focus Step according to actual demands 2 Click or in Adjust Focus to a...

Страница 39: ...plicable to the scenario for high speed conveyer belt 3 Select Param Source according to actual demands Default Param It adjusts the default parameters Polling Param It adjusts parameters configured in polling 4 Optional Enable or disable Lighting Adapt during self adaptive adjustment If it is enabled the client software will select the best one from all lighting options during the self adaptive a...

Страница 40: ...led the image will be reversed in a horizontal way Go to Image Settings click All Features and you can see the Mirror X Note This function is enabled by default and it may differ by device models 8 1 7 Set Test Pattern Test pattern helps troubleshooting image problems and images in the test pattern are only for test When exceptions occur in images acquired by the device in real time you can check ...

Страница 41: ...nds Note For different models of the device the specific parameters may differ and the actual device you purchased shall prevail Selected symbology amount and added code amount may affect the code recognition time Note that selecting more symbologies or adding more codes may consume more time to recognize codes in the image No matter 1D code or 2D code up to 20 codes can be added at a time Note th...

Страница 42: ...e live view window 3 Optional Repeat the above step to draw multiple ROIs according to actual demands Note The client software only parse codes in the ROI you drawn 4 Optional Set other ROI parameters according to actual demands ROI Index It indicates different ROIs and ranges from 0 to 149 which corresponds 1 to 150 ROIs Draw ROI Width It refers to the width in algorithm ROI Draw ROI Height It re...

Страница 43: ...lution Area Size It sets the pixel quantity in the horizontal and vertical direction of the ROI ROI Number It sets the row and column quantity Row Spacing It sets the interval between rows Column Spacing It sets the interval between columns 3 Click OK after settings 4 Repeat other optional steps mentioned in drawing single group of ROI according to actual demands Figure 8 10 Draw ROI in Batch 5 Op...

Страница 44: ...rs according to actual demands and click OK after setting Figure 8 11 Create Chessboard ROI 3 Click after creating ROI and the red frame becomes green as shown below Figure 8 12 Draw ROI via Chessboard 4 Optional Click to restore the ROI to the full screen and click to clean all configured ROIs 5 Repeat other optional steps mentioned in drawing single group of ROI according to actual demands ...

Страница 45: ...ed shall prevail Timeout Value Timeout value refers to the maximum running time of algorithm and its unit is ms The code reader will stop parsing the images and return results if the time is exceeded the waiting time configured Code Color It defines the readable code color White Code On Black Wall means that the client software can recognize the white code with black background Black Code On White...

Страница 46: ...ed focuses on recognition speed and the algorithm can recognize the code rapidly while High Performance refers to the algorithm can recognize the code that has distortion spot or white gap but its recognition speed is slow Balance refers to the algorithm makes a balance between speed and performance 2D Code Max Size It refers to the max recognizable code width The 2D code will not be recognized if...

Страница 47: ...d Note For QR code the code color is determined by the color of the concentric square on it indicates that the code color is white and indicates that the code color is black Figure 8 13 White QR Code Figure 8 14 Black QR Code For DM code the code color is determined by the color of its L shaped sides White L shaped sides indicate that the code color is white and black L shaped sides indicate that ...

Страница 48: ...e code recognition rate Note If you enable this parameter the more time will be consumed to recognize the codes in the image Advance Param This parameter is applicable to some special codes and it is recommended to use the default value DM Code Shape It defines the recognizable code shape Square stands for square mode If the 2D code is square shaped it can be recognized by the device Rectangle sta...

Страница 49: ...applicable to the quality evaluation for label 2 dimensional codes Iso29158 is applicable to the quality evaluation for DPM format 2 dimensional codes 3 Set Verify Edition including standard mode and HIK mode Standard mode is a standard quality evaluation mode HIK mode is a professional quality evaluation mode 4 Set Standard Aperture and Magnification Standard aperture refers to a standard apertur...

Страница 50: ...st mode this function is enabled by default In normal mode you need to enable it manually The code score is determined by two factors including image quality and print quality of codes The range of code score is between 0 and 100 and the higher the score and easier the code can be read Steps 1 Right click the device in Device Connection and click Feature Tree 2 Go to Algorithm Control and enable C...

Страница 51: ...l signals like software signal and hardware signal The trigger source of external trigger mode includes software physical lines counter TCP UDP and serial 8 3 2 Enable Internal Trigger Mode In the internal trigger mode the device acquires images via its internal signals You have 2 methods to enable the internal trigger mode Click I O Control Settings Input Trigger Mode and select Off as Trigger Mo...

Страница 52: ...interval you set Figure 8 20 Set and Execute Software Trigger Mode Set and Execute Hardware Trigger Mode Steps 1 Click I O Control Settings Input Trigger Mode 2 Select On as Trigger Mode 3 Select the specific line as Trigger Source according to actual demands 4 Set Debounce Time and Line Out Trigger In Polarity according to actual demands Note When selecting Rising Edge or Falling Edge as Line Out...

Страница 53: ...s 1 Click I O Control Settings Input Trigger Mode 2 Select On as Trigger Mode 3 Select Counter 0 as Trigger Source 4 Set Trigger Delay Count Number Count Source and Line Out Trigger In Polarity according to actual demands Figure 8 22 Set and Execute Counter Trigger Mode Set and Execute TCP Trigger Mode TCP start specifies the TCP server as the source for the trigger signal When the server receives...

Страница 54: ...n as Trigger Mode and select UDP Start as Trigger Source Set Trigger Delay Udp Trigger Port and Udp Start Trigger Text according to actual demands Figure 8 24 Set and Execute UDP Trigger Mode Set and Execute Serial Port Trigger Mode Serial start specifies the serial port as the source for the trigger signal When the serial port receives the specified string text the trigger signal will be outputte...

Страница 55: ...gger Mode 2 Select On as Trigger Mode 3 Select Self Trigger as Trigger Source and set Self Trigger Period and Self Trigger Count 4 Click Execute in Self Trigger Start to start and click Execute in Self Trigger Stop to stop Figure 8 26 Set and Execute Self Trigger Mode 8 3 4 Stop Trigger The device supportsstopping trigger via TCP UDP I O and serial port You can also set code reading timeout durati...

Страница 56: ... IO Stop Trigger Selector you can click Execute in Software Stop Trigger to stop current trigger Figure 8 28 Software Trigger End Stop Trigger via Serial When the specified serial port receives the specified string text the trigger will be stopped The client software sends stop trigger command to the device after Serial Stop Trigger Enable is enabled You should enter Serial Stop Trigger Text Seria...

Страница 57: ...top Trigger Text according to actual demands The range of Udp Trigger Port is from 1025 to 65535 and the default port is 2002 Figure 8 30 Stop Trigger via UDP Stop Trigger via TCP When the TCP server receives the specified string text the trigger will be stopped The client software sends stop trigger command to the device after Tcp Stop Trigger Enable is enabled You should enter Tcp Trigger Port a...

Страница 58: ...r Mode is On This function means that the code quantity outputted by the device is restricted to the settings you configured here You can enable CodeNum Stop Trigger Enable and set CodeNum Stop Trigger Min and CodeNum Stop Trigger Max according to actual demands If the outputted code quantity is smaller than configured CodeNum Stop Trigger Min and the device will output codes continuously If the o...

Страница 59: ...ontrol Settings Output Line Out Selector to select output signal Figure 8 34 Select Output Signal 8 4 2 Enable Line Inverter The level inverter function allows the device to invert the electrical signal level of an I O line and meets requirements of different devices for high or low electrical signal level You can go to I O Control Settings Output Line Out Inverter to enable it Note The Line Out I...

Страница 60: ... Out Activation Event to select event source The device supports following event sources including Off Acquisition Start Active Acquisition Stop Active Frame Burst Start Active Frame Burst Stop Active Exposure Start Active Soft Trigger Active Hard Trigger Active Counter Active Timer Active No Code Read Read Success and Light Strobe Long Note You need to set different parameters when selecting thes...

Страница 61: ... time for outputting the output signal Line Out Duration It sets the time duration of the output signal Figure 8 37 Select Acquisition Start Active Select Acquisition Stop Active If acquisition stops the output signal will be triggered When you select Acquisition Stop Active as Line Out Activation Event you can set its output delay time and duration Line Out Delay Time It sets the delay time for o...

Страница 62: ...tput signal will be triggered When you select Frame Burst Start Active as Line Out Activation Event you can set its output delay time and duration Line Out Delay Time It sets the delay time for outputting the output signal Line Out Duration It sets the time duration of the output signal Figure 8 39 Select Frame Burst Start Active Select Frame Burst Stop Active Note The Frame Burst Stop Active is n...

Страница 63: ... 40 Select Frame Burst Stop Active Select Exposure Start Active Note For different models of device when selecting Exposure Start Active as Line Out Activation Event the specific parameters may be different The actual product you purchased shall prevail If you select Exposure Start Active as Line Out Activation Event you can set its output delay time duration and ahead time Line Out Delay Time It ...

Страница 64: ... signal manually Line Out Delay Time It sets the delay time for outputting the output signal Line Out Duration It sets the time duration of the output signal Line Trigger Software Click Execute for manually outputting the output signal Figure 8 42 Select Soft Trigger Active Select Hard Trigger Active If you select Hard Trigger Active as Line Out Activation Event you can set its output delay time d...

Страница 65: ...2 Hardware Trigger Activation It sets the trigger activation of input signal including Rising Edge and Falling Edge Figure 8 43 Select Hard Trigger Active Select Counter Active Counter active means that the counter triggers the output signal When you select Counter Active as Line Out Activation Event you can set its output delay time and duration Line Out Delay Time It sets the delay time for outp...

Страница 66: ...uration It sets the time duration of the output signal Line Out Period It sets the time period of the output signal Figure 8 45 Select Timer Active Select No Code Read If you select No Code Read as Line Out Activation Event you can set its output delay time and duration Line Out Delay Time It sets the delay time for outputting the output signal Line Out Duration It sets the time duration of the ou...

Страница 67: ...ay Time It sets the delay time for outputting the output signal Line Out Duration It sets the time duration of the output signal Figure 8 47 Select Read Success Select Light Strobe Long If you select Light Strobe Long as Line Out Activation Event you do not need to set any parameters 8 5 Code Reading Result Settings In Data Processing module you can set filter rules for reading barcodes and other ...

Страница 68: ... rule and data processing parameters may differ with different device modes and trigger modes 8 5 2 Set Filter Rule You can set rules to filter unwanted barcodes to improve the reading efficiency in Filter Rule Two filter modes are available including normal mode and regular expression mode You can set it in Filter Mode Note The filter rule parameters may differ with different device modes and tri...

Страница 69: ...of a barcode is shorter in terms of the number of characters contained in the barcode than the configured value the device will not parse the contents of the barcode The valid value is from 1 to 256 For example if you set the value as 6 the device will not parse the contents of the barcodes which contain less than 6 characters Max Code Length If the length of a barcodeis longer in terms of the num...

Страница 70: ...et at the same time Once one regular expression is met code can be outputted Regular Expression Filter It sets the specific regular expression contents Min Code Length If the length of a barcode is shorter in terms of the number of characters contained in the barcode than the configured value the device will not parse the contents of the barcode The valid value is from 1 to 256 For example if you ...

Страница 71: ...net IP ModBus Fins and SLMP as the communication protocol when the device mode is Normal For details about communication protocol see section Communication Settings for details The specific parameter names and values may differ by device firmware versions Result Output via Smart SDK When the communication protocol is Smart SDK device mode is Normal and trigger mode is On you can set following para...

Страница 72: ... Local Override Strategy Local Picture Name Content It selects what contents you want to display in file name including frame time trigger No and frame No Local Time Format It selects a format type from the drop down list for the time stamp contained in the file name Take YYYYMMDD_HHMMSSFFF as an example from the left to the right YYYY represents year MM represents month DD represents date HH repr...

Страница 73: ...device will save images when the disk is safe in terms of storage space If the available disk space is lower than configured value and images will be deleted Local Override Max Count You need to set this parameter when selecting Max Count or Loop Max Count as Local Override Strategy Local Picture Name Content It selects what contents you want to display in file name including frame time trigger No...

Страница 74: ...in the file name Take YYYYMMDD_HHMMSSFFF as an example from the left to the right YYYY represents year MM represents month DD represents date HH represents hour MM represents minute SS represents second and FFF represents millisecond FTP Result Prefix It sets the prefix of FTP file name including No Result and All No stands for no prefix for file name and all images are saved in FTP root directory...

Страница 75: ...that the device will save image quantity configured in Local Override Max Count and no more imaged will be saved when the disk is full Loop Max Count means that after the image quantity is reached the number configured in Local Override Max Count the device will delete the first image and continue to save the latest image Reserve Space means that the device will save images when the disk is safe i...

Страница 76: ...ion Profinet Output Barcode Enter Character Enable If it is enabled enter character will be outputted Profinet Output Barcode Newline Character Enable If it is enabled a newline will be outputted Profinet Output Barcode Carriage Return Enable If it is enabled a carriage return will be outputted Profinet Add NoRead Enable You can add contentsto let the device output codes when the code recognized b...

Страница 77: ...t the device reads with preset contents and outputs comparison result Steps 1 Right click the device in Device Connection and click Feature Tree 2 Go to Contrast Control enable Contrast Enable and select Regular as Contrast Rules 3 Set Start Position that means the stating position of the comparison 4 Set Character Number that means the comparison quantity 5 Set code contents in Wildcard String No...

Страница 78: ...hen the preset value will become 0 The base value displays the preset value 6 Optional Click Execute in Contrast Reset to reset comparison After that the client software will use the first code it reads as the preset value Here we take start position 3 digital number 2 and step 2 as an example to explain the consecutive number comparison If the first code that the device reads is ur96k and then th...

Страница 79: ...rial FTP Profinet Melsec Ethernet IP ModBus Fins and SLMP communication protocols and you need to set corresponding parameters Note The specific communication parameters may differ by device models and firmware 8 7 1 Smart SDK If Smart SDK is selected as the Communication Protocols you can enable SmartSdk Protocol to let the device output data via Smart SDK Encode JPG Flag If enabled the device wi...

Страница 80: ...TCP Client If TCP Server is selected as the Communication Protocols you can enable TCP Server Enable and enter TCP Server Port Figure 8 53 TCP Server 8 7 4 Serial If Serial is selected as the Communication Protocols you can enable Serial Protocol enter Serial Baud Rate Serial Data Bits Serial Parity and Serial Stop Bits ...

Страница 81: ...as the Communication Protocols you can enable FTP Protocol enter FTP Host Addr FTP Host Port FTP User Name and FTP User PWD Figure 8 55 FTP 8 7 6 Profinet If Profinet is selected as the Communication Protocols you can enable Profinet Enable and set Profinet Device Name according to actual demands ...

Страница 82: ...MELSEC Destination Port It sets the port number of the target PLC MELSEC Data Base Address It sets the first address of the data area MELSEC State Base Address It sets the first address of the status area MELSEC Network Number It sets the network No MELSEC PLC Number It sets the PLC No MELSEC Module I O Number It sets the target module s I O number MELSEC Module Station Number It displays the modu...

Страница 83: ...P Figure 8 58 Ethernet IP 8 7 9 ModBus If ModBus is selected as the Communication Protocols you can enable ModBus Enable and set related parameters according to actual demands ModBus Mode It includes server and client and is server by default Note If client is selected as ModBus Mode you need to set ModBus Server IP ModBus Server Port and ModBus Scan Rate ms ModBus Control Address Space It is hold...

Страница 84: ...e Address Offset It is 0 by default ModBus State Data Number It is 2 by default ModBus Result Address Space It is input_register by default ModBus Result Address Offset It is 4 by default ModBus String Byte Swap If it is enabled string byte is saved by big endian If it is not enabled string byte is saved by little endian Figure 8 59 ModBus 8 7 10 Fins If Fins is selected as the Communication Proto...

Страница 85: ...he device reads the server s control register and the unit is ms Fins Control Area It is saved in DM area by default Fins Control Addr You can set it according to actual demands Make sure that each area cannot be overlapped and covered Fins State Area It is saved in DM area by default Fins State Addr You can set it according to actual demands Make sure that each area cannot be overlapped and cover...

Страница 86: ...g to actual demands SLMP Dst Addr It sets the IP address of the target PLC SLMP Dst Port It sets the port number of the target PLC SLMP Data Base Addr It sets the first address of the data area SLMP State Base Addr It sets the first address of the status area SLMP Network Num It sets the network No SLMP PLC Num It sets the PLC No SLMP Module I O Num It sets the target module s I O number ...

Страница 87: ...values with all the settings needed to control the device and you can save load and switch different user sets Save Settings If you have set the device parameters as desired you can save them into the user set Go to Config Management Save Settings and click UserSet1 UserSet2 or UserSet3 to save the current device settings Load Settings You can load the user set to restore the device to the saved g...

Страница 88: ...eed to set device mode as Normal before using this function Go to feature tree find Statistics Info and select Statistics Mode according to actual demands Two statistics modes are available All Frames means that the client software will display all data since the device is powered on Latest Frames means that the client software will display data of the last 10 frames Refer to the table below for s...

Страница 89: ...s Read Time Max The max time of code reading and the unit is ms Read Time Min The min time of code reading and the unit is ms Reset Statistics Click Execute to reset statistics information Figure 8 63 Statistics Information 8 10 Event Report The diagnose event report function in the feature tree monitors memory and CPU usage rate and let you know when there is a crash higher CPU usage rate insuffi...

Страница 90: ...ID3000 Series Smart Code Reader User Manual 81 below You can click Execute in Reset Event to clear all information Figure 8 64 Event Report ...

Страница 91: ...quired before device operation 9 1 Live View You can view the real time image in the live view window Click in live view window to start live view or click to stop Figure 9 1 Live View 9 2 Enable Acquisition Enabling acquisition allows the device to acquire the real time stream Click in live view window to start acquisition or click to stop You can also right click the device on the device list an...

Страница 92: ...w to add cross line and click beside to open the editing window to set cross line parameters Figure 9 3 Add Cross Line 9 4 Start Recording During live view you can record video files and capture images continuously Note Enabling acquisition is required before recording Click in live view window to start recording and click the icon again to stop You can also click beside and then click to capture ...

Страница 93: ... click Custom to customize window division as you desired Figure 9 5 Split Window 9 6 View Reports During acquisition or live view you can view the reading status of the device Click in control toolbar to open the statistics window to view the detailed information Read Code Images refers to the number of the images on which the barcodes are read by the device Unread Code Images refers to the numbe...

Страница 94: ...device errors warning and informational log etc Figure 9 7 View Log 9 8 Set Time After enabling NTP time synchronization the device will synchronize time according to the configured interval Steps 1 Go to Config Management and find Timing 2 Click Setting and enable NTP Enable 3 Set parameters according to actual demands Note Configure NTP server settings before using NTP time synchronization funct...

Страница 95: ...NTP Timing 9 9 Enable Device Auto Work This function allows the device to automatically enter the operating status after being powered on You can go to Config Management Device Auto Work Enable and enable Device Auto Work Enable Figure 9 9 Enable Device Auto Work ...

Страница 96: ...vice will reboot automatically after updating the firmware Select the device to be updated in the device list right click the device and click Firmware Update Click to select update file from local PC and click Update to update firmware Note You can also go to Tool Firmware Updater to update firmware Figure 10 1 Update Firmware 10 2 Reboot Device You can reboot the device via client software in 2 ...

Страница 97: ...ID3000 Series Smart Code Reader User Manual 88 Figure 10 2 Reboot Device ...

Страница 98: ... it in normal condition Solution Increase the brightness of supplement light appropriately or change to a brighter one Increase exposure and gain appropriately Increase exposure and gain appropriately 11 2 Why the image s frame rate is very low in the live view Problem Image incoherent Low frame rate Image tearing when adjusting the view preview Reason Network circuitry speed is not 100 Mbps Solut...

Страница 99: ...ve whether the top LNK light is flashing green or not to make sure the device can be connected to the network normally PC port and the device are in the same network segment 11 4 Why there is no image in the live view Problem No image in the live view Reason Enabled trigger mode but there is no trigger signal Network circuitry speed is not 100 Mbps Solution Sent the trigger signal to the device Di...

Страница 100: ...ptive Adjustment Modify section Set 1D Algorithm Parameter Modify section Set 2D Algorithm Parameter Add section Set Code Quantity Evaluation Add section Set Stack Code Algorithm Parameter Modify section Set Code Reading ROI Modify section Set Filter Rule Modify section Set Result Format Add section Contrast Control Settings Add section Fins Add section Statistics Information Add section Event Rep...

Страница 101: ...UD27155B ...

Отзывы: