background image

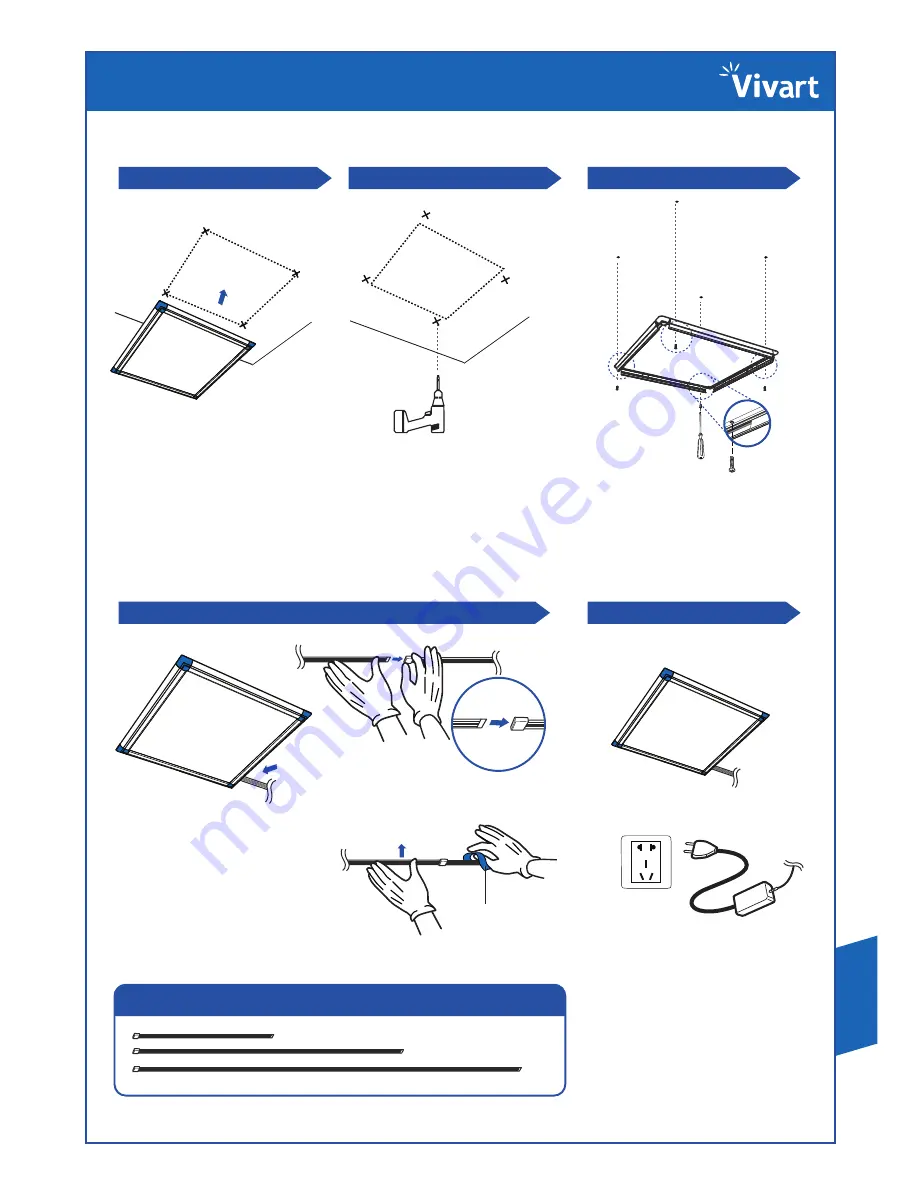
Installation of the product in a new location

1. Choose the location

Decide where to install the product.
Product location should have 

good interior effect, flat side and

be easily drillable 
(needed for hole(s) for bolts).

3. Attach with bolts

Attach product to ceiling with 
four bolts.

4. Flat cable extension/connection: 

Take off adhesive tape from flat cable 

and fix it on the ceiling

[Purchased separately]

You can extend the length by connecting 

1M

2M

3M

Extension flat cable 

and gender

Adhesive Tape

5. Finish installation

Connect the enclosed adapter, and 

turn on the power to finish installation.

After fixing flat cable extension/cellar

**Using the Flat cable for the cable exposed.

Extension flat cable types are sold separately 

(Depending on the area, choose 

an appropriate size and connect)

4 bolts are needed when 
installing product in new 

location, and, in this case, 

installation is easy and 

flat cable is utilized.

2. Appoint location of the hole

Drill final product hole(s) according 

to product size. 
Caution: pierce the hole according 

to above picture if one’s ceiling is 
constituted of strong materials.  

If it is wood/plaster board, one 

does not need to drill holes to install.

Содержание Vivart HFL03320K57W06

Страница 1: ...www hgm21 com P No OM 2011 L001 Light Management Solution Light is ART SnapType VIVART FLAT LIGHT...

Страница 2: ...low temperatures 30 and high temp 80 the complete product with a heat sink implemented through DHFS Dual Heat Sink Frame system that operates well in any condition Fields of Application TFT LCD Monit...

Страница 3: ...light is switched o in unusual way please handle the product after turning o the power If splashed with water please use only after removing all water or moisture While replacing artwork film or other...

Страница 4: ...ectric shock or fire Do not touch product with knifes or sharp objects To preserve brightness and degree of uniformity of DSE processed sheet and the LED modules there should be no scratches or stains...

Страница 5: ...K 0 6 Kg HFL03333K57W12 330 x 330 x 10 5 12 W DC 48V 880 170 75 5 700 K 0 8 Kg HFL05050K57W36 500 x 500 x 10 5 36 W DC 48V 2650 170 75 5 700 K 1 5 Kg HFL06220K57W12 620 x 200 x 10 5 12 W DC 48V 880 1...

Страница 6: ...s wood plaster board one does not need to drill holes to install 3 Wire connection 4 Checkpower productcondition 5 Attach the product 6 Installation complete Connect product s adapter to the wire that...

Страница 7: ...sive Tape 5 Finish installation Connect the enclosed adapter and turn on the power to finish installation After fixing flat cable extension cellar Using the Flat cable for the cable exposed Extension...

Страница 8: ...is done All LEDs cannot emit the light uniformly but it is unrelated to the degree of uniformity of the light emitted by the whole product 4 Change film Put in the film that one wishes to display usua...

Страница 9: ...g in another product s power cord to the outlet and observe If another product is not functioning please fix the outlet Check if the adapter is overheated or has a burning smell Change the adapter if...

Страница 10: ...ct use extend product s life span Product damage due to other mistakes made by the customer Product Name Purchase date year month day Customer s name Store Phone number Phone number Model Name Address...

Страница 11: ...MEMO...

Страница 12: ...ice Before calling Knowing exact product model fault status phone number and address will get you faster service 2F AZA Bldg 7 Yeongdeunpodong 3 ga Yeongdeunpo gu Seoul Korea Suggestions inquiry new d...

Отзывы: