background image

As mentioned earlier, we used the Hitec

#54403 after-market

micro switch assembly for this model. You can certainly use a
standard switch assembly but these are typically much bulkier and
weigh more - your call.

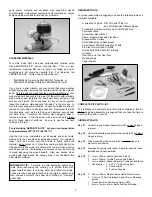
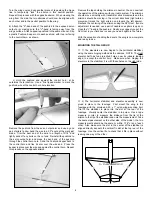
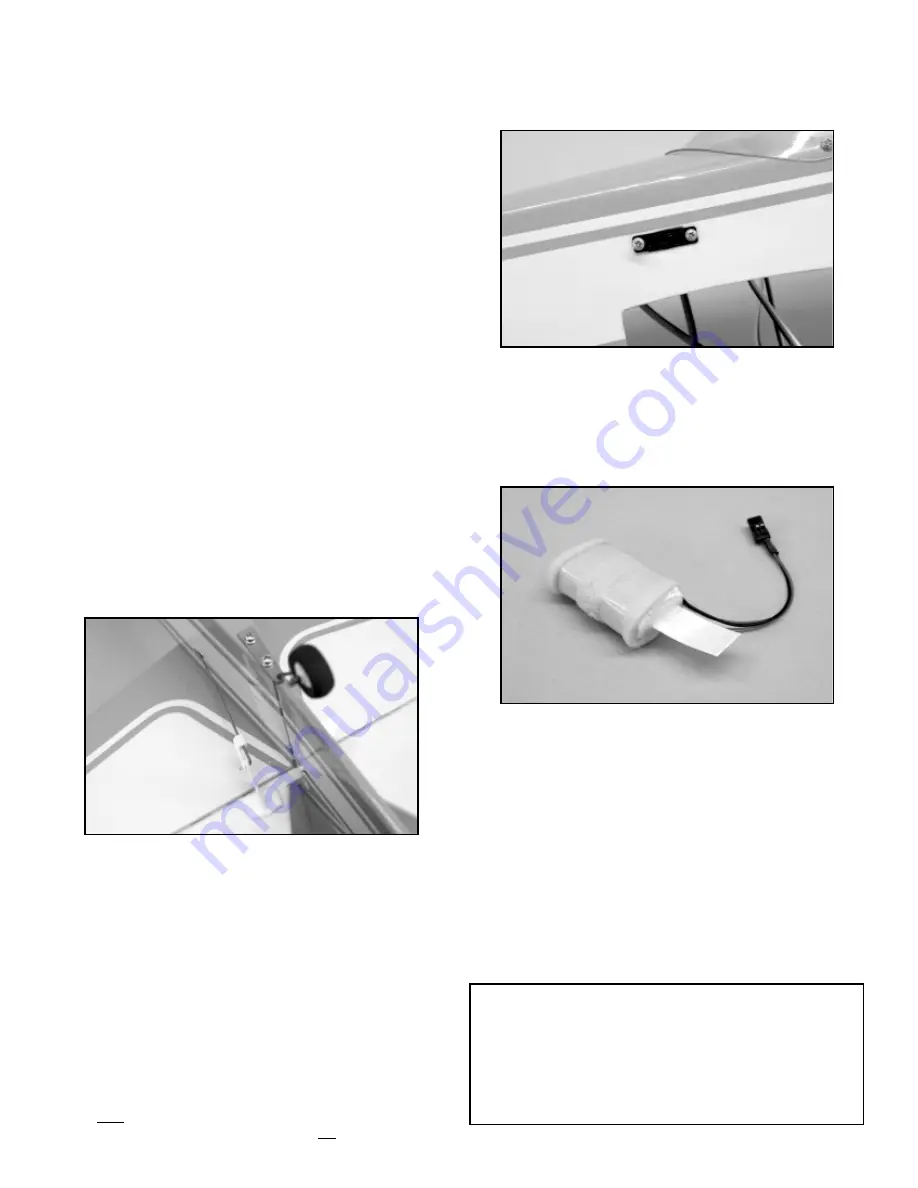
6) The battery pack is installed into the fuselage through the

wing saddle and placed into the space directly beneath the fuel
tank. In order to make the pack a little more easily removable, we
first wrapped it with a little filament tape, forming a "tab" at one
end. When the pack is inserted into the space beneath the tank,
the tab is left hanging out of the opening. This allows you to
remove the pack if ever necessary.

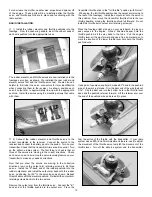
7) The receiver is now installed into the fuselage. First make

each of the servo connections to the appropriate receptacles in
the receiver. Also plug the switch connector into the receiver.
Wrap the receiver in foam and place it into the forward 
compartment, just behind the fuel tank.

For battery charging 

purposes, leave the switch connection to the battery pack 
accessible within the fuselage.

Likewise, leave the 6" aileron

servo extension lead out and accessible within the fuselage for
easy connection to the aileron "Y"-harness. Use additional small
pieces of foam to wedge the receiver within the compartment.

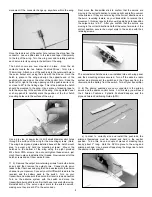
The receiver antenna is now routed out of the fuselage and back
to the rear of the airplane. To do this, drill a small hole in the side
of the fuselage to exit the antenna. Secure it at the rear of the
fuselage with a small hook and a rubber band.

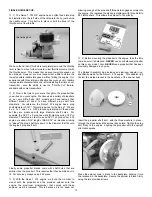
Re-install the output arm retaining screw in the throttle servo.
Reassemble the muffler and needle valve back onto the engine.
Trim the silicon fuel tubes to fit onto the carburetor and muffler
pressure nipple. Be sure to leave enough slack to easily grip
these tubes for fueling purposes.

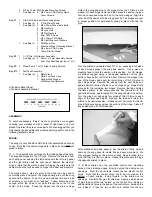
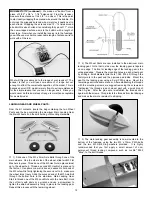
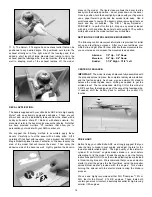
3) From the kit contents, locate the two remaining nylon 

control horns. These are now mounted to the rudder and elevator.
Apply thick CA glue to the two spikes on one of the horns. Apply
another dab of glue to the bottom of the control horn base. Press
the horn in place, into the holes in the bottom of the right elevator
half. Use the same method to mount the rudder control horn in
place to the bottom left side of the rudder.

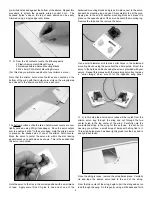
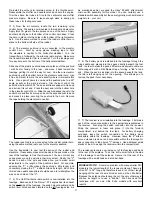
4) The elevator pushrod is now connected to the elevator 

control horn.

Start by using pieces masking tape to hold 

the elevators in neutral to the horizontal stabilizer.

Turn the 

transmitter on, followed by the airborne radio system. Make sure
the transmitter elevator trim is in neutral. Turn the fuselage over
for easy access to the bottom of the horizontal stabilizer.

Slide one of the plastic pushrod keepers in place onto the pushrod
- with its arm facing to the rear - and move it back toward the 
fuselage, getting it out of the way for now. Line the wire elevator
pushrod up with the bottom hole in the elevator control horn. Use
a fine tip marker to mark the wire exactly where it intersects this
hole. Use a pair of pliers to now bend the pushrod wire to a 90

O

angle, exactly at the mark just made. Trim the bent end of the
pushrod wire to within 3/16" and use a little sandpaper to clean up
and burrs at its cut end. Press the bent end into the bottom hole
in the elevator control horn. Slide the pushrod keeper back to the
control horn and flex its arm up and over the exposed pushrod end
and press it in place, securing the pushrod to the horn. Remove
the tape holding the elevators in neutral.

The rudder pushrod is now connected to the rudder control horn,
using the same method just used for the elevator pushrod.

Use the transmitter to now test the action of the rudder and 
elevators. If necessary, make small bends in the pushrods, at the
rear of the fuselage, to free their movement. You do not want any
undue pressure on the servos in their movement. Finally, the "V"
bends in each of the wire pushrods allow you to make small
adjustments in the length of the pushrods itself. For example,
opening the "V" a little makes the pushrod a little longer and 
conversely, closing the "V" a little shortens its length. Each time
this is done, needle nose pliers should be used to re-straighten the
wire on each side of the "V".

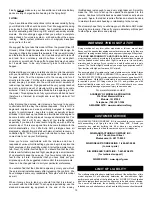
5) The On/Off airborne radio switch is now installed into the

fuselage. Because both the Norvel

.074 engine has its exhaust

on the right side of the fuselage, the switch mount doubler and its
switch lever hole have been located on the left fuselage side. As 

11

MODELER'S TIP: A common problem with many smaller R/C
models is the typical length of the receiver antenna. These are
often 30" to 36" long and therefore leave a lot of their length
hanging off the rear of a small model, such as the Little Extra.
Because the antenna should never be cut, the only other way to
shorten its length is to use a "bobbin". We have used this 
technique with our own Little Extra models with excellent
results.

Содержание little extra

Страница 1: ...ger fun fly type sport models the Little Extra is loaded with a lot of features and truly exhilarating performance potential The airframe is very light beautifully built and engineered to last a long time The covering has been professionally applied and the trim scheme is just about perfect for this type of model The assembly process is very quick and further enhanced by the completeness of the ki...

Страница 2: ...h the iron when working around any seams Overheating a seam may cause the covering to creep exposing the wood beneath Also use caution when working with heat around the canopy area heat will distort this clear plastic material REQUIRED TOOLS For proper assembly we suggest you have the following tools and materials available A selection of glues SIG Thin and Thick CA and SIG Kwik Set 5 Minute Epoxy...

Страница 3: ...the pre cut hinge slots in the wing panel up to the hinge slot cut out Place a card wedge into each hinge center and then press the aileron in place onto each exposed hinge half up to the card wedges Align the outer tip of the aileron with the wing panel tip The hinges are now in proper position for permanently gluing in place with thin CA glue Flex the aileron downward about 30O or so exposing bo...

Страница 4: ...ply some thick CA glue to one end of one of the hardwood mounting blocks and press it in place next to the servo beneath its mounting lug and use CA accelerator to set the glue Apply glue to the end of another mounting block and press it in place on the opposite side of the servo beneath the mounting lug Remove the tape and the remove the servo Use a small diameter drill to make pilot holes in the...

Страница 5: ...o leads to the Y harness and plug the Y harness lead into the aileron channel in your receiver Connect your On Off switch lead into the receiver and the battery pack to the switch Turn on your transmitter and make sure the aileron trim lever is in dead neutral Turn on the airborne system with the switch and move the transmitter aileron stick to confirm that he servos are both moving Reinstall both...

Страница 6: ...measurement on the other side of the model the two measurements should be the same or within 1 16 or so of each other Also make sure the slot in the center of the stabilizer is aligned directly beneath the vertical fin slot at the top rear of the fuselage Use the vertical fin to check that it fits in place without leaning one way or the other Turn the wing over and use another piece of tape along ...

Страница 7: ...tabilizer elevator assembly carefully back in place into the fuselage Once again align the stabilizer squarely to the fuselage per the above instructions With everything aligned set the model on a flat surface and stand back a few feet to view it directly from the front The stabilizer should be parallel with the wing in front view If it is tilting one way or the other use tape or small weights to ...

Страница 8: ...ct or small diameter drill bit to clear out this hole to allow clearance for the rudder control horn mounting spikes 6 The tail wheel mounting plate is now secured to the bottom rear of the fuselage with the two M2 x 6mm PWA screws included with the tail wheel assembly Slide the mounting bracket up to the fuselage and hold it centered in place to the bottom of the fuselage Use a marking pen or poi...

Страница 9: ...front guide the tank through the fuselage wing saddle and into the tank former Continue pulling the string until the stopper assembly fits into the round cut out in the front face of the firewall From the rear push the tank firmly into position as far forward as it will go The silicon sealer will form a very nice gasket protecting the inside of the fuselage from fuel 2 The balsa Fuel Tank Retainer...

Страница 10: ... radio system RADIO INSTALLATION 1 Install the rudder elevator and throttle pushrods into the fuselage From the open wing saddle insert the unbent ends of each wire pushrod into the appropriate tubes The rudder elevator and throttle servos are now installed onto the fuselage servo tray as shown We installed the rear rudder and elevator servos first and the throttle servo last We also found it help...

Страница 11: ...g tape to hold the elevators in neutral to the horizontal stabilizer Turn the transmitter on followed by the airborne radio system Make sure the transmitter elevator trim is in neutral Turn the fuselage over for easy access to the bottom of the horizontal stabilizer Slide one of the plastic pushrod keepers in place onto the pushrod with its arm facing to the rear and move it back toward the fusela...

Страница 12: ...n place Thread one of the M3 Hex Nuts in place almost up to the wheel hub Thread a second M3 Hex Nut in place up to the first nut Use pliers or a metric box end wrench to hold one of the M3 nuts while firmly tightening the second nut to it make sure the wheel turns freely Slide the exposed end of the M3 Axle Bolt through the bottom hole in the aluminum Main Landing Gear Start to thread one of the ...

Страница 13: ...n even lower idle speed can be obtained However you must experiment a little to obtain the lowest possible reliable idle speed without killing the engine Our experience with this simple modification has given us very reliable low speed idle characteristics and after adjusting the trims on our transmitter even the ability to use the Throttle Cut feature available with some transmitters 2 Now is the...

Страница 14: ... engines makes break in a must before attempting to fly the model Break the engine in per the factory instructions and DO NOT use the molded plastic spinner provided in this kit during break in We recommend that you use an electric starter to start the engine the first few times using the propeller spinner thrust washer provided with the engine This avoids burning the spinner with the electric sta...

Страница 15: ...this model Such conditions are always best for evaluating and trimming R C aircraft especially smaller models We also strongly suggest that you perform a complete range check of your radio system with and without the engine running Radio system problems will not magically disappear once you re in the air We suggest that you take this model off from the ground Rise Off Ground While it might be poss...

Страница 16: ...16 HERR LITTLE EXTRA LOG BOOK Date of first flight Comments ...

Отзывы: