4
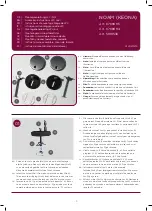
Instalación Taza
/ Bowl Installation
tubo de
drenaje
barreno
Coloque el tanque acostado sobre su respaldo en una superficie
suave, posteriormente coloque el empaque esponjoso (incluido)
en la parte inferior del tanque, enrosque la extensión (incluída).
/
Place the tank lying on its back of a soft surface, then place the
foamy gasket (included) into the bottom of the tank , screw the
extension (included).
tuerca (incluida)
pija
(incluida)
pija con
tuerca
tubo de
drenaje
3
Instale el cuello de cera (no incluido) o la brida sanitaria (no incluida) y coloque la taza
presionando hacia abajo.
/ Install the wax ring (not included) or toilet flange (not included)
and place the bowl by pressing down.
drill hole
Inserte la rondana y enrosque la tuerca
en la pija, para fijar la taza.
/
Insert the
washer and screw the nut to fix the bowl.
drain tube
lag with nut
nut (included)
lag
(included)
drain tube
drain
Wall Finished
Vista Superior
/ Top View
90°
Muro Terminado
15,2 cm
(5,98”)
válvula de paso (no incluida)
20 cm
(7,8”)
desagüe
shut off valve (not included)
Trace sus líneas como se indica.
/ Trace
lines as indicated.
No apretar las tuercas más de lo necesario,
para evitar daños a su producto.
Not tighten the nuts more than necessary,
to avoid damgae.
Barrene con broca de Ø 3/8” para
concreto (no incluida) y coloque los
taquetes (incluidos) en los barrenos.
/ Drill with Ø 3/8" drill bit concrete
(not included) and place the anchors
(includes) into the holes.
Enrosque las pijas (incluidas) en los
taquetes al piso.
/ Screw the lags
(included) in the ground anchors.
taquetes
(incluidos)
anchors
(included)
2
30,5cm
(12,0”)
instalación con cuello de cera
wax ring installation
instalación con brida sanitaria
toilet flange installation
3
2
5
6
7
4 cm mín.
(1,57" min.)
tuerca
nut
rondana
washer
Utilice el kit de fijación al piso incluido en el producto.
Use the floor fixing kit included in the product.
desagüe
use these holes
to see the
installation
drain
utilice las mirillas
para visualizar
la instalación
brida sanitaria
(no incuida)
toilet flange
(not included)
empaque
esponjoso
(incluido)
foamy gasket
(included)
Verifique que esté colocado el
o’ring en la extensión. /
Verify
that the o-ring is placed in the
extension.
cuello de cera
(no incuido)
wax ring
(not included)
extensión
(incluida)
extension
(included)
válvula de alimentación
15/16"-14 NS-1
fill valve
15/16" - 14 NS-1
Coloque el tanque en la taza.
/ Place the tank over the bowl.
tanque
taza
tank
bowl
8


