background image

3

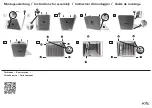
Conexiones Eléctricas

 Electric Connections

 /

12

water supply line

suministro de 

agua

8

9

10

½-14-NPSM

 hose (not 

included)

manguera

½-14-NPSM
(no incluida)

check valve

válvula check

11

13

Purge the water supply line 
before connecting the 
hose. Do not forget to keep 
closing the water supply 
untill finish installation.


Purgue la línea de 
suministro de agua antes 
de conectar la manguera. 
No olvide mantener el 
suministro de agua 
cerrado hasta terminar con 
la instalacion.

Purge the supply line by opening and 
closing it. /

 Purgue la línea de 

alimentación abriéndola y cerrándola.

hose 

(included)

manguera 

(incluida)

electronic module 

connector

conector del módulo 

electrónico

Screw the hose to the electronic module 
check valve and to the supply line (not 
included). / 

Enrosque la manguera a la 

válvula check del módulo electrónico y 
a la línea de alimentación (no incluido).

Unscrew the screws to open the electronic module. / 

Desenrosque 

los tornillos para abrir el módulo electrónico. 

screw

tornillo

 electronic module

módulo electrónico

Unscrew the fixing nut and pass the wires through it, proceed to 
insert the wires into the electronic module stud and screw the fixing 
nut onto the stud. / 

Desenrosque la tuerca de apriete y pase los 

cables  por  su  interior,  proceda  a  introducir  los  cables  en  el 
espárrago del módulo electrónico y enrosque la tuerca de apriete 
en el espárrago.

electronic module

módulo electrónico

stud

espárrago

fixing nut

tuerca de apriete

Connect the sensor connector to the batteries holder connector, connect the red power connector to the (+) terminal of the solenoid valve, connect 
the black power connector to the (-) terminal of the solenoid valve. / 

Conecte el conector del sensor al conector del porta baterías, conecte el conector 

de alimentación rojo a la terminal (+) de la electroválvula, conecte el conector de alimentación negro a la terminal (-) de la electroválvula.

solenoid valve

electroválvula

sensor connector

conector del sensor

red power connector

conector de alimentación rojo

black power connector

conector de alimentación negro

batteries holder connector

conector del 

porta baterías

Verify that batteries are 

installed. / 

Verifique que las 

baterías estén instaladas.

 supply line

línea de 

alimentación

Screw the hose (included) to the 
electronic module connector. / 

Enrosque la manguera (incluida) al 
conector del módulo electrónico.

Содержание ALFA UTV-297

Страница 1: ...ge please read all instructions before installing the product Wear safety glasses For any construction installation alteration extension or repair comply with your local building codes The product s illustration may vary in appearance to the actual product as result of the continuous improvement process it is subject to Agradecemos su elección por los productos HELVEX Estamos seguros de que su con...

Страница 2: ...te el módulo electrónico incluido marque y barrene elecronic module included módulo electrónico incluido Insert the anchors included and screw the lag screws included Inserte los taquetes incluídos y enrosque las pijas incluídas anchor taquete lag screw pija Unscrew the nut remove the washer and the tapered gasket from the stud Desenrosque la tuerca retire la rondana y el empaque cónico del espárr...

Страница 3: ...ugh it proceed to insert the wires into the electronic module stud and screw the fixing nut onto the stud Desenrosque la tuerca de apriete y pase los cables por su interior proceda a introducir los cables en el espárrago del módulo electrónico y enrosque la tuerca de apriete en el espárrago electronic module módulo electrónico stud espárrago fixing nut tuerca de apriete Connect the sensor connecto...

Страница 4: ...e zona de detección 1 9 9 8 5 cm 25 cm The faucet deactivates 1 second after moving your hand away or after 30 seconds of operation La salida se desactiva 1 segundo después de retirar su mano o después de 30 segundos de operación Ajuste de Distancia de Detección Detection Area Adjustment Open the electronic module remove and reinsert the batteries holder connector reassemble Abra el módulo electró...

Страница 5: ...uz roja parpadeará y dejará de operar la llave red flashing luz roja parpadeando Open the electronic module disconnect the sensor connector from the batteries holder connector remove the batteries Abra el módulo electrónico desconecte el conector del sensor del conector del porta baterías proceda a retirar las baterías Replace with 6 AA alkaline batteries connect and close the cap back in by tight...

Страница 6: ... page 5 step 22 and 23 Limpie el filtro de la válvula check página 5 paso 22 y 23 Clean the aerator page 5 step 24 and 25 Limpie el aireador página 5 paso 24 y 25 Verify the minimum pressure specifications page 1 Verifique las especificaciones de presión mínima página 1 Verify that the detection area is not obstructed Verifique que no se obstruya el área de detección Posibles Causas y Soluciones T...

Отзывы: