background image

HRS-3.1 CONNECTION AND CONFIGURATION...

6

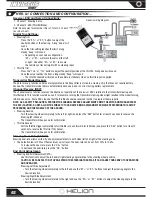
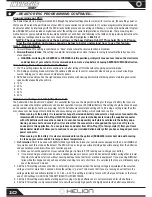
Receiver, ESC and Servo Connections:

1.  Channel 1: Steering Servo
2.  Channel 2: ESC (Throttle/Brake)

Note: An easy way to remember this is 1 to turn, 2 to burn 
( as in burn-out ).

Digital Trim Settings:

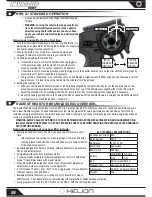
• Steering Trim


› Press the “ST+” or “ST-“ button to adjust the 

neutral position of the steering.  A long “beep” will 
sound


› Once the trim setting reaches the limit, a long 

steady “beep” will sound


» Depending on your servo confi guration, 

“ST+” or “ST-“ will move the servo either left 
or right.  Use either “ST+” or ST-“ to ensure 
the vehicle can track straight with no steering input

• Throttle Trim


› Press the “TH+” or “TH-“ button to adjust the neutral position of the throttle.  A long beep will sound


› Once the value reaches the limit, a long steady “beep” will sound


» The throttle should be trimmed so the vehicle is stationary when no throttle input is applied

Transmitter Model Backup:

The data for every function and model programmed to the transmitter is stored in a memory chip that does not require battery 
backup. The transmitter model data is automatically backed up, and is not lost during battery replacement.

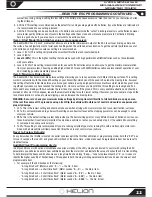
Channel Reverse (REV):

The channel reverse function reverses the direction of operation of the servos or ESC’s relative to the transmitter steering and 
throttle inputs. This function would be used if, for example, turning the transmitter steering wheel right resulted in the model turning 
left and vice versa. Some ESC’s require that the throttle channel be reversed in order to program them properly.

NOTE: AS A SAFETY PRECAUTION, PERFORM THE CHANNEL REVERSE ADJUSTMENTS WITH THE MOTOR UNPLUGGED FROM 
THE ESC (CAUTION: DO NOT ALLOW THE WIRES TO TOUCH AFTER BEING DISCONNECTED WHILE PERFORMING THIS SETUP 
PROCEDURE) AND THE WHEELS OFF THE GROUND.

• Steering Reverse:


› Turn the steering wheel completely to the left (or right) and press the “REV” button for at least 2 seconds to reverse the 

Steering (ST) channel.


› The transmitter will beep once for confi rmation.

• Throttle Reverse:


› Pull the throttle trigger completely to full throttle (or push forward for full brake) and press the “REV” button for at least 2 

seconds to reverse the Throttle (TH) channel.


› The transmitter will beep once for confi rmation.

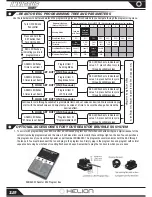
Steering Dual-Rate (ST D/R):

Steering dual-rate allows on-the-fl y end point adjustments to both sides (left and right) of the steering servo.

•  The default value is 100% of the maximum servo travel. The dual-rate can be set from 20% to 100%.


› To increase the dual-rate, press the “DR+” button.


› To decrease the dual-rate, press the “DR-“ button.

End Point Adjustment:

•  Steering End Point Adjustment (EPA)


› Use this function to adjust the left and/or right steering angle relative to the steering wheel position.


CAUTION:  BE CAREFUL TO NOT OVER-EXTEND THE STEERING THROW AS IT CAN CAUSE YOUR SERVO TO OVER-WORK 
AND OVER-HEAT.


› Steering-Left Side Adjustment:


» Turn the steering wheel completely to the left and use the “ST+” or “ST-“ buttons to adjust the steering angle to the 

desired location.


› Steering-Right Side Adjustment:


» Turn the steering wheel completely to the right and use the “ST+” or “ST-“ buttons to adjust the steering angle to the 

desired location.

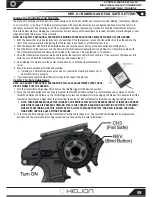
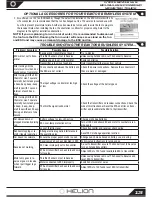
Generic wiring diagram.

Содержание Invictus 10MT

Страница 1: ... be considered abuse and or neglect Product specifications are subject to change without notice Due to ongoing development the actual product may vary from images shown This product contains chemicals known to the State of California to cause cancer and birth defects or other reproductive harm This product is not a toy 14 Recommended for ages 14 and up Adult supervision required for ages under 18 ...

Страница 2: ...ent consider replacing the disposable batteries for this transmitter and for other household electronic items with rechargeable batteries Visit your local hobby dealer for hobby grade chargers and batteries b Patience while reading thoroughly through all of the instructions and guides that will help ensure you get the most out of your new Helion RC product Please use caution and follow the manufac...

Страница 3: ... drive wheels Chevron style swamper tires and realistic wheels Full size pickup body with flags Adjustable body mounts LiPo compatible and programmable ESC Never leave the battery unattended while charging and never operate the charger without adult supervision Never charge a warm battery always allow the battery to cool to room temperature before charging Never drop the charger or battery and do ...

Страница 4: ...should never be ignored or taken lightly Always take caution when operating your model as damage to property and injury can result from careless operation Please consult your local hobby dealer with any questions or troubleshooting issues And of course don t forget to have fun you deserve it after reading through all of these safety tips 1 Steering wheel controls left right motion designed to be o...

Страница 5: ...l turn solid red If the receiver s LED does not turn solid red turn off both the transmitter and receiver and repeat steps 1 2 5 Once binding is complete turn the power off and back on to both the transmitter and re ceiver 6 Ensure normal operation of throttle and steering a If binding to a different vehicle you may need to reverse the steering channel on your transmitter to work properly 7 If you...

Страница 6: ...eversed in order to program them properly NOTE AS A SAFETY PRECAUTION PERFORM THE CHANNEL REVERSE ADJUSTMENTS WITH THE MOTOR UNPLUGGED FROM THE ESC CAUTION DO NOT ALLOW THE WIRES TO TOUCH AFTER BEING DISCONNECTED WHILE PERFORMING THIS SETUP PROCEDURE AND THE WHEELS OFF THE GROUND Steering Reverse Turn the steering wheel completely to the left or right and press the REV button for at least 2 second...

Страница 7: ...larm will sound if the transmitter voltage drops below 4 5V This alarm is meant as a safety feature only The trans mitter should not be operated below 4 5V If the low battery alarm sounds stop using your model immediately and turn off both the model s receiver and the transmitter Replace the transmitter batteries immediately with fresh AA batteries to prevent loss of control of your model b Always...

Страница 8: ...emains at center location hands off The Radient Reaktor series brushless motor and ESC is a great power plant to satisfy your need for speed and performance as an entry level brushless system Though the Reaktor system was engineered for value performance was definitely a factor We ve included some great features for you to help keep your system running in top shape while keeping your battery upgra...

Страница 9: ...er than the threshold for 2 seconds the ESC will cut of the output power Please note that the ESC cannot be restarted if the voltage of each Lipo cell is lower than 3 5V For NiMH battery packs if the voltage of the whole NiMH battery pack is higher than 9 0V but lower than 12V it will be considered as a 3S Lipo If it is lower than 9 0V it will be considered as a 2S Lipo For example if the NiMH bat...

Страница 10: ... we recommend setting LVC to 5 using a setting lower than this may cause over discharge of some batteries and cause damage to your battery which could lead to a fire When running a LiPo battery it is required to change the included battery connector to a high current connector We recommend W S Deans Ultra Plugs WSD1300 available at your local hobby dealer Using the supplied connector with LiPo bat...

Страница 11: ...nd should be avoided at all costs If this happnes reduce the maximum braking force to a lower setting If however you are unable to stop and the lack of deceleration is not due to wheel slipping you can increase the braking force WARNING Be sure to check your maximum brake settings by driving from full throttle to full hard brake in an open area If the rear tires come off the ground causing a front...

Страница 12: ...LED flahes 2 times to set Item 2 Program Item 2 Drag Brake Force Program Item 3 LVC Threshold Program Item N Programmable Item RED LED flashes to indicate set value 1 8 press button to cycle through available values RED LED flashes to indicate set value 1 6 press button to cycle through available values RED LED flashes to indicate set value 1 X press button to cycle through available values GREEN ...

Страница 13: ...n ning again Loss of throttle signal Check transmitter and receiver check wiring Random stopping or re start irregular operation Strong electro magnetic interference in the oeprating area Reset ESC or change operation location Car doesn t accelerate Ensure the proper punch mode is used Change punch mode based on battery you are using Reverse not working Reverse mode has been disabled in ESC Follow...

Страница 14: ...t of the vehicle and if done excessively may decrease stability Removing clips will lower the ride height and may cause the chassis to drag on the ground It is ideal to have the drive shafts above level but still allow the shocks to extend when you lift the truck while the vehicle is sit ting on a flat surface with the body installed Add or remove clips to achieve the desired ride height Upper Sho...

Страница 15: ...f the spur gear before the pinion gear moves this is purely by feel not visual Check this movement in multiple places by rotating the spur gear approximately 1 6 rotation and checking again iii If the spur gear is allowed to move more than a very small amount or if it there is no backlash the gear mesh must be adjusted If there is a lot of movement it is recommended to attempt to tighten the mesh ...

Страница 16: ...s of your vehicle Operating your vehicle under these conditions will void your war ranty iii Taking the above into consideration leaving wheels too loose can cause them to strip It is recommended to check that the wheel nuts are tight every time you run your vehicle iv Tire wear Consequently running your vehicle will cause the tires to eventually wear out Be sure to obtain and use genuine replacem...

Страница 17: ...ll not trim straight always has right or left bias Binding in steering system Inspect and correct any binding components or loosen screws if over tight Front wheels too tight Check and adjust wheel nuts to ensure the wheels are not too tight Vehicle top speed and acceleration is slow Battery voltage too low Charge battery Drivetrain has too much friction Check for debris excessive wear on gears in...

Страница 18: ...REAR BUMPER ASSEMBLY REAR BUMPER INSTALLATION 18 HLNA0259 HLNA0145 HLNA0259 HLNA0281 HLNA0124 ...

Страница 19: ...REAR SUSPENSION PIVOT INSTALLATION REAR SUSPENSION PIVOT ASSEMBLY 19 1 10th SCALE 4x4 BRUSHLESS POWERED MONSTER TRUCK HLNA0142 HLNA0137 HLNA0257 HLNA0069 HLNA0205 HLNA0117 HLNA0258 HLNA0260 ...

Страница 20: ...R INPUT SHAFT AND MOTOR MOUNT ASSEMBLY REAR BUILKHEAD AND SPUR GEAR ASSEMBLY 20 HLNA0099 HLNA0137 HLNA0261 HLNA0134 HLNA0285 HLNA0247 HLNA0201 HLNA0286 HLNA0143 HLNA0199 HLNA0280 HLNA0280 HLNA0280 HLNA0198 ...

Страница 21: ...AR GEARBOX ASSEMBLY FRONT REAR DIFFERENTIAL ASSEMBLY 21 1 10th SCALE 4x4 BRUSHLESS POWERED MONSTER TRUCK HLNA0147 HLNA0199 HLNA0125 HLNA0201 HLNA0133 HLNA0292 HLNA0101 HLNA0100 HLNA0100 HLNA0101 HLNA0104 ...

Страница 22: ...REAR GEARBOX INSTALLATION REAR SUSPENSION INSTALLATION 22 HLNA0124 HLNA0124 HLNA0146 HLNA0124 HLNA0263 HLNA0144 HLNA0137 HLNA0146 ...

Страница 23: ...REAR SHOCK TOWER INSTALLATION REAR SHOCK TOWER ASSEMBLY 23 1 10th SCALE 4x4 BRUSHLESS POWERED MONSTER TRUCK HLNA0144 HLNA0113 HLNA0129 HLNA0076 HLNA0269 HLNA0269 HLNA0269 ...

Страница 24: ...REAR HUB CARRIER INSTALLATION REAR HUB CARRIER ASSEMBLY 24 HLNA0300 HLNA0112 HLNA0287 HLNA0094 HLNA0094 HLNA0285 HLNA0146 HLNA0279 HLNA0113 ...

Страница 25: ...SHOCK SPRING INSTALLATION SHOCK ASSEMBLY 25 1 10th SCALE 4x4 BRUSHLESS POWERED MONSTER TRUCK HLNA0089 HLNA0088 HLNA0085 HLNA0091 HLNA0089 HLNA0090 HLNA0090 HLNA0084 HLNA0089 HLNA0087 HLNA0091 ...

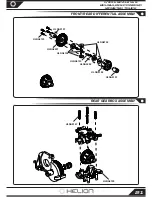
Страница 26: ...CENTER DRIVE SHAFT COVER INSTALLATION REAR SHOCK INSTALLATION 26 HLNA0262 HLNA0262 HLNA0146 HLNA0127 ...

Страница 27: ...FRONT BUMPER INSTALLATION FRONT BUMPER ASSEMBLY 27 1 10th SCALE 4x4 BRUSHLESS POWERED MONSTER TRUCK HLNA0281 HLNA0124 HLNA0206 HLNA0206 HLNA0145 ...

Страница 28: ...FRONT SUSPENSION ASSEMBLY FRONT STEERING BLOCK ASSEMBLY 28 HLNA0069 HLNA0258 HLNA0151 HLNA0260 HLNA0117 HLNA0255 HLNA0110 LEFT RIGHT HLNA0111 HLNA0109 HLNA0285 HLNA0286 HLNA0256 ...

Страница 29: ...NK INSTALLATION STEERING AND SERVO SAVER ASSEMBLY 29 1 10th SCALE 4x4 BRUSHLESS POWERED MONSTER TRUCK HLNA0265 HLNA0265 HLNA0265 HLNA0265 HLNA0266 HLNA0266 HLNA0265 HLNA0115 HLNA0115 HLNA0265 HLNA0266 HLNA0265 HLNA0122 ...

Страница 30: ...FRONT SUSPENSION INSTALLATION FRONT GEARBOX INSTALLATION 30 HLNA0124 HLNA0147 HLNA0113 HLNA0144 HLNA0124 HLNA0201 HLNA0292 HLNA0285 HLNA0246 HLNA0099 HLNA0099 ...

Страница 31: ...FRONT STEERING LINK ASSEMBLY FRONT SHOCK INSTALLATION 31 1 10th SCALE 4x4 BRUSHLESS POWERED MONSTER TRUCK HLNA0127 HLNA0146 HLNA0268 HLNA0268 HLNA0268 HLNA0141 HLNA0141 HLNA0137 ...

Страница 32: ...FRONT TOP PLATE ASSEMBLY SERVO ASSEMBLY AND INSTALLATION 32 HLNA0144 HLNA0264 HLNA0147 23 25 24 HLNA0128 HLNA0252 6KG HLNA0291 ...

Страница 33: ...MOTOR ASSEMBLY MOTOR INSTALLATION 33 1 10th SCALE 4x4 BRUSHLESS POWERED MONSTER TRUCK HLNA0148 HLNA0282 HLNA0062 14T HLNA0062 HLNA0123 RDNA0028 ...

Страница 34: ...BODY ASSEMBLY AND INSTALLATION REAR GEAR COVER INSTALLATION 34 HLNA0262 HLNA0256 HLNA0130 HLNA0139 HLNA0270 Red Body HLNA0271 Blue Body HLNA0271 Clear Body HLNA0283 HLNA0140 HLNA0140 ...

Страница 35: ...NOTES 35 1 10th SCALE 4x4 BRUSHLESS POWERED MONSTER TRUCK ...

Страница 36: ... NOTES 36 ...

Страница 37: ...0121 SCREW KIT FHPS DOMINUS HLNA0122 FLAT HEAD PHILIPS SCREWS FHPS M3X8MM HLNA0123 FLAT HEAD PHILIPS SCREWS FHPS M3X6MM HLNA0124 FLAT HEAD PHILIPS SCREWS FHPS M3X10MM HLNA0125 FLAT HEAD PHILIPS SCREWS FHPS M2X8MM HLNA0126 SCREW KIT BUTTON HEAD PHILIPS SCREWS BHPS DOMINUS HLNA0127 BUTTON HEAD PHILIPS SCREWS BHPS M3X12MM HLNA0128 BUTTON HEAD PHILIPS SCREWS BHPS M3X8MM HLNA0129 SET SCREWS SHSS M3X5MM...

Страница 38: ... 10MT HLNA0263 MAIN CHASSIS INVICTUS 10MT HLNA0264 FRONT TOP PLATE INVICTUS 10MT HLNA0265 STEERING KIT INVICTUS 10MT HLNA0266 STEERING PLASTIC INVICTUS 10MT HLNA0267 SERVO LINK INVICTUS 10MT HLNA0268 STEERING TURNBUCKLE SET INVICTUS 10MT HLNA0269 REAR CAMBER TURNBUCKLE SET INVICTUS 10MT HLNA0270 RED BODY INVICTUS 10MT HLNA0271 BLUE BODY INVICTUS 10MT HLNA0273 TIRES AND WHEELS INVICTUS 10MT HLNA027...

Страница 39: ...0178 ALUMINUM WHEEL HEX SET DOMINUS SC HLNA0179 CENTER DIFFERENTIAL DOMINUS SC TR HLNA0181 ALUMINUM REAR HUB CARRIERS DOMINUS HLNA0182 ALUMINUM THREADED SHOCK SET DOMINUS HLNA0231 SLIPPER CLUTCH PADS DOMIINUS HLNA0232 SLIPPER SPRING AND NUT DOMINUS HLNA0233 SLIPPER CLUTCH PLATES AND PADS DOMINUS HLNA0234 SLIPPER CLUTCH SHAFTS DOMINUS SC TR HLNA0235 SPUR GEAR CENTER DIFFERENTIAL 50T DOMINUS HLNA023...

Страница 40: ...1 10th SCALE 4x4 BRUSHLESS POWERED MONSTER TRUCK 000091 001 REV A HLNA0289 POWERED BY ...

Отзывы: