Model:
Net Monitor
Checking the NetMonitors IP address
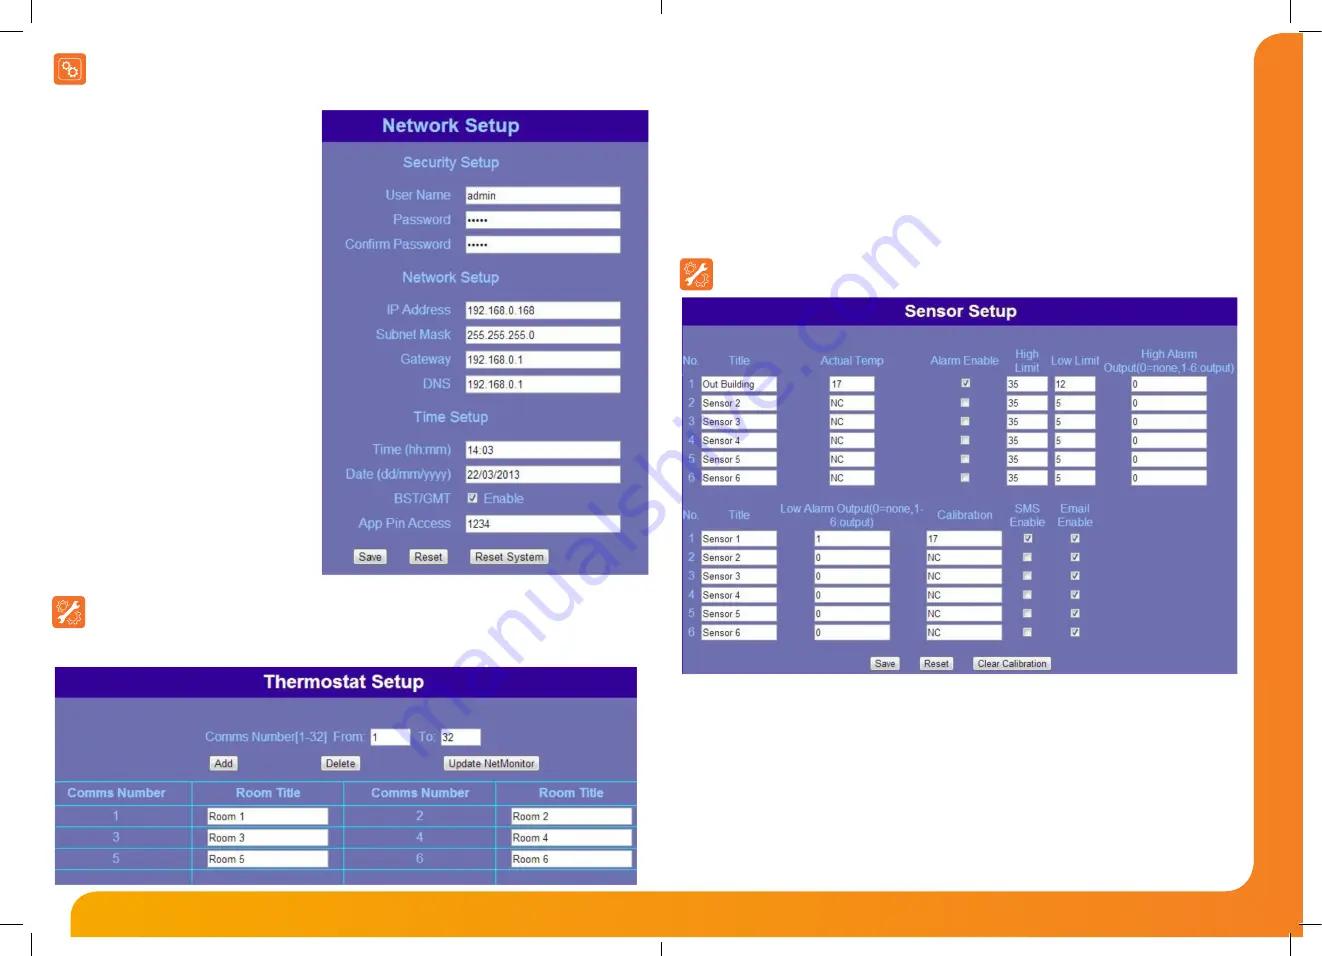
Select Network Setup from the menu.
You will now see the current network configuration for the
NetMonitor.
Security Setup.
To secure your NetMonitor, enter the username & password
you would like to use when you access via web browser.
Network Setup.
IP Address – This is the IP address you are assigning to the
NetMonitor, this needs to be in the same range as your router.
Subnet Mask – Enter the subnet mask of your network
Gateway – This needs to be the IP address of your router
DNS – This needs to be the IP address of your Domain Name
Server, usually the IP of your router.
Time Setup.
Enter the current time, date & select if you would like to clocks
to alter automatically for GMT updates.
APP Pin Access.
Enter a four digit pin number, this is used when you access
your system via the smartphone or tablet application.
Save – Save changes made to the Network Setup screen.
Reset – Resets all details back to the last stored settings.
Reset System – This will reboot the NetMonitor hardware.
Note: It is important to correctly set the Gateway and DNS.
Thermostat Set-up
Prior to configuring the NetMonitor, you must assign a unique comms number to each thermostat on your system. This is done at each
individual thermostat. On the thermostat, access the feature menu and assign a unique comms number on feature 06.
For example if you have 12 thermostats on the system, access feature 06 on each one numbering them 1-12.
Make a note of the comms number and room so you can rename the room titles on the NetMonitor.
Adding thermostats
Enter the communications numbers you want to add, for example, to add 12 thermostats enter
From: 1 To: 12
then click add.
Renaming the Thermostat
Type the new room title in the title box next to the communications number.
Deleting a Series of Thermostats
Enter the communications numbers you want to delete, for example
From: 1 To: 12
, then press Delete.
Press
Update NetMonitor
to store any changes.
Sensor Set-up
For each sensor connected you have the ability to enter a title, enable sensor alarm, plus configure High and Low Limit
Temperatures. The NetMonitor can also be set to enable one of the 12 volt Relay Outputs should the High or Low limit be
reached.
SMS
- This function only applies when using the NetM.
Enabling this means the NetM will send a text message if either the High or Low limit is reached.
- Enabling this means the NetMonitor will send an Email if either the High or Low limit is reached.
Calibration
- used to re-calibrate the temperature sensor if required.
Click Save to store any changes.
The example above is configured as follows:
When Out Building temperature falls below 12°C, relay output number 1 will be enabled and a text message & email will be sent.
7
8
Network Series - Installation Guide


