Model:
Net Monitor
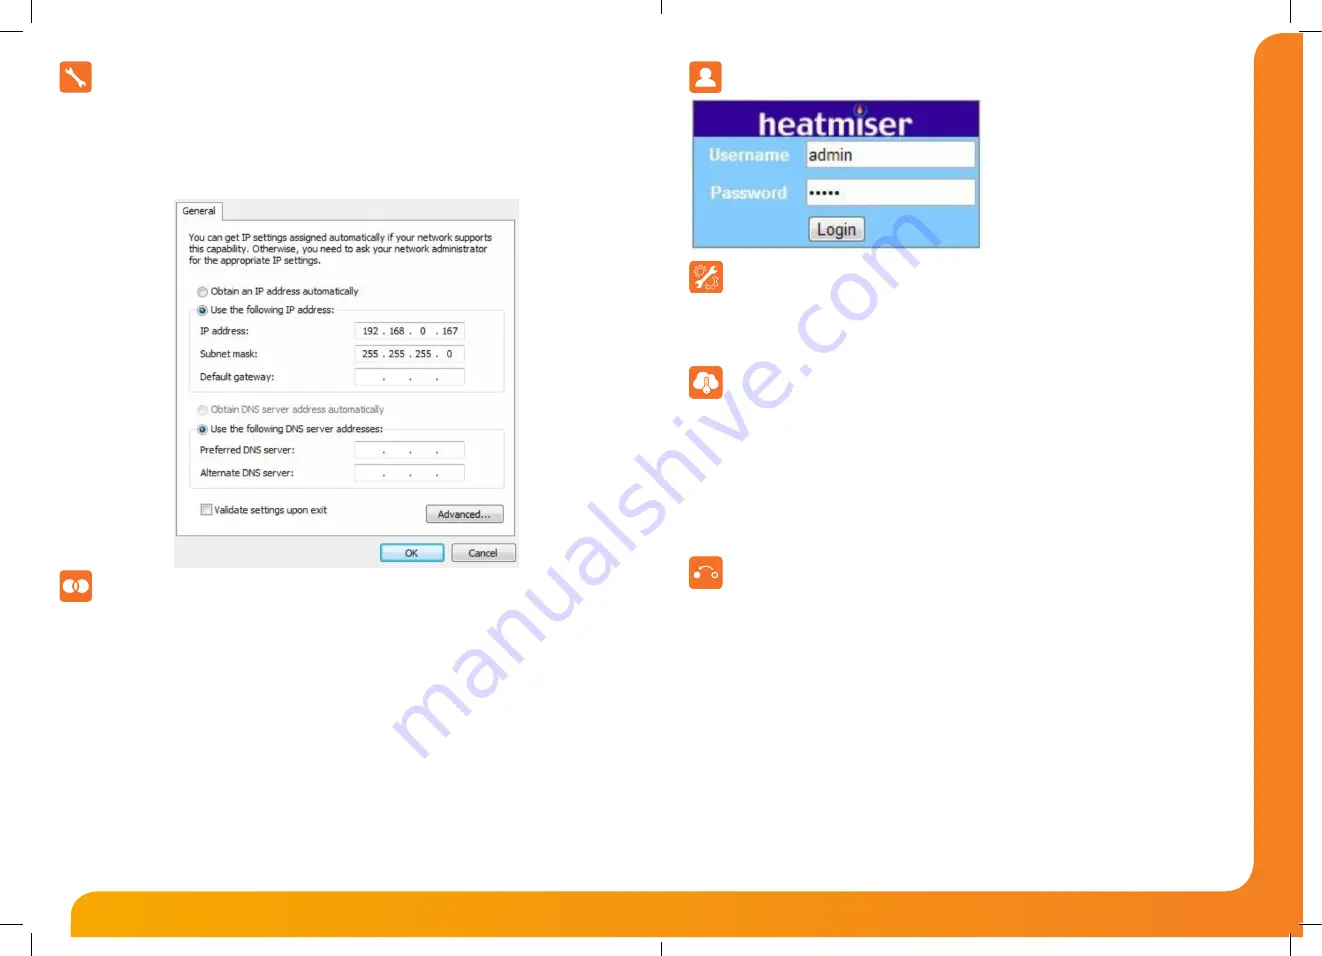
Your PC may be selected to Use the following IP address. If so apply the IP address
192.168.0.167
and the Subnet
mask
255.255.255.0
as shown in the image below. Press OK on this screen and the next screen to store these
settings. You will return to this screen again shortly to restore the settings back to their original values.
Make a note of your original IP address and Subnet mask settings before making any changes.
Manual IP Address Selection
Click the Windows icon.
In the search bar type
ping 192.168.0.168
If you see
reply from 192.168.0.168
4 times, your PC can successfully communicate with & the Netmonitor.
If you see a
Request Time Out
error, please read the steps below.
This error occurs when your PC & NetMonitor are not in the same IP address range. It simply means the two devices
cannot communicate with each other.
You need to check the following:
•
Your PC’s wireless connection is turned off.
•
Your PC is hard wired via Ethernet cable to the router.
•
Your PC’s IP address is in the same range as the NetMonitor.
•
The NetMonitor is powered on.
Once you have verified all of the above information, repeat the ping procedure.
Test Connection to NetMonitor (Ping Procedure)
Logging into the NetMonitor
Open your preferred web browser. In the address
bar type the default IP address of the NetMonitor
192.168.0.168
The browser will then display the login screen of
the NetMonitor.
When prompted, enter the default username
and password, both are admin.
SMS Set-up (Net Only)
Click SMS setup.
The Heatmiser NetM can store 6 mobile phone numbers.
Activated alarms will be sent to the mobile numbers enabled in this list.
Accessing the NetMonitor over the Internet
Port Forwarding
Within the router you will have a firewall which is designed to block unwanted incoming Internet traffic. This
means that you will not be able to access the NetMonitor without adjusting the configuration of your router.
To gain remote access to the NetMonitor, you need to configure Port Forwarding within your router.
You should forward port
80
to the IP address of your Netmonitor.
(Web browser access)
You should forward port
8078
to the IP address of your Netmonitor.
(App access)
Please consult your router manufacturer or instruction manual for more information on how to set-up port
forwarding.
When your router connects to the internet you are automatically assigned an IP address by your internet
provider. This IP address can either be fixed or dynamic.
To find out what your IP address is; open your preferred web browser, using the Google search engine, type:
What is my IP?
This will show your current IP address. You would need to check with your internet provider if this is fixed or
dynamic. If the IP address is fixed, then connecting to your system would be easy as you would use the same
IP address every time. If the IP address changes, then connecting to the system would be almost impossible.
This is when a service called Dynamic DNS would be used instead.
Dynamic DNS is a method of updating a Domain or host name to point to an ever changing IP address.
For example you could create the host name
johnsmith.dyndns.org
, the DNS service in this example would
be DYNDNS.com. It’s their job to find out what your IP address is every time it changes, so connecting to your
system will be easy by using the host name you have created. Your router will have a Dynamic DNS section
and within this section there will be recommended DNS clients. Setup an account with one of these DNS
clients and you can then use the host name you create to access the NetMonitor remotely.
IP address, Fixed or Dynamic?
5
6
Network Series - Installation Guide


