background image

H D S m u s i c

 Page 

6


owners manual

HDS Pro.Sound.1


It is possible to select 16 different parts, corresponding 
to the 16 standard MIDI channel. 

Once all the 16 MIDI channel has been selected, the 
display show the message ALL. This condition allows 
to modify some parameters values at the same time, 
speeding up the editing operation. See ahead for further 
details.

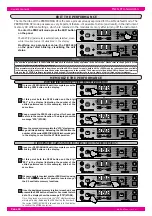
SELECTING THE PARTS (CH) IN GM2 MODE

SELECTING THE PARTS (CH) IN GM2 MODE

Press repeatedly the DATA   button, the display show 
the the PART (CH) number you want to edit

SELECTING THE PARAMETERS TO EDIT IN THE SELECTED PARTS (CH): SOUND

SELECTING THE PARAMETERS TO EDIT IN THE SELECTED PARTS (CH): SOUND

The LED #2 lighting on indicates the selection of the sound bank #2

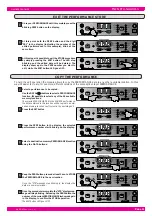
SELECTING THE PARAMETERS TO EDIT IN THE SELECTED PARTS (CH): VOLUME

SELECTING THE PARAMETERS TO EDIT IN THE SELECTED PARTS (CH): VOLUME

To select the VOLUME parameters of the selected PART 
(CH) sound, press the EDIT button once more time. The 
current default value of the parameter is indicated in 
the display. Volume = 100 in this example.

You can increase or decrease the volume level, by 
pressing the DATA     buttons. The display show 
you in realtime the value changing.

Volume -

Once you have reached the VOLUME = 000, (minimum sound 
level), by pressing once more again the DATA 

 button you'll set 

the selected part OFF, then the part is disabled.

Part disabled

NOTE

The current default value of the selected parameter, is show in the display. 
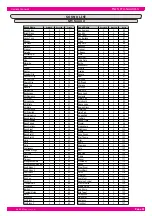
In the part #1 the sound is: GRAND PIANO. Please refer to the sound list 
included at the end of the manual.

Once you have selected the PART you want to modify 

(#01 in this example), the EDIT menu parameter are 

selected by pressing the EDIT button. Each time you 

press the button a different parameter is selected.

Now pressing the DATA   button you select the next 
sound in the sound database.

In order to ease and speed up the sound selection, the sounds are 
mapped according to GM mapping. For each sound it’s possible 
immediately to select its VARIATION, (an alternative sound belonging 
to the same timbrel family, located in a subsequent bank.)

Each time you press the DATA   button a next sound 
is selected.

The HDS has 4 sound bank in total. From bank 1 (dot #1 light up in 
the display), to bank 3 (letter "H" showed in the display).

The access to the proprietary HDS sound locations 
bank (the fourth bank). is indicated by the letter "H" 
in the display.

If the sound has a variation in a next bank, the second 
(or third) dot lighing up on in the display, indicates the 
selection of a sound variation located in a subsequent 
sound bank.

The default value of the parameter can be restored by pressing the 
two DATA buttons at the same time.

Содержание HDS Pro.Sound.1

Страница 1: ... Deutsch Bedienungsanleitung Owners manual HDS Pro Sound 1 English ...

Страница 2: ......

Страница 3: ... Deutsch Bedienungsanleitung HDS Pro Sound 1 ...

Страница 4: ... werden 5 WARNUNG Weder dieses Gerät noch andere Gegenstände auf das Netzkabel stellen oder derart aufstellen daß durch das Netzkabel ain Schaden ausgelöst werden könnte beispielsweise durch Betreten darüber Stolpern Gegenstände darüber rollen oder schieben 6 Das Gerät muß derart aufgestellt werden daß eine ausreichende Ventilation gewährleistet ist eventuell vorhandene Lüftungsschlitze müssen fre...

Страница 5: ...rn der TONHÖHE TRANSPOSE 7 Ändern der FEINSTIMMUNG TUNE 7 Ändern des Multieffektes pro PARTS CH EFX 7 Ändern des HALLEFFEKT des angewählten PARTS CH REV 8 Der Modus ALL im EDIT Menü 8 Der PERFORMANCE Modus 9 Arbeiten mit dem PERFORMANCE MODE 9 Anwählen der PERFORMANCES 9 Auswählen einer PERFROMANCE am HDS Pro Sound 1 9 Auswählen über MIDI 9 Erstellen einer PERFORMANCE 10 Speichern einer PERFORMANC...

Страница 6: ...HDS Pro Sound 1 Lieferumfang Bedienungsanleitung HDS PC Editor Software Netzteil MIDI Kabel ...

Страница 7: ...das HDSmusic Multipedal und in 2 ein Volume Pedal 4 5 Am INPUT RCA Chinch Anschluss kann ein weiteres Instrument Line Signal angeschlossen werden 5 6 Hier kann der HDS Pro Sound 1 an einen Mixer oder Aktiv Lautsprecher angeschlossen werden 6 Hier können Sie 2 Kopfhörer anschließen Der PERF Knopf PERFORMANCE schaltet den Performance Mode ein Hier sehen Sie ob wann Midi Informationen das Gerät errei...

Страница 8: ...1 kann auf verschiedene Art mit einem PC verbunden werden MIDI Schnittstelle oder USB Universal Serial Bus In beiden Fällen wird der Datenaustasch als Standard MIDI Specification gesendet oder empfangen NOTE Normalerweise verfügt ein PC über eine USB Schnittstelle dies ist allerdings von Ihrem PC abhängig und kann abweichen Auf Ihrem PC muss ein Programm zur Wiedergabe von Standard MIDI Files inst...

Страница 9: ...können ACHTUNG Das MIDI Interface überträgt keine AUDIO Signale nur Mididaten Der HDS Pro Sound 1 muss immer mit einem Lausprecher System verbunden sein Ist Ihr PC mit Aktiven Lautsprechern ausgestattet ist es möglich diese zur Klangwiedergabe zu verwenden PC MIDI OUT PC MIDI OUT AUDIO CARD LINE IN AUDIO CARD LINE IN Haben Sie den HDS Pro Sound 1 mit der Audiokarte wie beschrieben verbunden ist es...

Страница 10: ... PEDAL Anschlüsse Unabhängig vom Midi Controller des HDS Pro Sound 1 ist es möglich 2 verschiedene Pedal Typen gleichzeitgig zu verwenden Die einzelnen Funktionen des Multipedal Buchse 2 können mit dem HDS PC Editor programmiert werden INPUT Chinch Buchsen der Pro Sound 1 Der HDS Pro Sound 1 verfügt ueber einen Stereo Eingang an dem Sie weitere Klanquellen anschliessen können Dieses Signal wird an...

Страница 11: ...Frontseite Ihres HDS Pro Sound 1 Durch drücken der DATA Taste können Sie die DEMO SONGS weiterzuschalten Ohne Weiterschaltung hören Sie alle Titel nacheinander Um die DEMO SONGS zu stoppen drücken Sie die PERF Taste Der HDS Pro Sound 1 befindet sich dann wieder im GM Modus GM2 Verändern des Grundmodus GM2 Der GM2 Modus ist für das Abspielen von Standard MIDI Files somit werden alle Spuren Daten op...

Страница 12: ...ART CH Klanges zu verändern drücken Sie die EDIT Taste mehrmals bis die LED auf VOLUME ist Volume 100 in diesem Beispiel Jetzt wird die Laustärke durch Drücken der DATA Tasten verändert und der Wert im Display angezeigt Volume Volume Erreichen Sie den Wert VOLUME 000 minimum sound level und drücken nochmal DATA Taste so wird der Part Kanal ausgeschaltet OFF Part aus Hinweis Drücken Sie die Edit Ta...

Страница 13: ...e von 64 00 63 je PART CH Drücken Sie die EDIT Taste so oft bis TUNE aufleuchtet TUNE 00 Durch Drücken der DATA Tasten können Sie den Wert verringern oder erhöhen Die Änderung sehen Sie im Display Tune Tune Ändern des EFX Anteil pro PART CH EFX Ändern des EFX Anteil pro PART CH EFX Einstellen des EFX Anteil chorus tremolo phaser delay etc in einem PART Drücken Sie wieder die EDIT Taste bis EFX auf...

Страница 14: ...tzt Grundeinstellung Einstellen des Hallanteils REV im angewählten PART Drücken Sie die EDIT Taste bis REV leuchted Das Display zeigt REV 080 in diesem Beispiel Drücken Sie die DATA Tasten oder um den REV Hallanteil in einem Part zu ändern Der Wert wir im Display angezeigt Der Wert kann von 0 bis 127 geändert werden VOLUME In ALL MODE wird die Laustärke für alle PARTS geändert VELOCITY Ermöglicht ...

Страница 15: ...iese Performances zeigen Ihnen das Klanpotenzial des HDS Pro Sound 1 Um alle Perfomances richtig zu hören muss der Grundkanal Midi Common Chanel mit dem Midi Intrument übereinstimmen Z B Midiakkordeon sendet auf Kanal 1 Diskant 2 Chord 3 Bass 10 Schlagzeug usw Sie finden eine genaue Liste Performance List in der Anleitung für welches MidiSystem welche Performances erstellt wurden Anwählen der PERF...

Страница 16: ...eren Speicherplatz Speichern einer PERFORMANCE auf einem anderen Speicherplatz Haben Sie ihre PERFORMANCE geändert drücken Sie den blinkenden PERF Taster Drücken Sie die PERF TASTE erneut An dieser Stelle blinkt die PERF Taste und in diesem Beispiel das DISPLAY P01 Halten Sie die PERF Taste für 3 Sekunden gedrückt bis das Display STR STORE anzeigt Jetzt ist Ihre Performance abgespeichert 1 2 3 Wen...

Страница 17: ...en oder mit der Änderung neu beginnen 3 Wählen Sie die zu kopierende Performance an 1 Drücken Sie die EDIT Taste 2 Drücken Sie die PERF Taste Jetzt blinkt die zu kopierende Performance 3 Wählen Sie einen neuen PERFORMANCE Platz mit hilfe der DATA Tasten unter dem Display aus 4 Halten Sie jetzt die PERF Taste für 3 Sekunden gedrückt 5 Mit den DATA Tasten wählen Sie die PERFOR MANCE an eine der 99 m...

Страница 18: ... nach EIN Ausschalten gespeichert COMMON CHANNEL Grundkanal MIDI IDENTIFICATION NUMMER SYSTEM RESET MIDI DATA BULK Um ins MEMORY MANAGEMENT SYSTEM zu kommen halten Sie die PERF und EDIT Taste min 3 Sekunden gedrückt Das erste Menu ist COMMON CHANNEL Das Display zeigt den Grundwert in diesem Fall C15 MIDI IDENTIFICATION NUMMER Sie können Ihrem HDS Pro Sound 1 eine Idenfikation Nummer zuweisen Das h...

Страница 19: ...t Die PART CH LED beginnt zu blinken Drücken Sie die EDIT Taste und RST erscheint im Display Diese Funktion stellt die Werkseinstellungen wieder her Halten Sie für 2 sek die DATA Taste um den RESET zu starten Nach dem RESET befindet sich der HDS Pro Sound 1 wieder im GM 2 Modus Drücken Sie die EDIT Taste erneut um in das MIDI ID Menu zu gelangen ...

Страница 20: ...ht möglich war Um in das MEMORY MANAGEMENT SYSTEM zu gelangen halten Sie bitte den EDIT Knopf und den EDIT Knopf für ca 3 Sekunden gedrückt Drücken Sie 3 mal den EDIT Knopf um in das BULK Menü zu gelangen Haben Sie die BULK Funktion erreicht blinkt das Display BULK Um aus dem MANAGEMENT SYSTEM zu gelangen drücken Sie PERF Taste Diese Funktion überträgt die PERFORMANCE Daten an einen PC oder Midire...

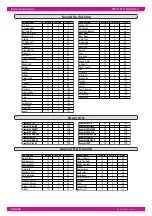
Страница 21: ... 0 91 Gtr Mute 0 0 28 Bowed Glass 0 0 92 Gtr Overdrive 0 0 29 Metal Pad 0 0 93 Gtr Distorted 0 0 30 Halo Pad 0 0 94 Gtr Harmonics 0 0 31 Sweep Pad 0 0 95 Bass Acoustic 0 0 32 Ice Rain 0 0 96 Bass Fingered 0 0 33 Sound Track 0 0 97 Bass Picked 0 0 34 Crystal 0 0 98 Bass Fretless 0 0 35 Atmosphere 0 0 99 Bass Slap 1 0 0 36 Brightness 0 0 100 Bass Slap 2 0 0 37 Goblin 0 0 101 Bass Synth 1 0 0 38 Echo...

Страница 22: ...m 11 0 127 DrumKit_STD1 11 0 112 DrumKit_ROOM1 11 0 113 DrumKit_POWER1 11 0 114 DrumKit_ELECT1 11 0 115 DrumKit_ANALOG1 11 0 116 DrumKit_JAZZ1 11 0 117 DrumKit_BRUSH1 11 0 118 DrumKit_ORCH1 11 0 119 Sound Name Bank MSB Bank LSB PrgChg Organ LFO 12 0 23 Gtr Ovation 12 0 25 Gtr Jazz Standard 12 0 26 Bass Deep 12 0 38 Bass Sinus 12 0 39 Violin Orch 12 0 40 Flugel Horn 12 0 56 Toto Horns 12 0 60 Synt ...

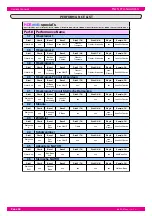
Страница 23: ...z Guitar Kontrabass Strings xxx man Drums 10 Circus Renz Xylophon Jazz Guitar E Bass Accordion 1 xxx man Drums 11 Musette 1 Musette Jazz Guitar E Bass xxx xxx man Drums 12 Stubnmusi 1 Hackbrett Acoustic Git E Bass VM Harmonika xxx xxx 13 Schürzenjäger Steirische A Steel Guitar SynBass xxx xxx man Drums 14 3th Mann Zither Jazz Guitar Kontrabass VM Harmonika xxx man Drums 15 Organ 1 Jazz Perc Organ ...

Страница 24: ...2 TN Disk3 HN Rhyth Sample CH Obrkr Akk xxx D Bass kurz lang AcouGit HIT xxx xxx xxx AcouGit Chords 41 Oberkrainer Trio mit Steirische Harmonika Disk1 Chord Bass1 Bass2 Disk2 TN Disk3 HN Rhyth Sample CH Steirische SLO xxx Bariton kurz lang JazzGit Chords xxx xxx xxx JazzGit Chords 42 Stoanis Disk1 Chord Bass1 Bass2 Disk2 TN Disk3 HN Rhyth Sample CH Steirische A xxx Basspos aune E Bass xxx xxx man ...

Страница 25: ...Spezifi kationen können ohne Vorankündigung geändert werden HDSMusic Date ott 06 Model HDS PRO Sound 1 MIDI Implementation Chart Version 1 00 Function Transmitted Recognized NOTE Basic Default x 1 16 These data are memorized also switching the module OFF Channel Changed x 1 16 Default x Mode 3 Mode Messages x Mode 3 4 Altered Note number x 0 127 Velocity Note On x o Note Off x o Channel Aftertouch...

Страница 26: ...HDSmusic Vogelloh 21 D 80997 München Tel 49 089 89 22 31 62 Fax 49 089 89 22 31 64 www hdsmusic de ...

Страница 27: ... English owners manual HDS Pro Sound 1 ...

Страница 28: ...located so that its location or position does not interfere with its proper ventilation 8 This product should be located away from heat sources such as radiators heat registers or other products that produce heat 9 The product should be connected to a power supply only of the type described in the operating instructions or as marked on the product 10 This product may be equipped with a polarized l...

Страница 29: ...h velocity 7 Selecting the parameters to edit in the selected parts ch transpose 7 Selecting the parameters to edit in the selected parts ch tune 7 Selecting the parameters to edit in the selected parts ch efx 7 Selecting the parameters to edit in the selected parts ch rev 8 The mode ALL in edit menu 8 The performance mode 9 Enter the performance mode 9 Select the performances 9 Manual recalling 9...

Страница 30: ...HDS Pro Sound 1 package Owners manual HDS PC Editor Software AC Adapter MIDI cable ...

Страница 31: ... 4 it s possible to connect two type of pedals to the ex pander an Expression pedal to the Input 2 and a HDS Multipedal unit to the Input 1 4 5 The INPUT RCA connectors allows to plug an external Line source to the instrument Consult the relative chapter of this user manual 5 6 Connect the instrument to an external speaker system or a Mixer 6 These jack connectors allows to plug two headphones to ...

Страница 32: ...ible to use directly the PC USB built in connection In both case MIDI or USB the transfer rate and the features of the protocol comply with the standard MIDI specifi cations the only difference is the connections type NOTE Normally a desktop PC offers MIDI connection from an installed audio card The type of the connection is dependant from the model of the audio card In relation to this please ref...

Страница 33: ...e expander will play the sequence REMEMBER The MIDI interface does not transmit AUDIO signals just control data only You must always connect the audio output of the MIDI instrument you are controlling to an external speaker system If your computer is equipped with a multimedia speaker system it s possible to connect the HDS Pro Sound 1 to directly the computer speaker in the following way CONNECT ...

Страница 34: ... the signal into the audio OUTPUT of the module Please note that the external signal will be not processed in any way from the HDS Pro Sound 1 this is a dry input only This connection allows to use a couple of mixer inputs to connect a digital piano and the HDS Pro Sound 1 at the same time As the same way using the input connection it s possible to connect an rp x piano sound module to a HDS Pro S...

Страница 35: ...it s possible to select each MIDI files or demo song by simply pressing the DATA button The display will indicate the number of the selected MIDI file In the normal DEMO mode all the MIDI files will be played in chain You can exit The DEMO mode by pressing the PERF button on the panel The module will return the default mode GM2 EDIT THE DEFAULT MODE GM2 The default GM2 mode is designed to be conne...

Страница 36: ...0 minimum sound level by pressing once more again the DATA button you ll set the selected part OFF then the part is disabled Part disabled NOTE The current default value of the selected parameter is show in the display In the part 1 the sound is GRAND PIANO Please refer to the sound list included at the end of the manual Once you have selected the PART you want to modify 01 in this example the EDI...

Страница 37: ...s at the same time NOTE The TUNE allows to shift the PART CH pitch fine tuning in a range of 64 00 63 Press the EDIT button to select the TUNE The display indicates the current default value TUNE 00 in this example Pressing the DATA buttons to increase or de crease the PART TUNE The display show you in realtime the value changing Transpose Transpose Tune Tune SELECTING THE PARAMETERS TO EDIT IN TH...

Страница 38: ...sing data with the Standard instrument and Parameters default see the Table The PARTS and GLOBAL ALL mode data editing such as SOUND TUNE TRANSPOSE etc will be lost switching off the instrument The Factory GM2 default will be automatically restored once the module will be started on again VOLUME In ALL MODE sets the GENERAL volume of the instrument V E L O C I T Y PERF mode Set a programmable VELO...

Страница 39: ...lows you to feel the real sound power of this impressive instrument Some of these performance are programmed with multi split and layer please set on Ch 15 the transmission channel of your MIDI master controller in order to control all the PARTS used on the performance using a unique MIDI transmission channel See ahead for further details the chapter MIDI COMMON channel SELECT THE PERFORMANCES SEL...

Страница 40: ...THE SAME PERFORMANCE LOCATION STORE THE EDIT IN THE SAME PERFORMANCE LOCATION STORE THE EDIT IN A DIFFERENT PERFORMANCE LOCATION STORE THE EDIT IN A DIFFERENT PERFORMANCE LOCATION Once your PERFORMANCE edit it s complete press the blinking PERF button on the display At this point both the PERF button and the digit P01 in the display indicating the number of the edited performance in this example b...

Страница 41: ...destination memory PERFORMANCE location using the DATA buttons 4 5 Use the DATA buttons to select a PERFORMANCE location It s possible to select any of the 99 available memory locations 6 To help the edit operation the module allows to copy the PERFORMANCE data to any other available location In this way it s easier to create for example different versions of the same split or layer PERFORMANCE Th...

Страница 42: ...OFF the instrument COMMON CHANNEL SETTING MIDI IDENTIFICATION NUMBER SYSTEM RESET MIDI DATA BULK To enter the MEMORY MANAGEMENT SYSTEM mode keep pressed al least for 2 seconds the PERF and the EDIT buttons at the same time The first menu is the COM MON CHANNEL setting The display show the COMMON CHANNEL default value 15 in this case MIDI IDENTIFICATION NUMBER This function allows to use more than ...

Страница 43: ...H LED will blink in the instrument Press the EDIT button again the display show the flash ing message RST RESET The RESET menu it s now selected This function restore the original programmed factory set up of the entire instrument Keep pressed at least 2 sec the DATA button to reset the instrument In this way the factory data set up is fully restored The LED and the display stop blinking and the i...

Страница 44: ...e on Page 3 Press another time the EDIT button the display show the flashing message BUL BULK 1 2 Press the EDIT buttons again and the MIDI ID menu is selected 3 Press the DATA button to start the data transmission The data transmission in progress is visualized in the display with a progressive number from 0 to 100 in percentage Once the data transmission it s completed the message EOT End of tra...

Страница 45: ...28 Bowed Glass 0 0 92 Gtr Overdrive 0 0 29 Metal Pad 0 0 93 Gtr Distorted 0 0 30 Halo Pad 0 0 94 Gtr Harmonics 0 0 31 Sweep Pad 0 0 95 Bass Acoustic 0 0 32 Ice Rain 0 0 96 Bass Fingered 0 0 33 Sound Track 0 0 97 Bass Picked 0 0 34 Crystal 0 0 98 Bass Fretless 0 0 35 Atmosphere 0 0 99 Bass Slap 1 0 0 36 Brightness 0 0 100 Bass Slap 2 0 0 37 Goblin 0 0 101 Bass Synth 1 0 0 38 Echo Drops 0 0 102 Bass...

Страница 46: ... 0 127 DrumKit_STD1 11 0 112 DrumKit_ROOM1 11 0 113 DrumKit_POWER1 11 0 114 DrumKit_ELECT1 11 0 115 DrumKit_ANALOG1 11 0 116 DrumKit_JAZZ1 11 0 117 DrumKit_BRUSH1 11 0 118 DrumKit_ORCH1 11 0 119 Sound Name Bank MSB Bank LSB PrgChg Organ LFO 12 0 23 Gtr Ovation 12 0 25 Gtr Jazz Standard 12 0 26 Bass Deep 12 0 38 Bass Sinus 12 0 39 Violin Orch 12 0 40 Flugel Horn 12 0 56 Toto Horns 12 0 60 Synt Horn...

Страница 47: ...us Renz Xylophon Jazz Guitar E Bass Accordion 1 xxx man Drums 11 Musette 1 Musette Jazz Guitar E Bass xxx xxx man Drums 12 Stubnmusi 1 Hackbrett Acoustic Git E Bass VM Harmonika xxx xxx 13 Schürzenjäger Steirische A Steel Guitar SynBass xxx xxx man Drums 14 3th Mann Zither Jazz Guitar Kontrabass VM Harmonika xxx man Drums 15 Organ 1 Jazz Perc Organ Jazz Guitar Kontrabass xxx xxx man Drums 16 Organ...

Страница 48: ...N Disk3 HN Rhyth Sample CH Obrkr Akk xxx D Bass kurz lang AcouGit HIT xxx xxx xxx AcouGit Chords 41 Oberkrainer Trio mit Steirische Harmonika Disk1 Chord Bass1 Bass2 Disk2 TN Disk3 HN Rhyth Sample CH Steirische SLO xxx Bariton kurz lang JazzGit Chords xxx xxx xxx JazzGit Chords 42 Stoanis Disk1 Chord Bass1 Bass2 Disk2 TN Disk3 HN Rhyth Sample CH Steirische A xxx Basspos aune E Bass xxx xxx man Dru...

Страница 49: ...6 Model HDS PRO Sound 1 MIDI Implementation Chart Version 1 00 Function Transmitted Recognized NOTE Basic Default x 1 16 These data are memorized also switching the module OFF Channel Changed x 1 16 Default x Mode 3 Mode Messages x Mode 3 4 Altered Note number x 0 127 Velocity Note On x o Note Off x o Channel Aftertouch x o Pitch Bend x o Control Change 0 32 x o Bank Select 1 x o Modulation 5 x o ...

Страница 50: ...HDSmusic Vogelloh 21 80997 Muenchen BRD Tel 49 089 89 22 31 62 Fax 49 089 89 22 31 64 www hdsmusic de ...

Страница 51: ...ticular installation If this instrument does cause harmful interference to radio or television reception which can be deter mined by turning the instrument off and on the user is encouraged to try to correct the interfer ence by one or more of the following measures Reorient or relocate the receiving antenna Increase the separation between the equipment and the receiver Connect the equipment into ...

Страница 52: ...HDSmusic Vogelloh 21 D 80997 München Tel 49 089 89 22 31 62 Fax 49 089 89 22 31 64 www hdsmusic de STOCK CODE 271486 Specifications are subject to change without prior notice PRINTED IN ITALY ...

Отзывы: