13
2.2
2.1
1.
3.1
3.2
4.2
4.1
7.3
7.1
7.2
5.1
ca.135°
5.2
6.1
6.2
ca.135°
7.3
7.2
A
B
EIN
ON
AUS
OFF
2.2
2.1
5.1
ca.135°
5.2
6.1
6.2
ca.135°
7.3
7.3
7.2
A
B
7.2
7.1
3.1
4.2
4.1
3.2
1.
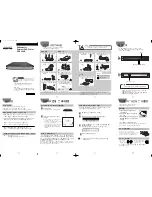
ATTENTION: Do not release the handle, guide the handle in the locked position,
because it turns arround quickly due to the sash weight, thus could cause heavy injuries
(see point 5 and 6).
1. Switch off electricity primary sided before the power supply unit.
2� Remove the cap�
3. Insert the manual unlocking-handle into the gear and move it a little to left and right, to release the gear.
4. Install the unlocking key and rotate it to the glazing side until you hear a closure sound.
5. Now, you can lift the sash by means of a release handle, move it to the desired position and move it into
the lowered position�
Locking
6. Insert the manual release handle back into the drive gear spindle and lift the door (6.1, 6.2). Slide the door
shut and lock it�
7. Bring the coupling pin of the lift drive (A) in matching position to the drill hole of the drive rod (B). In order
to couple lift drive and drive rod, turn the unlocking key towards the frame side (7.2).
WARNING:
If the manual unlocking-handle will not be pulled off before electrical start-up, this can lead to
severe injuries!
Manual release / locking in case of power failure in
the
open
state
Fuse box
Содержание HS
Страница 9: ...9 ...
Страница 21: ...21 145 4 5 x B 22 115 40 Ø7 B 115 10 17 Positioning of the drive pin Bolts may extend by max 4 mm ...
Страница 27: ...27 2x M4 x 10 Torx T20 2 2x M4 x 10 Torx T20 2 2x M4 x 10 Torx T20 2 Connect drive pin with toothbelt ...
Страница 34: ...34 Mounting of rollers From a sash weight of 200 kg 2 additional 400 kg rollers must be used ...
Страница 71: ...71 Notes ...


