Hatco Toast-Qwik TQ3-2000 series Скачать руководство пользователя страница 8

8

Form No. TQ3CEM-0618

OPERATION

General

Toast-Qwik

®

 Conveyor Toasters are designed for ease of 

operation. To operate the toaster, perform the appropriate 

procedure in this section.

WARNING

Read all safety messages in the IMPORTANT SAFETY 

INFORMATION section before operating this equipment.

CAUTION

BURN HAZARD:

  •  Some exterior surfaces on unit will get hot. Use caution 

when touching these areas.

  •  Do not remove crumb tray for cleaning until toaster is 

cool.

Always operate toaster with crumb tray installed.
Toasting of coated or buttered products such as garlic 

bread, cheese sandwiches, and sweet rolls is NOT 

recommended. Residue will reduce toaster performance 

and could ignite inside toaster. Using toaster with food 

products listed above will void unit warranty.
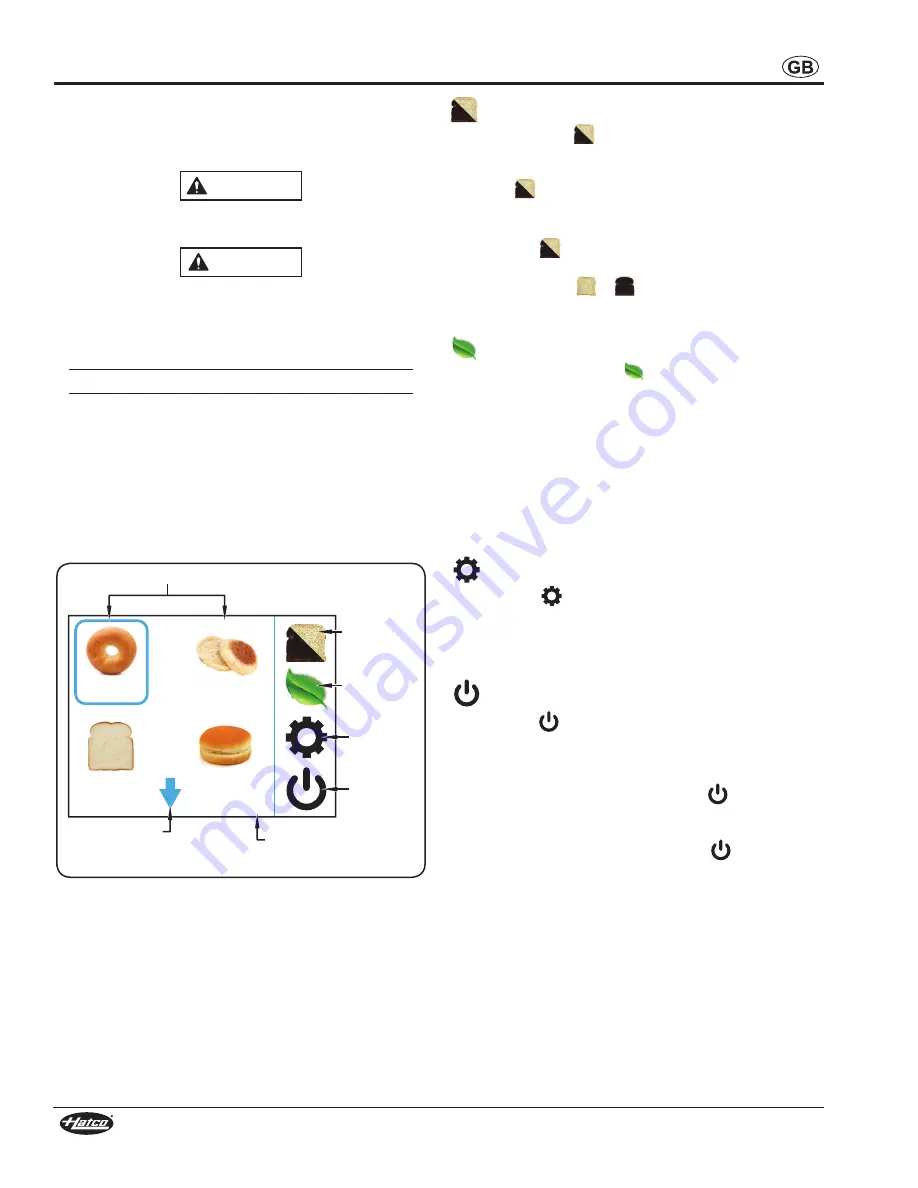
Touchscreen Control

The following are descriptions of the controls used to operate 

TQ3 Series Toast-Qwik Conveyor Toasters. All controls are 

located on the touchscreen control at the front of the unit.

NAME

NAME

NAME

1/3

NAME

Menu Item Icons

Touch arrow to

scroll between

screens.

Indicates the

screen number

(first of three).

Lighter/

Darker

Icon

PowerSave

Icon

Service

Icon

Standby

Icon

Touchscreen Control (showing the Menu screen)

Menu Item Icons

Each menu item icon stores the toast settings for a custom 

menu item. Touching one of the menu item icons will adjust the 

element and conveyor belt settings to the selected menu item. 

There are 12 customizable menu item icons available on the 

touchscreen control. Refer to “Programming a Menu Item” in 

this section to change or create custom menu items.

NOTE: When programming menu items, set up the most used 

menu items on the first Menu screen (screen 1/3).

 Lighter/Darker Icon

The Lighter/Darker (

) icon allows the toasting shade to be 

changed from the current menu item setting at any time during 

operation. 
To use the

icon:

  a. Place the item on the conveyor, and touch the desired 

menu item icon.

  b.  Touch the

icon on the touchscreen. The Toast Shade 

screen will appear.

  c.  Touch either the

or

icon up to five times to produce 

toasting shades lighter or darker than the current menu 

item setting. 

 PowerSave Icon

Touching the PowerSave (

) icon puts the toaster into 

PowerSave mode. In PowerSave mode, the toaster remains 

activated but the conveyor stops and the heat level drops to a 

reduced percentage of the current heat settings.

NOTE: During recovery from PowerSave mode, the 

ColorGuard system will slow down the conveyor speed 

for consistent toast color. Full conveyor speed will be 

achieved in approximately 10 minutes, depending on 

how much the heat output level of the elements was 

reduced during PowerSave mode.

 Service Icon

The Service (

) icon  provides access to the password-

protected Service screen. The Service screen allows 

management and service technicians to access specific toaster 

settings, diagnostic/service information, and software update 

functions.

 Standby Icon

The Standby (

) icon toggles the toaster between operation 

and standby. In standby, the conveyor and elements are off and 

the touchscreen control display is dark, but the toaster remains 

energized.
  • From standby, touch and hold the

icon for three 

seconds to activate the toaster. The toaster will be ready 

for operation in approximately ten minutes. 

  • From operation, touch and hold the

icon  for  three    

seconds to shut down operation and put the toaster into 

standby.

Содержание Toast-Qwik TQ3-2000 series

Страница 1: ...for future reference WARNING No opere este equipo al menos que haya le do y comprendido el contenido de este manual Cualquier falla en el seguimiento de las instrucciones contenidas en este manual pu...

Страница 2: ...ions 6 Installation 7 General 7 Operation 8 General 8 Touchscreen Control 8 Operating the Toaster 9 Programming Menu Items 10 PowerSave Mode 10 Updating Firmware 10 Adjusting Automatic PowerSave 11 Ch...

Страница 3: ...s have been instructed on the safe and proper use of the unit This unit is not intended for use by children or persons with reduced physical sensory or mental capabilities Ensure proper supervision of...

Страница 4: ...le toast tray and an over temperature warning light Model TQ3 500H Model TQ3 500H includes the same features as model TQ3 500 but has a 76 mm 3 high opening allowing for the toasting of food items up...

Страница 5: ...ening height is 76 mm 3 No Character Opening height is 51 mm 2 NOTE Shipping weight includes packaging Plug Configurations Units are supplied from the factory with an electrical cord and plug Plugs ar...

Страница 6: ...1 16 51 mm 2 256 mm 10 1 16 TQ3 500H 76 mm 3 TQ3 900 373 mm 14 3 4 524 mm 20 5 8 435 mm 17 3 16 333 mm 17 3 16 281 mm 11 1 16 51 mm 2 256 mm 10 1 16 TQ3 900H 76 mm 3 TQ3 2000 475 mm 18 3 4 536 mm 21 1...

Страница 7: ...t in an area that is convenient for use Location should be level and strong enough to support weight of unit and contents NOTICE Plug unit into a dedicated circuit Do not use multiple appliances on sa...

Страница 8: ...When programming menu items set up the most used menu items on the first Menu screen screen 1 3 Lighter Darker Icon The Lighter Darker icon allows the toasting shade to be changed from the current me...

Страница 9: ...m The elements and conveyor belt will adjust settings to the selected menu item Use the blue arrow keys to scroll between screens of available menu items Expandable Toast Tray USB Port Crumb Tray Touc...

Страница 10: ...test toast 100 highest heat darkest toast Btm Heat Heat output level from bottom elements Setting range is 1 100 1 lowest heat lightest toast 100 highest heat darkest toast Time Total time product is...

Страница 11: ...djustments are done touch EXIT to return to the Service screen then EXIT again to return to the Menu Screen Changing Control Settings Use the following procedure to make changes to control access priv...

Страница 12: ...rized Hatco Service Agent or contact the Hatco Service Department at 1 414 671 6350 Daily Cleaning To preserve the finish of the unit it is recommended that the metal surfaces be wiped daily with a da...

Страница 13: ...g chamber has slots that allow bread crumbs to drop through to the crumb tray Over an extended period of use bread crumbs may build up on the reflector and not drop through onto the tray 1 Perform the...

Страница 14: ...only Service by unqualified personnel may lead to electric shock or burn WARNING ELECTRIC SHOCK HAZARD Turn OFF power switch unplug power cord and allow unit to cool before performing any cleaning set...

Страница 15: ...lamp bulbs xenon light bulbs LED light tubes glass components and fuses Product failure in booster tank fin tube heat exchanger or other water heating equipment caused by liming sediment buildup chem...

Страница 16: ...asificaci n El ctrica 20 Dimensiones 20 Instalaci n 21 Generalidades 21 Operaci n 22 Generalidades 22 Control con pantalla t ctil 22 Funcionamiento de la tostadora 23 Programaci n de elementos de men...

Страница 17: ...seg rese de que todos los operadores se hayan instruido acerca del uso seguro y correcto de la unidad ADVERTENCIA Si la tostadora se sobrecalienta o el ventilador de enfriamiento del interior de la un...

Страница 18: ...aproximadamente 8 productos de panificaci n por minuto Entre las caracter sticas espec ficas del modelo se incluyen las siguientes deslizador de tostadas desmontable bandeja recolectora de tostadas ex...

Страница 19: ...de la unidad Lea la etiqueta para ver el n mero de serie y la verificaci n de la informaci n el ctrica de la unidad CEE 7 7 Schuko AS 3112 BS 1363 JIS C 8303 15 A 250 V Configuraciones del Enchufe ES...

Страница 20: ...mm 18 3 4 536 mm 21 1 8 435 mm 17 3 16 520 mm 16 9 16 281 mm 11 1 16 51 mm 2 359 mm 14 1 8 TQ3 2000H 76 mm 3 Modelo Voltaje Hertz Vatios Amperios Configuraciones del Enchufe Peso de embarque TQ3 500...

Страница 21: ...gar que sea conveniente para usar La ubicaci n debe estar nivelada y suficientemente firme como para soportar el peso de la unidad y el contenido AVISO Enchufe la unidad en un circuito dedicado No uti...

Страница 22: ...ar o crear elementos de men personalizados NOTA Cuando est programando elementos del men configure los m s usados en la primera pantalla del Men pantalla 1 de 3 cono de M s claro M s oscuro El cono de...

Страница 23: ...on los elementos de men disponibles NAME NAME NAME 1 3 NAME 5 Pulse el elemento de men que desee en la pantalla t ctil El elemento del men seleccionado se resaltar con un recuadro de color azul Las re...

Страница 24: ...la unidad debajo y a la derecha de la pantalla t ctil Apagado 1 Pulse y sostenga el cono en la pantalla t ctil durante un segundo para apagar la unidad y poner la tostadora en modo de espera 2 Despu...

Страница 25: ...e la flecha o la contigua al valor de Time para cambiar la cantidad de minutos de inactividad que deben transcurrir antes de que se active PowerSave autom tico 4 Cuando haya terminado de realizar los...

Страница 26: ...ento de Servicio de Hatco al 1 414 671 6350 Limpieza diaria Para preservar el acabado de la unidad se recomienda limpiar las superficies de metal diariamente con un pa o h medo ADVERTENCIA Si sumerge...

Страница 27: ...imentaci n 2 Limpie las migas en la bandeja de residuos con un cepillo de cerdas Para limpiar el reflector coloque el cepillo de cerdas a trav s de la banda transportadora y limpie hacia cada lateral...

Страница 28: ...o puede causar descargas el ctricas o quemaduras ADVERTENCIA PELIGRO DE ELECTROCUCI N Antes de realizar cualquier tipo de limpieza ajuste o mantenimiento APAGUE el interruptor de encendido desenchufe...

Страница 29: ...aci n indebida instalaci n deficiente o suministro de tensi n el ctrica inadecuado al Producto 2 LIMITACI N DE REMEDIOS Y DA OS La responsabilidad de Hatco y los derechos del Comprador descritos a con...

Страница 30: ...33 Caract ristiques Techniques 33 Configuration des fiches 33 Tableau des valeurs nominales lectriques 34 Dimensions 34 Installation 35 G n ralit s 35 Mode d emploi 36 G n ralit s 36 Panneau de comma...

Страница 31: ...areil AVERTISSEMENT DANGER D INCENDIE Laissez une distance minimale de 25 mm 1 sur les c t s et l arri re de l appareil Laissez une distance minimale de 305 mm 12 l avant mesur partir de l ouverture d...

Страница 32: ...it maximale est d environ 8 pains par minute Les caract ristiques sp cifiques du mod le incluent une glissi re toasts amovible un bac toasts extensible et un t moin signalant les surchauffes Mod le TQ...

Страница 33: ...NOTA tiquette des caract ristiques techniques situ e au dos de l appareil Consultez l tiquette pour conna tre le num ro de s rie et v rifier les caract ristiques lectriques de l appareil CEE 7 7 Schuk...

Страница 34: ...35 mm 17 3 16 333 mm 13 1 8 281 mm 11 1 16 51 mm 2 256 mm 10 1 16 TQ3 900H 76 mm 3 TQ3 2000 475 mm 18 3 4 536 mm 21 1 8 435 mm 17 3 16 520 mm 16 9 16 281 mm 11 1 16 51 mm 2 359 mm 14 1 8 TQ3 2000H 76...

Страница 35: ...de supporter le poids de l appareil et de son contenu AVIS Branchez l appareil un circuit d di Ne branchez pas plusieurs appareils sur un m me circuit Ne placez pas l appareil dans une zone expos e d...

Страница 36: ...e cette section pour modifier ou cr er des rubriques de menu personnalis es NOTA Lorsque vous programmez des rubriques de menu mettez les rubriques les plus utilis es sur la premi re page du Menu page...

Страница 37: ...es NAME NAME NAME 1 3 NAME 5 S lectionnez l ic ne de rubrique de menu souhait e sur l cran tactile La rubrique s lectionn e sera entour e d un carr bleu Les l ments et la courroie du convoyeur ajusten...

Страница 38: ...primer le nom actuel b Utilisez le clavier pour changer ou mettre jour le nom de la rubrique c Touchez le touche pour enregistrer le nom et revenir au menu de programmation 5 Lorsque la programmation...

Страница 39: ...nger le niveau de sortie de chaleur des l ments en mode conomie d nergie Temps Appuyez sur la fl che ou c t de la valeur Temps pour modifier le nombre de minutes d inactivit requises pour activer le m...

Страница 40: ...ou le Service apr s vente Hatco au 1 414 671 6350 Nettoyage quotidien Pour pr server la finition de l appareil il est recommand de nettoyer quotidiennement les surfaces m talliques l aide d un chiffo...

Страница 41: ...ite dans la section MODE D EMPLOI et d branchez le cordon d alimentation 2 Essuyez les miettes qui se trouvent sur le tiroir ramasse miettes l aide d un pinceau brosse Pour essuyer le r flecteur place...

Страница 42: ...ENT DANGER DE D CHARGE LECTRIQUE Mettez l appareil en veille laissez le refroidir mettez l interrupteur marche arr t en position OFF et d branchez le cordon d alimentation avant de proc der au nettoya...

Страница 43: ...e par le collage l accumulation de s diments les attaques chimiques ou le gel ou une mauvaise utilisation manipulation ou application du produit une mauvaise installation ou l application de tension...

Страница 44: ...e information Symbol Identification Identificaci n de los s mbolos Identification de Symbole Caution Hot Surface Precauci n superficie caliente Attention Surface Chaude Power ON Encendido Puissance Su...

Отзывы: