background image

12

Form No. F2GPM-0721

English

OPERATION

Clear a Single Order

Use this procedure to clear an order.
  1.  On the Select Lockers screen, touch a locker number with 

the order you want to clear.

  2.  With the locker selected, touch LOCKER SETTINGS.
  3. Enter the Passcode and touch ENTER to access the 

Locker Settings screen. 


•  The factory set Passcode is: 88888

  4.  On the Locker Settings screen, touch CLEAR ORDER.

NOTE: Clearing an order will clear the order from the selected 

locker and all other lockers linked to the same order.

Change a Locker’s Heated/Ambient Setting 

Use this procedure to change a single locker’s Heated/Ambient 

setting. 
  1. On the Select Lockers screen, touch the desired locker 

number to change the HEATED/AMBIENT mode selection 

of that locker.

 2. With the locker selected/highlighted, touch LOCKER 

SETTINGS.

  3. Enter the Passcode and touch ENTER to access the 

Locker Settings screen. 


•  The factory set Passcode is: 88888

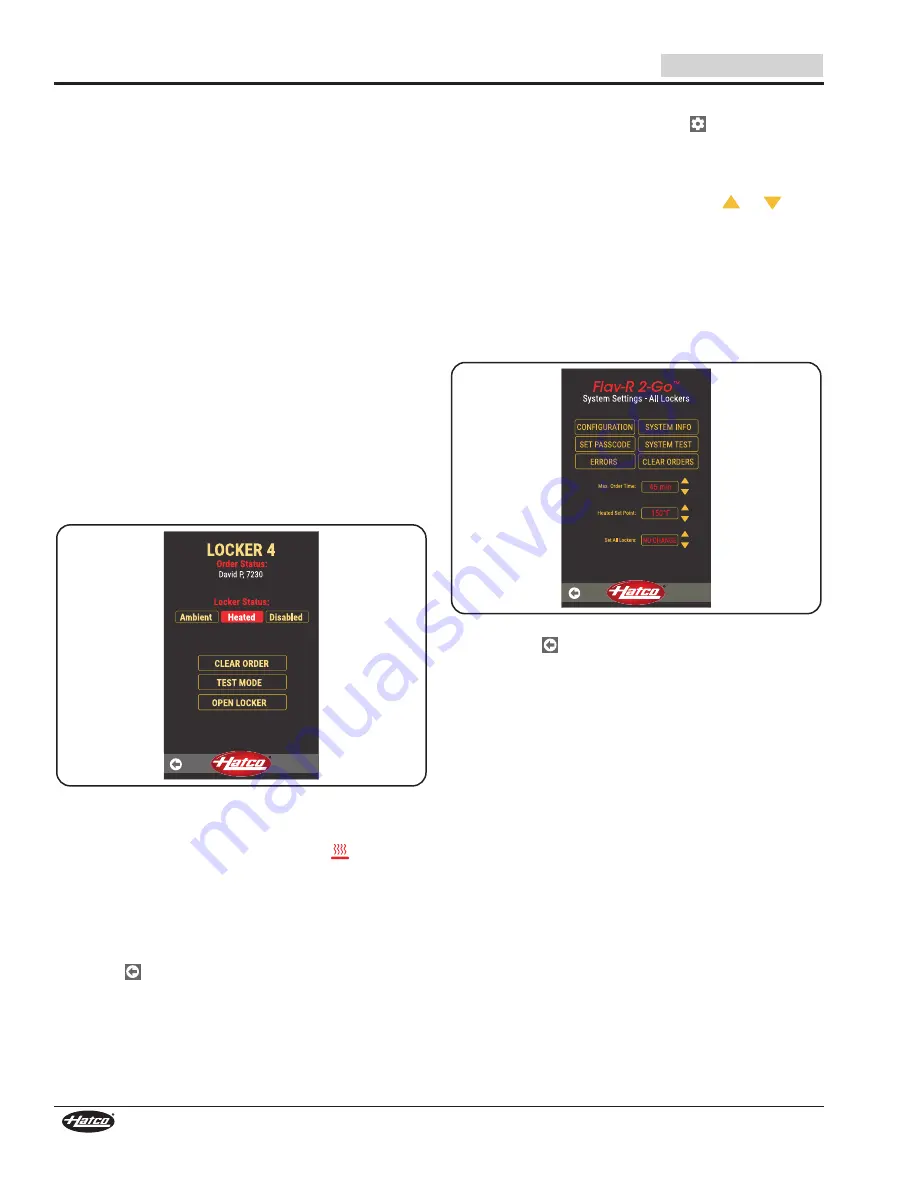
Locker Settings Screen

  4.  On the Locker Settings screen, touch AMBIENT or HEATED.
 

•  Heated selection will turn the heating elements on for 

the locker. The HEATED mode icon (

) will appear 

next to the locker on the Select Lockers Screen.


• Allow the locker 30 minutes to reach operating 

temperature.


•  Ambient selection will turn the heating elements off for 

that locker. No icon will appear next to the locker on the 

Select Lockers Screen.

  5. Touch   to return to the Select Lockers screen.

Change All Lockers’ Heated/Ambient Setting

  1.  On the Select Lockers screen, touch 


for system settings.

  2. Enter the Passcode and touch ENTER to access the 

System Settings screen. 


•  The factory set Passcode is: 88888

  3. On the “Set All Lockers” line, touch the 

 or 

 arrow 

to toggle between “Ambient”, “Heated”, and “No Change” 

selections.


•  “No Change” keeps the ambient or heated setting for 

individual lockers made in the “Change a Locker’s 

Heated/Ambient Setting” procedure.


•  “Ambient” turns off ALL of the heating elements inside 

each locker.


•  “Heated” turns on ALL of the heating elements inside 

each locker.

System Settings Screen

  4.  Touch the 


to return to the Select Lockers screen.

Overtime Order

When an order is in the locker past the maximum order time, the 

timer on the Select Lockers screen will turn red. The customer 

will not be able to open the locker after the timer expires. The 

customer will be notified to “Please see staff to reorder!”. 
In order for the locker to be used for another order, the locker 

must be cleared. Use the following procedure to reset an 

overtime order.
  1.  Remove and discard food from locker.
  2.  Follow the “Clear a Single Order” procedure.
  3.  When the next order is ready, follow the “Placing an Order” 

procedure.

Содержание F2GBP Series

Страница 1: ...dad concerniente al mantenimiento uso y operaci n de este producto Si usted no puede entender el contenido de este manual por favor pregunte a su supervisor Almacenar este manual en una localizaci n s...

Страница 2: ...Mount Models 8 Installing Built In Models 9 Operation 10 General 10 Placing an Order 10 Picking up an Order 11 Clear a Single Order 12 Change a Locker s Heated Ambient Setting 12 Change All Lockers He...

Страница 3: ...le Turn OFF power switch unplug power cord and allow unit to cool before performing any cleaning adjustments or maintenance DO NOT submerge or saturate with water Unit is not waterproof Do not operate...

Страница 4: ...AND ACCESSORIES section of this manual for all of the available options and accessories F2GP 21 F2GP 22 and F2GP 12 Models Countertop Models The F2GP 21 F2GP 22 and F2GP 12 models are designed for co...

Страница 5: ...d size electrical receptacle NEMA 5 15P Plug Configurations NOTE Receptacle not supplied by Hatco NOTE The specification label is located next to the power cord See the label for the serial number and...

Страница 6: ...View Side View A B C SPECIFICATIONS Model Width A Depth B Height C F2GP 21 C 77 3 4 1974 mm 24 11 16 626 mm 16 7 8 428 mm F2GP 22 C 77 3 4 1974 mm 24 11 16 626 mm 31 3 4 804 mm F2GP 12 C 44 1 8 1121...

Страница 7: ...mm 2 1 8 54 mm C A B Model Width A Depth B Height C F2GBP 12 C 44 1 8 1121 mm 24 11 16 626 mm 34 3 4 883 mm F2GBP 14 C 44 1 8 1121 mm 24 11 16 626 mm 64 3 8 1635 mm F2GBP 21 C 77 3 4 1974 mm 24 11 16...

Страница 8: ...the model and installation type Installing Countertop Models Installing Floor Mount Models Installing Built In Models Installing Countertop Models 1 Place the unit in the desired location Locate the u...

Страница 9: ...to 78 1 2 1981 1994 mm 32 to 32 1 2 812 826 mm A B Wall Cutout Dimensions 2 Remove the access panels on the bottom and top of each locker column on the customer side by removing the screws 3 Lift the...

Страница 10: ...ON BURN HAZARD Some exterior surfaces on the unit will get hot Use caution when touching these areas 2 For lockers with HEATED mode enabled allow the heated lockers 30 minutes to reach operating tempe...

Страница 11: ...e following procedure to unlock and remove food from a locker on the customer side A general outline of this procedure should be provided to the customer 1 On the Orders Ready screen touch the name th...

Страница 12: ...rature Ambient selection will turn the heating elements off for that locker No icon will appear next to the locker on the Select Lockers Screen 5 Touch to return to the Select Lockers screen Change Al...

Страница 13: ...Lockers screen touch for system settings 2 Enter the Passcode and touch ENTER to access the System Settings screen The factory set Passcode is 88888 3 Touch CLEAR ORDERS All orders will be cleared on...

Страница 14: ...he USB slot The software folder must be in the root folder on the USB drive The software will update automatically when the USB drive is inserted USB Slot Touchscreen Controller USB Slot 3 After the t...

Страница 15: ...e environments in which they are used Some aftermarket or generic replacement parts do not have the characteristics that will allow them to operate safely in Hatco equipment This unit has no user serv...

Страница 16: ...Service by unqualified personnel may lead to electric shock or burn WARNING ELECTRIC SHOCK HAZARD Turn OFF power switch unplug power cord and allow unit to cool before performing any cleaning adjustm...

Страница 17: ...on either side but needs to be installed on the bracket under the touchscreen controller as shown below Side Shelf Mounting Locations Side Shelf Side Shelf Installation 2 Install the circle shelf bra...

Страница 18: ...xt indicates locker is overtime White text indicates time food is in locker Settings Locker is disabled Order Code Locker in HEATED mode Error Description of Select Lockers Screen NOTE If the order co...

Страница 19: ...armer Elements metal sheathed Drawer Warmer Drawer Rollers and Slides Food Warmer Elements metal sheathed Display Warmer Elements metal sheathed air heating Holding Cabinet Elements metal sheathed air...

Страница 20: ...lation des mod les encastr s 28 Mode d emploi 29 G n ralit s 29 Passer une commande 29 R cup rer une commande 30 Effacer une commande unique 31 Modifier le r glage chauff temp rature ambiante d un cas...

Страница 21: ...AVERTISSEMENT DANGER DE D CHARGE LECTRIQUE Brancher l appareil sur une prise de courant avec terre de tension de format et de configuration des broches corrects Si la fiche et la prise ne se correspon...

Страница 22: ...21 F2GP 22 et F2GP 12 mod les sur comptoir Les mod les F2GP 21 F2GP 22 et F2GP 12 sont con us pour tre utilis s sur un comptoir Ces mod les comportent deux ou quatre casiers de haut avec une ou deux c...

Страница 23: ...F2GBP 21 et F2GBP 22 mod les encastr s Les mod les F2GBP 12 F2GBP 14 F2GBP 21 et F2GBP 22 sont con us pour tre encastr s dans un mur Ces mod les comportent une ou deux colonnes et ont une hauteur de...

Страница 24: ...Reportez vous l tiquette du num ro de s rie et les donn es lectriques de l appareil Tableau des valeurs nominales lectriques Mod les mont s sur un comptoir Tableau des valeurs nominales lectriques Mod...

Страница 25: ...les mont s au sol Vue de face Vue de c t A B C Mod le Largeur A Profondeur B Hauteur C F2GP 21 C 1974 mm 77 3 4 626 mm 24 11 16 428 mm 16 7 8 F2GP 22 C 1974 mm 77 3 4 626 mm 24 11 16 804 mm 31 3 4 F2...

Страница 26: ...3 mm 15 16 54 mm 2 1 8 A B Mod le Largeur A Profondeur B Hauteur C F2GBP 12 C 1121 mm 44 1 8 626 mm 24 11 16 883 mm 34 3 4 F2GBP 14 C 1121 mm 44 1 8 626 mm 24 11 16 1635 mm 64 3 8 F2GBP 21 C 1974 mm 7...

Страница 27: ...et du type d installation Installation des mod les mont s sur un comptoir Installation des mod les mont s au sol Installation des mod les encastr s Installation des mod les mont s sur un comptoir 1 P...

Страница 28: ...mensions de la d coupe du mur 2 Retirez les vis des panneaux d acc s situ s en haut et en bas de chaque colonne de casiers c t client puis retirez ces panneaux 3 Soulevez l appareil et placez le avec...

Страница 29: ...es de l appareil deviennent chaudes Toucher ces zones de l appareil avec pr caution 2 Pour les casiers dont le mode CHAUFF est activ Laissez aux casiers chauff s 30 minutes pour atteindre leur temp ra...

Страница 30: ...ur d verrouiller un casier et en retirer de la nourriture c t client Les grandes lignes de cette proc dure doivent tre fournies au client 1 Sur l cran Commandes pr tes appuyez sur le nom sous lequel l...

Страница 31: ...ne ic ne n appara tra c t du casier sur l cran de s lection des casiers 5 Appuyez sur pour revenir l cran de s lection des casiers Modifier le r glage chauff temp rature ambiante de tous les casiers 1...

Страница 32: ...1 Sur l cran de s lection des casiers appuyez sur pour acc der aux param tres du syst me 2 Saisissez le code d acc s et appuyez sur ENTER entr e pour acc der l cran des param tres du syst me Le code...

Страница 33: ...l dans la prise USB Le dossier du logiciel doit se trouver dans le dossier racine de la cl USB Le logiciel se met automatiquement jour lorsque la cl USB est ins r e Prise USB Panneau de commande cran...

Страница 34: ...dans lesquels elles sont utilis es Certaines pi ces de rechange g n riques ou de second march ne pr sentent pas les caract ristiques leur permettant de fonctionner sans danger dans la mat riel Hatco C...

Страница 35: ...l appareil en basculant l interrupteur d alimentation sur arr t puis nouveau sur marche Si le probl me persiste contactez une agence de service apr s vente agr e ou Hatco pour obtenir de l aide GUIDE...

Страница 36: ...ode QR Utilisez les formats de donn es suivants lors de la cr ation d un code QR en fonction du type de code cr er Format de donn es pour le placement d une commande par l op rateur ORDER CREATE ORDER...

Страница 37: ...c t client l aide du scanner de code QR Les grandes lignes de cette proc dure doivent tre fournies au client 1 Sur l cran Commandes pr tes scannez le code QR Si le nom du client ne figure pas sur la...

Страница 38: ...la tablette circulaire 3 Ins rez la tablette lat rale sur les supports de la tablette circulaire Tablette lat rale Support de la tablette lat rale Installation de la tablette lat rale 4 Fixez la tabl...

Страница 39: ...enveloppe m tallique l ments de pr sentation du r chaud enveloppe m tallique air chauffant l ments des armoires de stockage enveloppe m tallique air chauffant l ments de puits chauffants s ries HW HWB...

Страница 40: ...ire Plattsburgh 800 634 5005 Duffy s AIS Sauquoit 800 836 1014 J B Brady Inc Syracuse 315 422 9271 NORTH CAROLINA Authorized Appliance Charlotte 704 377 4501 OHIO Akron Canton Comm Svc Inc Akron 330 7...

Отзывы: