background image

25

H4X

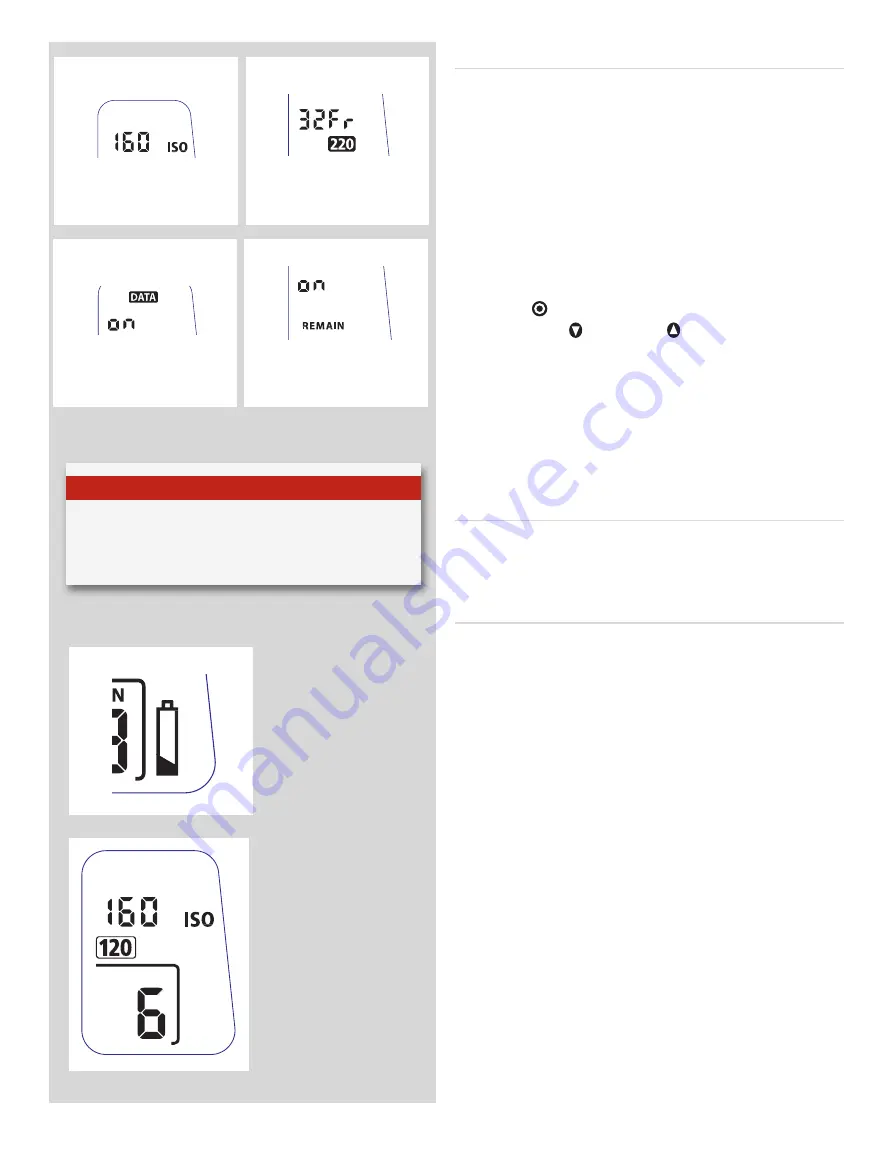
Manual film 
speed setting. 

220 film length 
setting. 

Data imprinting 
setting. 

‘Frames remaining’ 
counter setting.

Frame counter setting                                                        

The frame counter can be set to show either how many unex­
posed frames remain on a film or how many frames have already 
been exposed. The LCD shows your choice of setting by adding 
the word 

Remain

 as a reminder of the number of frames


remain-

ing


or ‘countdown’. Absence of this word implies the opposite, 

namely, ‘count­up’, so it denotes the number of the next frame 
to be used (for example, the figure 4 means three frames have 
already been exposed). This information is also automatically dis­
played on the grip LCD and viewfinder LCD though only as a fig­
ure above a symbol. 

To access frame counter setting:

1)  Ensure the magazine settings lock is in the unlocked position.
2)  Press the   button until 

Remain

 appears.

3)  Press either the   button or the   button to reach the desired 

setting (toggle function). 


•‘on’ will show the number of frames remaining  on the roll.


•‘oFF’ will show the number of the next frame in the series. 

4)  The new setting will be saved automatically after a time out 

of five seconds. 

5)  Return the magazine settings lock to the locked position.

Low-battery symbol                                                               

The low­battery symbol only appears on the magazine LCD when 
the battery needs changing.

Example

In the example shown here:


•  120 film length set manually


•  the film speed (ISO160) has been set manually 


•  5 frames have already been exposed (therefore with regular  
   120 film, 11 frames remain)


•  the battery is functional 

N o t e

Operation and changes made to the data imprinting func-
tion are accessed through the camera menu. Please see sep-
arate section in camera User Manual for full details.

Содержание H4X

Страница 1: ...H4X User Manual H4X ...

Страница 2: ...attery holder 14 Fitting the batteries 14 Battery life 14 Battery status 15 Power 15 On 15 Standby 15 Viewfinder screen 16 Accessory connection 16 PC connector 16 Base plate 16 3 Viewfinder 17 Parts Components 18 Attaching and removing the viewfinder 18 Eyepiece adjustment 18 Eye cup 18 Integral flash unit 18 4 Film magazine 19 Parts components 20 LCD panel 21 LCD illumination 21 Buttons 21 Functi...

Страница 3: ...ital backs 3rd party digital backs or film magazines Access to HCD lenses for use with film or 3rd party backs and access to the revolutionary True Focus function with all backs and film magazines are just two features in this extremely attractive model Hasselblad cameras famed for quality and reliability were chosen to re cord the lunar missions there could hardly be better praise than that Hasse...

Страница 4: ...ch as the HTS 1 5 and the CF Adapter to really broaden your range The HTS 1 5 tilt shift adapter optional accessory delivers an easy to use portable tilt shift solution for five HC HCD lenses ranging from 28mm to 100mm The CF adapter optional accessory allows use of the clas sic CF lenses from the Hasselblad V System Have a look at the list towards the end of this manual for more details Phocus Ha...

Страница 5: ...H4X 1 Photo Claudio Napolitan Hasselblad Masters This section provides an introduction to the control buttons functions as well as the information provided on the display screens General overview controls ...

Страница 6: ...ay Accesses battery status and general informa tion screen ON OFF PROFILES ESC button Turns the camera on and off Accesses Profiles and acts as escape button for other functions Rear control wheel Accesses and changes various set tings M UP button Raises and lowers mirror Can be reassigned to another function Remote release cord port For attaching a remote release cord electrical STOP DOWN button ...

Страница 7: ...mber of captures in that option is chosen by the rear control wheel front control wheel rear control wheel Setting information The lower row on the screen displays information about the current state of the setting In short the upper row displays what you can do and the lower row displays the current state of settings or what you have done Example of typical camera grip display Grip display overvi...

Страница 8: ...am variable M Manual Centre Weighted CentreSpot Spot Exposure method and metering method mode examples Flash LED Exposure method indication aperture priority mode Aperture setting f 5 6 Warning triangle LED Exposure compensation setting reminder symbol Metering method setting Centre weighted Focus Assist LED Exposure compensation setting 0 7 EV Shutter speed setting 1 30 second Capture counter Tru...

Страница 9: ...al focus choice screen from the main screen See under Lenses for full details It also acts as the ON and SEL select buttons for many other settings Drive button SAVE ENTER D This is a triple function button It provides direct access to the Drive settings see under Lenses Drive for full details It also acts as the SAVE and ENTER buttons for many other settings as well as an OK button when navigatin...

Страница 10: ...ll details On the front of the grip there are two more control buttons plus the remote cord release port M UP button M Press this button to raise the mirror and press again to lower it toggle function A quick double press of the button two within a half second will immediately access the Self timer function Can be reassigned in Custom Options to another function Remote release cord port N For atta...

Страница 11: ...ly Q R ON OFF Error Ready Overexposure Low battery ON OFF Error Ready Low Battery ON OFF Media full IAA yellow Error Ready Overexposure Underexposure 5 images left 1 image left Low battery ON OFF Media full IAA yellow Overwrite red Transfer complete Error Ready Overexposure Underexposure 5 images left 1 image left Low battery IAA yellow Overwrite red Transfer complete Overexposure Underexposure 5 ...

Страница 12: ...isplay Enter moves screen down one level on the menu Exit moves screen back up one level on the menu Does not save any settings Off deactivates the particular function being set On activates the particular function being set Sel Select selects the character marked for image info and profile name ESC Escape terminates an action and returns to the main screen Does not save any settings Save saves a ...

Страница 13: ...he viewfinder screen which can be easily removed or exchanged without the use of special tools or adjustment procedures Please take extra care when handling the camera body with out a protective cover or the digital back in place to pro tect the auxiliary shutter Likewise the front opening of the camera body reveals the mirror when unprotected by a cover or lens Do not touch or attempt to clean th...

Страница 14: ...attery holder by depressing the the battery holder button A and simultaneously swinging the battery holder re taining lever B down until it stops Pull battery holder down wards C To attach ensure the battery holder is flat against the camera grip and aligning the two upper lugs with the slot in the grip slide it back into position as far as it will go Swing back the battery holder retaining lever ...

Страница 15: ...well as general practice Power The camera can be set at two active power modes ON or Standby as well as OFF In active modes battery consumption is least in Standby mode and most in ON mode The camera enters Standby mode to conserve battery consumption after 10 seconds Default but can be changed in Custom Options 1 Both the grip and the digital back displays are dimmed accordingly The digital back ...

Страница 16: ... Matte D viewfinder screen for extreme brightness clarity and even illumination An optional accessory screen with a grid pattern is also available To change a viewfinder screen remove the viewfinder to access the viewfinder screen To remove the screen place the tip of a ballpoint pen or similar in the viewfinder screen removal lug and pull upwards To replace the screen position the right side of t...

Страница 17: ...interchangeable to suit preference each of them naturally indicating the spot light metering area for accuracy in expo sure calculation The information display located beneath the viewing frame is continually updated and visible and is back lit for optimum visibility This display also duplicates much information visible on the grip display for immediate check ing In addition to the display there a...

Страница 18: ...hly toned area While holding the camera in your left hand you can with your right thumb turn the adjustment wheel until the markings on the viewfinder screen reach the optimum sharpness for your eyesight If you normally wear eyeglasses for distance viewing and intend to wear them for camera use then do not remove them for the above procedure If on the other hand you prefer to remove your eyeglasse...

Страница 19: ...ic film advance wind on and wind off A display provides information while some settings data can be printed on the edge of the film for archival pur poses Film magazines not only provide for special requirements in technical applications but also allow a broader spectrum of expression for creative work Film Magazine Photo Mark Zibert Hasselblad Masters ...

Страница 20: ...storing a film magazine to protect both the databus connection and the darkslide The features include Automatic 120 220 compatibility Automatic wind on wind off Automatic film advance LCD information panel Integral darkslide Customizable data imprinting Illuminated LCD Barcode recognition Count up or count down film frame reminder choice Multi shot option A B C D E F G H I J K L Parts and componen...

Страница 21: ...oggle action Change down button D Can change the settings downwards For example to decrease the film speed setting Toggle action Function selector E Selects the four functions that can be set on the magazine The functions are on a menu loop so that repeated pressing of the se lector button will successively access all functions in turn After a time out of five seconds of non activity the display r...

Страница 22: ...rox 1 month of use left a low battery symbol appears on the magazine LCD as a warning The magazine will continue to function with no battery power left as long as it remains attached to the camera body How ever when detached the settings will not be stored Battery replacement 1 2 Release the film holder by folding out the film holder key and rotating it 90 in a counter clockwise direction Withdraw...

Страница 23: ...arkslide indicator on the magazine shows red sig nifying that the darkslide is closed Firstly push the lever of the magazine release button to the right fig 4 1 and while maintain ing that position press the centre of the button firmly inwards to wards the camera body fig 4 2 to finally release the magazine Note You cannot remove a magazine if the darkslide is not closed Note Film settings ISO fil...

Страница 24: ...gth setting and film speed setting is automatic The LCD will automatically show the barcode symbol and the appropriate film length Note that film speed can be overridden with barcoded films but not film length If however the film has no barcode then proceed as follows To access film type setting 1 Ensure the magazine settings lock is in the unlocked position 2 Press the button until the 120 or 220...

Страница 25: ... 1 Ensure the magazine settings lock is in the unlocked position 2 Press the button until Remain appears 3 Press either the button or the button to reach the desired setting toggle function on will show the number of frames remaining on the roll oFF will show the number of the next frame in the series 4 The new setting will be saved automatically after a time out of five seconds 5 Return the magaz...

Страница 26: ...he film holder key clockwise 90 to lock the film holder in place and fold the key back into its stored position You might find that increased pressure on the left hand side of the film holder will more easily ensure a positive and correct positioning in the magazine If the camera is active or in standby mode the film will be wound automatically by the camera to position the first frame this functi...

Страница 27: ...formance expected from Hasselblad In addition to exceptional sharpness the design also incorporates a very pleasing bokeh All lenses feature an electronically controlled central shutter designed to extreme ly fine tolerances for supreme accuracy To ensure reliable and fast autofocus in low contrast and low light conditions an AF focus assist light on the grip is automatically activated As a genera...

Страница 28: ...ng 67 77 95 mm according to lens and are screwed clockwise into place As there is no rotation of the front section of the lens when focus is changed filters do not rotate either This is particularly useful when using polarizing or graduated filters where the orientation is normally critical Lens shades 5 6 All lenses are supplied with lens shades that additionally provide extra protection for tran...

Страница 29: ...tively if you have already calculated the required distance you can make a manual distance setting by using the distance scales together with the infrared mark instead of the central lens index For specialists please contact your Hasselblad dealer for information about digital backs adapted solely for infrared photography Focus assist 10 11 12 As well as the conventional view on the focusing scree...

Страница 30: ...ease note that when focusing manually the infinity and closest distance marks on the lens scale can appear to be positioned beyond the central index This is only an apparent effect and does not change the focusing range of the lens Autofocus override in Manual mode See the following section for a description of how to use the advantages of a rapid auto focus check while remaining in Manual mode Au...

Страница 31: ...ally used in specific circumstances to automati cally correct for camera angle focus setting discrepancies but it can also be combined with other autofocus settings To be able to exploit True Focus correctly a few important points should be studied in order to obtain a full understanding of how and when to use it Basically there are four variables to pay attention to listed below a proximity of ca...

Страница 32: ...RIVE button to store the setting Manual override in autofocus mode Manual override is always possible in automatic focus mode without any need to make a new setting just rotate the focusing ring in the conventional manner As the lens barrel does not rotate in autofocus mode you can hold the focusing ring for instant manual adjustments as you would with a conventional lens However to retain the new...

Страница 33: ...lock resetting of multi point sensors are distracting to workflow and prone to error Making a True Focus setting at A will ensure that focus is automatically adjusted in accordance with the change of camera angle True Focus uses yaw rate technology and by way of the Absolute Position Lock APL processor logs camera movement as the basis for an extremely rapid compensatory focus reset without any sh...

Страница 34: ... appear in the viewfinder and the audio confirmation signal 4 Recompose the picture and press shutter release button camera does not re focus because it is temporarily in AF T mode The True Focus icon disappears from the view finder Camera reverts to AF S Note that camera reverts to AF S if the focusing ring on the lens is moved In this mode the True Focus function is activated by pressing an assi...

Страница 35: ... accessories However a warning is displayed which disappears after confirmation Tip The True Focus function can also be combined with other auto focus modes for specific situations Tip To expand your range of lenses consider using a CF adapter to allow you to use most of the lenses from the Hasselblad V system Tip For users who prefer manual focus control but would like the benefits of autofocus o...

Страница 36: ...posure settings even in difficult and changeable lighting situations Light measurement is made through the lens TTL and exposure is controlled manually or automatically by the con trol wheels and or settings The information is visible on both the grip display and the viewfinder display A great deal of control is available ranging from 100 manual through to sophisticated fully automatic by way of t...

Страница 37: ...al preference and ways of working A discussion of the points to consider in this context is beyond the scope of this manual Since the light measuring system is TTL filter factors lens extension extension ring fac tors etc are automatically taken into account for average purposes However some combinations of methods and equipment can cause slight discrepancies for various reasons and therefore for ...

Страница 38: ...tonal comparison measurements The spot mode can display zones instead of EVs in the viewfinder display see Custom Options 14 Selecting metering method Proceed as follows with the camera in active mode 1 Press the EXP button on the viewfinder 2 Turn the rear control wheel in either direction 2a to successively access the three choices Centre Weighted Centre Spot and Spot 2b 3 Press Save DRIVE butto...

Страница 39: ... and viewfinder displays in manual mode means that a change has been made to the exposure compensation setting See later section on Exposure compensation The actual aperture settings and shutter speeds are indicated to the right of the exposure scale in the conventional manner Note full stops half stops and third stops are also displayed according to setting see increment setting For example a set...

Страница 40: ...ent combinations AE L button 1 2 3 4 5 6 This button has two main functions that can be incorporated in various working methods involving exposure locking It also has an extra function for the flash measure capability see AE L section under Flash The AE L button can a lock an EV setting in manual and automatic modes b be used as a Zone System placement button a When the button is pressed fig 1 the...

Страница 41: ...t parts of the subject as zone values illus 5 in the viewfinder display instead of EV deviations as you move the spot marking over the subject Included are Lo and Hi illus 6 to signify areas beyond the range of the sensor Alternatively you can choose to re classify an area as another zone and then check the rest of the subject to see how other areas fall on the zone scale Do this by following the ...

Страница 42: ...learing of the setting after capture However in Custom Options 3 you can select 1 3 1 or 1 2 EV increment changes in Custom Options 23 you can choose to retain the setting after capture and in Custom Options 17 you can deactivate the function To make a fixed exposure compensation setting proceed as follows with the camera in active mode 1 Press the button on the viewfinder 2 Turn either the front ...

Страница 43: ...to Multi exp 3 Turn the rear control wheel to select the number of frames required 4 Press Save DRIVE button to store the setting 5 The LCD will display firstly that no frames have been exposed in the multi sequence For example in the case of a three exposure setting the display will be Exp 0 3 6 Press the shutter release button to make the first exposure 7 The LCD will display how many frames hav...

Страница 44: ...44 H4X Photo Mark Holthusen Hasselblad Masters 7 Profiles not only allow for rapid setup in changing working environments but also ensure an element of security Profiles ...

Страница 45: ...cus single single drive programmed exposure centre weighted metering user button None Studio normal flash sync manual focus single drive manual exposure spot metering user button AF Fill flash normal flash sync adjusted output 1 7EV autofocus single single drive auto exposure centre weighted metering Spare customized profiles The default setting is highlighted on the display for easy and rapid acc...

Страница 46: ...le to what suits you see under Image Info 4 2 for procedure details To use a profile from the main screen press the PROFILES button to reach the profiles screen again Scroll down the list to the pro file you want and then press the Load AF button All the saved settings will then be automatically implemented Using profiles 1 From the main screen click PROFILES ON OFF button on the grip and the prof...

Страница 47: ...zed workflow The custom options are designed to work for you in the back ground ensuring security and also helping to bring down the barriers between you and capturing the image Each one can be changed to suit your preferences so that the whole camera becomes a reflection of the way you like to work Custom settings controls and displays ...

Страница 48: ...menu MENU Text setting System status Interval options This section is primarily only accessible with Hasselblad CF CFH use 3rd party digital backs may or may not initiate the Digital screen and its settings Please refer to the appropriate user manuals for information Digital Custom Options ...

Страница 49: ...inations of symbols on the display at any time will not necessarily be the same as many of the screens illustrated in this manual To simplify the descriptions reference is often made to a main or standard screen Apart from default settings there is no actual standard setting in the normal sense and there fore you create your own standard which of course can be changed at any time The main screen i...

Страница 50: ... Normally the mirror is raised before the shutter is tripped creating a pause between the two actions to minimize camera vibration However during this pause there will be no image in the viewfinder and no light metering available for any eventual exposure change Therefore the Self timer function can be set to a sequence where the delay is followed by the mirror being raised instead Normally the mi...

Страница 51: ...s to its normal position and the camera is made ready for the next capture Mirror raised Mirror remains in raised position No image is visible in the viewfinder until M UP button pressed 8 Press On AF button Note that this now reads Off and the line of text at the bottom of the screen reads Self timer on 9 Press SAVE DRIVE button to save the setting 10 Press ENTER DRIVE button again from the Self ...

Страница 52: ... drive settings In Single you must press the shutter release button separately for every separate capture until the sequence is finished In Continuous you can either maintain the pressure on the button to take all frames without stopping or you can release the pressure on the button and press again to continue to the end of the sequence without losing any frames within the set sequence Tip Check t...

Страница 53: ...f and the line of text at the bottom of the screen reads Bracketing on Half press the shutter release button to standby mode for this function press the shutter release button again full press for activation or full press the shutter release for immediate activation To escape from this mode press Menu then Enter Drive button on the Bracketing screen then Off AF button Step highlighted 1 3 EV varia...

Страница 54: ...Press Save Drive button to save the setting 8 Press Enter Drive button again from the Interval screen to activate the function Press On AF button Note that this now reads Off and the line of text at the bottom of the screen reads Interval on Half press the shutter release button to standby mode for this function press the shutter release button again full press for activation or full press the shu...

Страница 55: ...lowing list the options marked in red are the default settings So in the case of the User button for example as None is the default there will be no reaction from the camera until you make a specific choice and save it If you want to reset the camera to the default setting for all options press the ON OFF button quickly to enter Profiles select Standard and then press Load MENU F R Enter Enter F F...

Страница 56: ...ions The words and figures in red signify the default setting for that option 4 1 Custom options Stop down button function 6 Stop Down but can be reassigned to B mode T mode Flash Measure Interval timer Cycle LM mode Expose Standby Histogram IAA toggle Digi tal focus check Delete last image Grey balance exposure None AF Drive AE lock Self Timer Bracketing Mirror up M UP button function 7 Mirror up...

Страница 57: ...on On allows the adjustment Off retains the normal setting Spot mode 14 Normal Zone Determines how the camera behaves when set to Spot Mode Normal makes the camera behave in the same fashion as when set to Average or Centre Weighted Zone makes the camera behave in the same fashion as the Hasselblad 205FCC That is the central spot is placed over a particular area of the subject and the AE L button ...

Страница 58: ...gnal Off disables the signal Show histogram 21 Yes No Sets whether a histogram of a capture appears on the display after exposure Yes enables the setting No disables the setting Interval Self Timer 22 Exit Stay Allows either the Interval or Self Timer mode to remain active after a capture or immediately return to standard setting Exit clears the setting and produces an automatic return to standard...

Страница 59: ...ual mode only Normal selects conventional display f5 6 f8 etc Light meter selects light meter type display f5 6 f8 etc Extra mirror delay 31 50 ms 100 ms 200 ms None 25 ms Extends the delay period between the mirror being raised and the opening of the lens shutter thereby reducing the negative effect of vibration on longer exposure times True Focus in AF S 32 Off on Re assigns half press of shutte...

Страница 60: ...gned to different functions Default settings are as ac cording to name 1 Press the Menu button 2 Press the button you want to reassign True Focus AE L M UP or Stop Down This directly accesses the particular button you chose at the Custom options level in the menu 3 Rotate the rear control wheel to select the function you want the button to activate 4 Press the Save button MENU DRIVE Save R Interva...

Страница 61: ...n and flash compensation Imp Type 2 prints the relevant basic information only aper ture shutter and exposure correction Date Time prints date time only the correct date and time is set through the Settings menu under Date Time Text Date prints text plus date Text Info prints text plus basic info Text prints text only that you have created in 4 2 2 Text 4 2 Image Info The Imprint type facility con...

Страница 62: ... the text line cursor moves along the text line in the arrow s direction moving past every character with every click on the Sel AF button to the desired position The highlighted character in the text line can then be replaced by a new character chosen by mov ing the selector cursor out of the box positioning it over the new character to highlight it and then pressing the Sel AF button By turning ...

Страница 63: ...rol wheels until the desired character is highlighted by the selec tor cursor in this case the copyright symbol and press Save Note that more symbols have automatically appeared as you scrolled down the screen 5 Choose the next character in the same manner in this case a space and press Save 6 The capital letter J has been highlighted and saved in this example 7 Repeat the procedure until all the ...

Страница 64: ... button 6 By turning the front control wheel you can move the cursor to mark the following for change hours minutes year month and day respectively By pressing the 24 h button AF you can choose between a 24 hour or 12 hour system for time 7 Turn the rear control wheel to make the changes when the cursor is correctly positioned 8 Press the Save DRIVE button to store the new setting 8 4 3 Date Time ...

Страница 65: ...ows a list of camera components Info Usage and to the right of each individual component a figure that represents the number of actions taken by that component Please note that even a completely new camera will have registered actions as these occur during testing before delivery 7 Press the Next ISO WB button to display Info Version to display the software version for each item Press the Next ISO...

Страница 66: ...MENU button on the grip 2 Turn the front control wheel until Digital appears 3 Press Enter Drive button on the grip 4 Turn the front control wheel to access either of the two options that are ISO setting and White Balance 5 In ISO setting turn the rear wheel to choose between 50 100 200 or 400 6 In White Balance turn the rear wheel to choose between Daylight Cloudy Shade Flash Fluorescent Tungsten...

Страница 67: ...e flash is required It includes an integral flash primarily intended for fill flash use but strong enough for simple close work Combined with an adapter and a portable unit H cameras can exploit the automatic features offered by Metz and other top names in the field for powerful and reliable solutions When in the studio the H system is capable of providing flash metering for maximum control and se...

Страница 68: ...o Manual mode Rear sync is a useful feature used either for effect or to produce a more natural look when combining long exposures involving light trails and flash When using suitable dedicated units compatible with SCA3002 adjustments are made automatically and governed by the settings on the camera This applies to whether the flash unit is set to TTL or whether it is set to its own integral mete...

Страница 69: ...5 000 5 600º K To raise the flash unit into its operative position slide the flash unit catch backwards in the direction of the flash symbol To return the flash unit into its closed position push down on the top of the unit until it clicks back into place The flash unit is automatically activated when it is in the operative position and de activated when returned to its stored position The green L...

Страница 70: ...re the camera acts much as a flash meter would The aperture setting can be adjusted and more trial exposures made until the information on the grip display is satisfactory To use flash measure 1 Press the FLASH button on the grip to access the flash option screen 2 Turn the rear control wheel until Flash measure appears 3 Press Save DRIVE button to access the flash exposure screen 4 Make prelimina...

Страница 71: ...0 Optional accessories provide the opportunity to extend the capabilities of your system or just to add extra convenience to suit your way of working Photo Mark Holthusen Hasselblad Masters Optional Accessories ...

Страница 72: ...Tripod quick coupling H fits 1 4 and 3 8 tripod threads and has a safety catch Flash adapter SCA 3902 3053393 For connecting flashes compatible with the SCA 3002 system to the Hasselblad H4X UV sky filters 3053470 3053474 and 3053478 Absorbs UV radiation and reduces blue haze without affecting colors Also protects the front lens surface Particu larly recommended when the camera is used in harsh co...

Страница 73: ...53348 Lens holder for custom made eyesight correction lenses available from opti cians To be used for optimal viewing comfort and accuracy HC lens accessories H 13 26 and 52 Extension tubes 3053513 3053526 and 3053542 TheExtensiontubesattachbetweenthe lens and the body to reduce the close focusing distance for close up photo graphy They are available in three sizes 13 mm 26 mm and 52 mm As the H4X...

Страница 74: ...m HC lens range HC 3 5 35mm HC 3 5 50 IImm HC 2 8 80mm HC 2 2 100mm HC Macro 4 120 IImm HC 3 2 150mm HC 4 210mm HC 4 5 300mm HC 3 5 4 5 50 110mm HCD 4 0 5 6 35 90mm V system C type lenses with optional CF lens adapter ...

Страница 75: ...V 90x HVD 90x viewfinders Optional viewfinders H4X Camera All HC HCD lenses including extension tubes and converter CF lens adapter HTS 1 5 For use with HCD28 HC35 HC50 HC80 and HC100 including extension tubes Accessories SCA3902 TTL Flash Adapter Camera body Connectivity diagram ...

Страница 76: ...o Hasselblad Masters Appendix This section provides an insight into the more technical aspects as well as some important reference information P and Pv explanatory charts Technical specifications Problems Equipment Care Service ...

Страница 77: ...t into effect where speeds can be adjusted this pre vents the possibility of adjusting the fastest speed of 1 800s To counter this compensa tory adjustments are therefore made to the aperture instead to retain the set exposure However this compensation is not always required and when using flash strobe as the main light source it is actually undesirable because compensation will result in underex ...

Страница 78: ...7 16 15 14 13 210 80 35 150 120 50 50 110 50 50 110 110 8 1000 500 250 125 60 30 15 8 4 2 1s 2s 4s 8s 16s 32s 64s 2 0 2 8 4 0 5 6 11 16 22 32 45 64 90 1 4 1 0 1 2 3 4 5 2 3 4 5 6 7 8 9 1 0 11 EV 12 23 22 21 20 19 18 17 16 15 14 13 210 80 35 150 120 50 50 110 50 50 110 110 Shutter speed Shutter speed Aperture Aperture Pv Mode Centre Weighted 23 x 20 mm approx 25 of a 37 x 49 mm sensor CentreSpot 23...

Страница 79: ...e built in flash or a wide variety of flashes compatible with the SCA3002 Metz system using adapter SCA3902 ISO range16 to 6400 Flash output can be adjusted 3 to 3EV for fill in purposes independent of ambient light Synch at all shutter speeds Flash measurement Built inmeasurementsystemthatmeasuresflashlightfromnon TTLflashes suchasstudioflashes Exposure metering Multi mode exposure metering using...

Страница 80: ...on Stop down 7 M UP button function Mirror up 8 Control wheel direction CW 9 Flash ready exposure lock Yes 10 Magazine exposure lock Yes 11 Lens exposure lock Yes 12 Out of range exposure lock No 13 True exposure On 14 Spot mode Normal 15 Focus aid in MF Half press 16 AF assist light Camera 17 Rear wheel quick adjust Yes 18 Control lock All controls 19 Beeper On 20 Show histogram Yes 21 Interval S...

Страница 81: ...alt water spray Dust on the lens glass and focusing screen can be removed with a blower brush or very soft lens brush if necessary Smears on the lens glass should be treated with great caution In some cases they may be removed with a high quality lens cleaning solution on a tissue but be care ful not to scratch the lens or touch any of the glass surfaces with your fingers If in any doubt do not at...

Страница 82: ...e compensation Quick Adjust 42 Exposure method 38 F Flash 67 Focus assist 29 G Grip display 7 I Image info 62 Infrared focus settings 29 Integral flash 69 Interval 54 ISO white balance 66 L Lenses 27 Light metering exposure control 36 Light metering sensitivity 78 M Manual focus 30 Metering method 38 P PC connector 16 P Pv modes 39 Profiles 44 S Saving settings 12 Self timer 50 Shutter and apertur...

Страница 83: ...al Victor Hasselblad AB Hasselblad A S All images in this manual not credited to the specific photogra pher Jens Karlsson Hasselblad and David Jeffery Cover shots Mats Bengtsson Victor Hasselblad AB Hasselblad A S assumes no responsibility or liability for any errors or inaccuracies that may appear in this manual Victor Hasselblad AB Hasselblad A S assumes no responsibility or liability for loss o...

Страница 84: ...84 H4X Hasselblad A S Hejrevej 30 DK 2400 Copenhagen Denmark Victor Hasselblad AB Box 220 SE 401 23 Göteborg Sweden 10 2011 UK v1 ...

Отзывы: