manualshive.com logo in svg
background image

Outlander Series 

www.harmar.com 

17

I V.   O P E R AT I O N

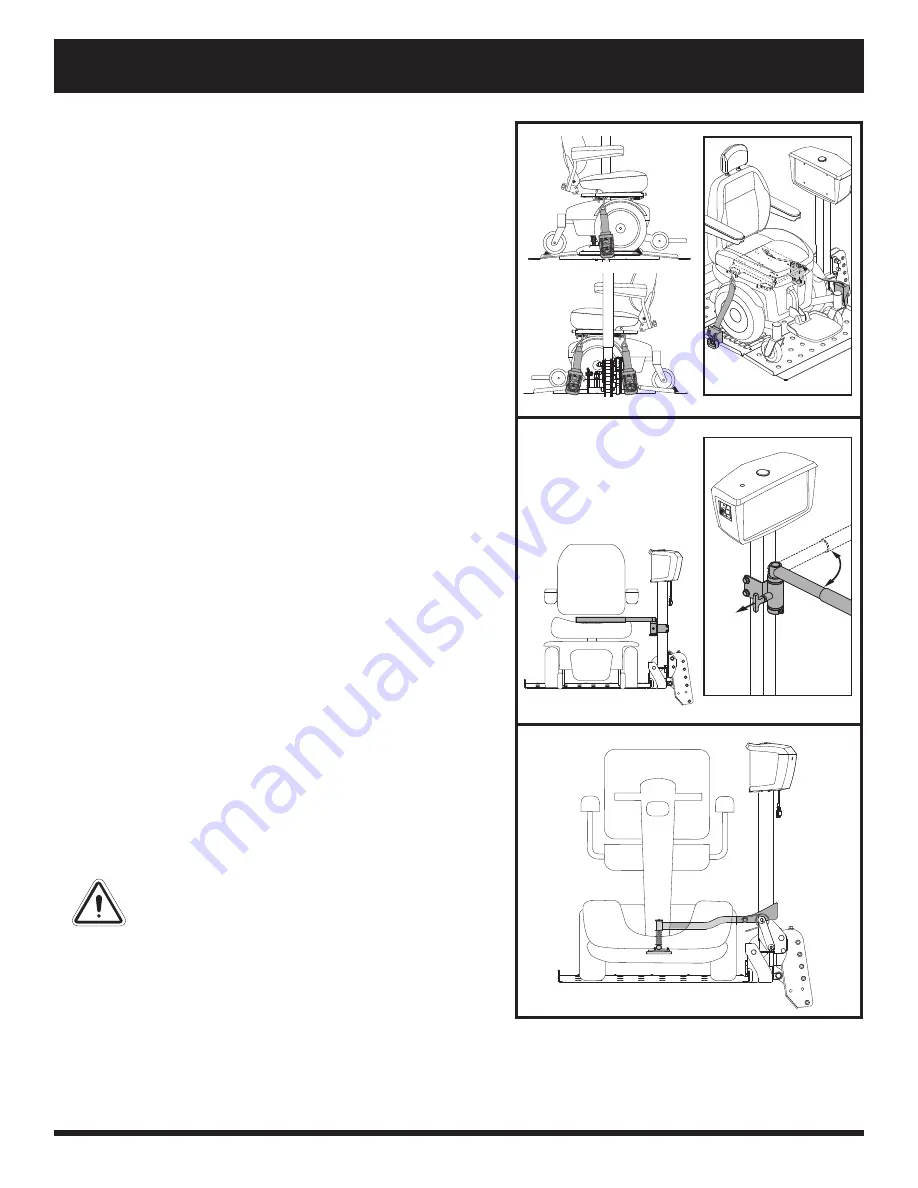
4.  Raise the lift platform by pressing the toggle up. 

Continue to raise the lift until the motor stops, then 

release.

NOTE: As the lift platform rises, the automatic lock-

down arm activates to secure the product to the lift 

platform. You may need to adjust the product’s tiller 

position to prevent interference with the smooth 

operation of the automatic lock-down arm.

NOTE: The motor will stop automatically at the top 

of its stroke and will emit a clicking sound. Release 

the key upon hearing this sound.

5.  If equipped with product hold-down bar, position it 

into desired location.

NOTE: Ensure mobility device is secure.

NOTE: Pay attention to the path of the lift platform 

during operation. Make sure the lift does not rub 

against or interfere with the vehicle in any way. If 

you notice any contact between the lift platform 

and the vehicle, stop lift operation immediately 

and contact your authorized Harmar Dealer for 

assistance.

To remove a mobility device from the lift system:

1.  Lower the lift platform to the ground.

2.  Unfasten the tie-down straps or allow the lock-down 

arm to automatically return to the vertical position.


Unlock and loosen the tie-down straps.


Rotate only the adjustment lever on each strap 

forward and rearward in a ratcheting motion until 

each strap reaches its original furled position.

3.  Unload the mobility device from the lift platform.

WARNING! Do not attempt to manually pull the lift 

platform down from the stowed position. Doing 

so will result in product damage and will void the 

product warranty.

4.  Raise the lift platform for storage, noting that it will 

automatically fold into a stowed position.

Figure 16. Securement of the Unit

Содержание Pride DE/FULL

Страница 1: ...Including Models Outlander Series Owner s Manual...

Страница 2: ...OPOSITION 65 WARNING This product may contain substances which are known to the state of California to cause cancer and birth defects or other reproductive harm For more information go to www P65Warni...

Страница 3: ...tlander Series www harmar com 3 C O N T E N T S I INTRODUCTION 4 II SAFETY 5 III INSTALLATION 10 IV OPERATION 15 V BATTERY CHARGING 20 VI CARE AND MAINTENANCE 22 VII TROUBLESHOOTING 25 VIII WARRANTY 2...

Страница 4: ...ns or recommendations contained in other lift system related literature issued by Harmar or contained on the lift system itself INTERNET AND PRIVATE PURCHASES If you purchased your product over the In...

Страница 5: ...completely Do not open the swing away hitch adapter with a mobility device on the lift Crush Hazard Pinch crush points created during assembly and operation Keep hands clear Crush Hazard Moving lift...

Страница 6: ...vised children to play near the lift system while the batteries are charging Avoid exposure to rain snow ice salt or standing water whenever possible Maintain and store in a clean and dry condition Ke...

Страница 7: ...ntact your authorized Harmar Dealer for information on proper disposal of your Harmar product and its packaging Use only AGM or Gel Cell batteries to reduce the risk of leakage or explosive conditions...

Страница 8: ...in through visual inspection that there are no obstructions such as the fuel tank exhaust pipes or electrical wires in the path of the drill bit LIFTING NON HARMAR PRODUCTS The lift system is an extre...

Страница 9: ...ity device Verify with your authorized Harmar Dealer that the total weight of your mobility device including additions does not exceed the maximum weight allowance WARNING Never exceed the maximum lif...

Страница 10: ...4 4 Position the lock down arm onto the threaded bolts and align with the two holes See figure 4 5 Insert the washer 6 Reattach hardware 7 Secure the nut to the securement screw 8 Reattach the black c...

Страница 11: ...itch tube 2 Ensure that the hitch tube is properly oriented as shown in figure 7 and mount the hitch tube to the lift frame using the previously removed mounting hardware Install the hardware in the d...

Страница 12: ...nce that the lift will tilt during transport NOTE Make sure the hitch tube and lift platform are parallel to the ground before operating the lift system An angled hitch tube may cause unreliable lift...

Страница 13: ...ttery case into the mating connector running from the motor See figure 9 Wiring Harness Installation The wiring harness is approximately 25 ft 7 62 meters long and will accommodate most vehicles NOTE...

Страница 14: ...chocks on the platform Scooters Place a wheel chock in front of the front wheel s and behind the rear wheels or behind the front wheels and in front of the rear wheels Power Chairs Place a wheel chock...

Страница 15: ...s on 2 Use the toggle switch to raise or lower the lift system See figure 13 Loading and Securing Your Mobility Device 1 Set the speed control of the mobility device to the slowest setting and careful...

Страница 16: ...tment lever forward and rearward in a ratcheting motion until the tie down strap reaches an adequate level of resistance for mobility device securement NOTE Inspect the tie down straps before each use...

Страница 17: ...ift does not rub against or interfere with the vehicle in any way If you notice any contact between the lift platform and the vehicle stop lift operation immediately and contact your authorized Harmar...

Страница 18: ...Move lift system toward the vehicle 2 Align swing away adapter over receiver and latch as shown in figure 19 3 Reinstall the safety pin WARNING Do not operate the swing away lift assembly while the m...

Страница 19: ...he lift system is equipped with a manual crank that serves as backup in the event of a power failure Using the supplied tool rotate the manual crank located on top of the motor housing clockwise or co...

Страница 20: ...t expose the battery charger to rain or other sources of moisture unless it has been tested for outdoor use Refer to the manual supplied with the battery charger for more information WARNING Explosive...

Страница 21: ...y Replacement BATTERY BOX BATTERY SECUREMENT STRAP BATTERY SECUREMENT BRACKET BATTERY CONNECTOR NOTE If you encounter a damaged or cracked battery immediately enclose it in a plastic bag and contact y...

Страница 22: ...parts before using the lift system Retractable tie down straps Scooter lock down arm Power chair hold down bar 90 Day Maintenance Schedule Clean and lubricate the T bar inner telescoping tube Use onl...

Страница 23: ...your authorized Harmar Dealer for repair or replacement The lift platform surface may become slippery if exposed to moisture ice snow rain mist spray conditions etc Use caution when loading unloading...

Страница 24: ...tely 900 chemicals since it was first published in 1987 What types of chemicals are in the Proposition 65 list The list contains a wide range of naturally occurring and synthetic chemicals that includ...

Страница 25: ...attery or vehicle battery is fully charged Make sure all connections to the motor and battery are secure Check the wiring harness for signs of wear or decay Replace the harness if necessary What if th...

Страница 26: ...ion or operation of the lift system ONE YEAR WARRANTY The battery is covered by a separate one 1 year warranty provided by the battery manufacturer The batteries are not warranted by Harmar SERVICE CH...

Страница 27: ...Outlander Series www harmar com 27 N O T E S...

Страница 28: ...28 www harmar com Outlander Series N O T E S...

Страница 29: ......

Страница 30: ...800 833 0478 www harmar com 03JUN19 PN...

Отзывы: