background image

32

AUXILIARY ANALOG AUDIO INPUTS AND PROGRAMMING

Auxiliary Analog audio Inputs and Programming

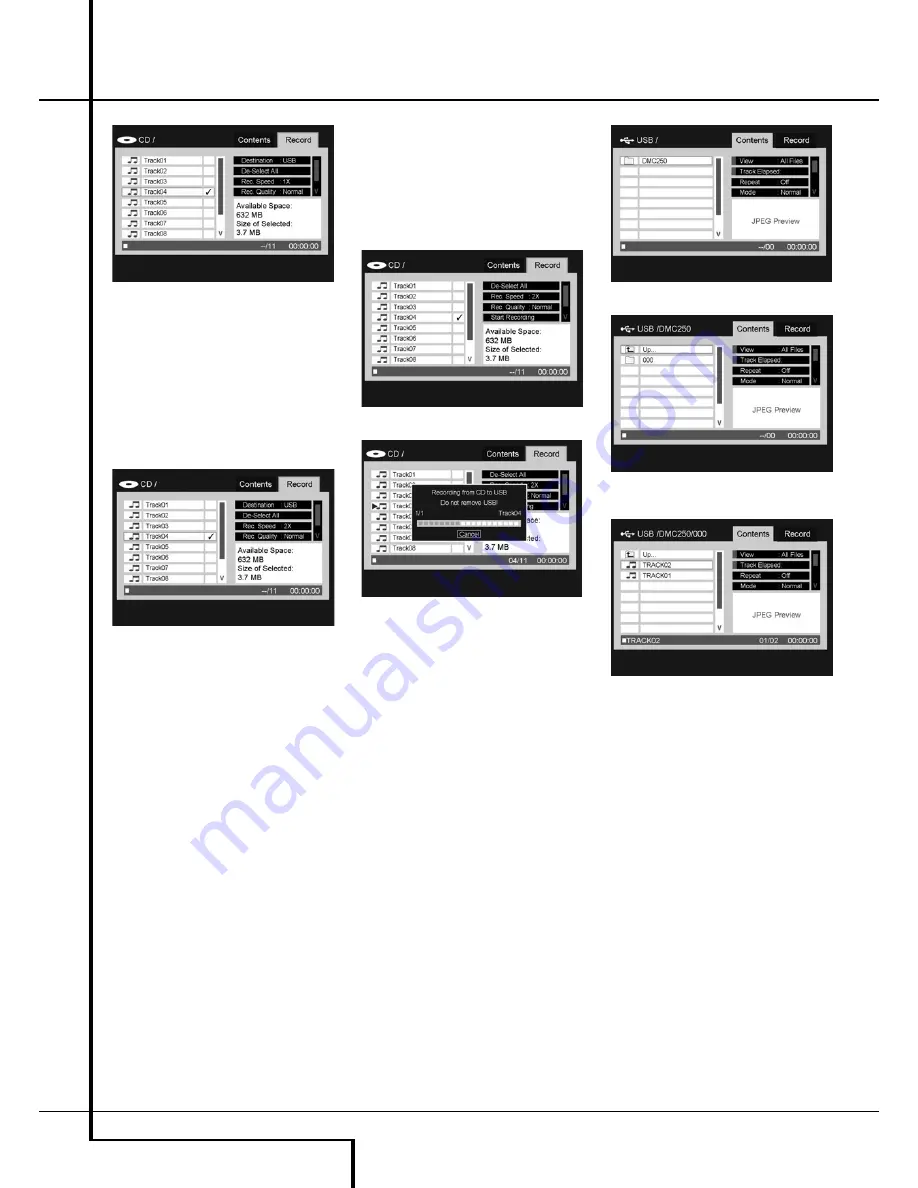
Figure 12b – Selecting a Track For Recording

Step Six (CDs only):

Select the recording

speed by scrolling to the Rec. Speed line. The
default setting is 1x, which means the recording
will be made at the same speed as the CD is
playing. Press the Enter Button to select 4x
recording, which records a 60-minute CD in only
15 minutes. See Figure 12c (Select Recording
Speed). Due to the inherent nature of the analog
audio stream, quadruple speed recording is not
 available.

Figure 12c – Select Recording Speed

Step Seven:

Select the recording quality by

scrolling to the Rec. Quality line. The default
 setting is Normal, and the other options are Low
and High. The recording quality sets the
 sampling rate as follows:

• 

High:

192kb/sec

• 

Normal:

128kb/sec

• 

Low:

64kb/sec

As shown in Figures 12d  (Start Recording
Command) and 12e (Recording Status Display),
the DMC 250 displays the amount of space 
available on the destination media for recording,
as well as the total size of all tracks selected for
recording. Let these figures guide you according-
ly.

Step Eight:

When all settings on the Recording

Menu are made, scroll down to the Start
Recording line (see Figure 12d Start Recording
Command) and press the Enter Button to begin
the recording process. When recording from the
Auxiliary Analog Audio Inputs, make sure your
source materials are cued up so that you can
coordinate the start of playback to avoid a long
period of silence at the beginning of the 
recording.

The status display shown in Figure 12c (Select
Recording Speed) will appear to indicate the
track number currently being recorded, along
with a temperature bar display of the progress
of the recording. The Cancel command is high-
lighted so that if you wish to stop the recording
at any time, you need only press the Enter
Button.

Figure 12d – Start Recording Command

Figure 12e – Recording Status Display

IMPORTANT NOTE:

Do not remove the desti-

nation media from the DMC 250 while recording
is in progress. If you do so, you may corrupt the
media so that it can no longer be used for any
purpose, losing all data stored on the media or
possibly even rendering it permanently unusable.
In addition, you may damage the DMC 250, and
any repairs would not be covered under your
warranty.

When recording from a CD, the recording will
stop after all selected tracks have been
processed. When recording from the AUX source,
you will have to stop recording manually by
pressing the Enter Button to execute the Cancel
command, as described above. The DMC 250 is
not capable of sensing the presence or absence
of an audio signal at the Auxiliary Analog Audio
Inputs, and is thus not able to start or stop the
recording automatically.

The DMC 250 will create a folder labeled 
“DMC 250” on the destination media. Within
this folder a new numbered folder will be
 created each time you begin a recording session.
The numbered folders will contain the MP3 files
you record 12g. (See Figure 12f Destination
Media At Top Level, 12g Numbered File for First
Recording Session through 12h Recorded MP3
File). As you can see, the DMC 250 will preserve
the track  number of the original selection.

Figure 12f – Destination Media At Top Level

Figure 12g – Numbered File for First Recording
Session

Figure 12h – Recorded MP3 File

You may play the recorded files on the DMC 250
as you would any other files. You may also
remove the media and play the recorded files on
another compatible device, such as a cell phone,
PDA or PC. If the files have been stored on an
SD memory card, they may also be played on a
separately available Harman Kardon Guide +
Play multimedia navigation device. Visit
www.harmankardon.com for information on
purchasing a Guide + Play product.

NOTES ON RECORDING:

• You may make analog audio recordings from

any of the DMC 250’s media sources by
 connecting the Analog Audio Outputs to an
external analog recording device, installing
blank media in that device and turning it on
for recording.

• Some people prefer to avoid making analog

recordings of digitally compressed audio files,
such as MP3 and WMA files, due to the
 possibility of distortion resulting from the basic
nature of compression as a “lossy” process.

Содержание DMC 250

Страница 1: ...ENGLISH DMC 250 Digital Media Center OWNER S MANUAL ENGLISH...

Страница 2: ...ay 25 CD Playback 27 MP3 Windows Media and JPEG Playback 30 Auxiliary Analog Audio Inputs and Programming 30 Auxiliary Analog Audio Inputs 30 Programming a Playlist 31 Recording 34 Troubleshooting Gui...

Страница 3: ...subtitles or aspect ratio DVD players are among the fastest growing consumer electronics products ever brought to market but this may nevertheless be the first DVD player you ve owned Although many o...

Страница 4: ...I the DMC 250 is capable of outputting high resolution 720p or 1080p video and 5 1 channel Dolby Digital or DTS digital audio with the convenience of just a single cable connection JPEG Files JPEG sta...

Страница 5: ...ere the Stop button was pressed This is helpful if you are watching a movie and must interrupt your viewing session but wish to pick up where you left off Pressing the Stop button twice will stop the...

Страница 6: ...ngles Multiple options for dialog language and soundtrack selection limited to DVD s recorded with multiple dialog languages or sound tracks Intuitive menu operating system 4 step Zoom off x1 x2 x3 pl...

Страница 7: ...he slot Card Slot 2 Gently insert a Compact Flash I card label side up pushing it all the way until it is firmly seated in the slot Remove the card by pulling it out of the slot It is necessary to tur...

Страница 8: ...y installed the source icon will appear at normal brightness If no media is installed in a particular source e g if a card slot is empty its icon will be dimmed and you will not be able to select it Y...

Страница 9: ...ned off and DISC ERROR when a disc not compatible with the DVD is put into the play position F Title Indicators These two positions in the display will show the current title number when a DVD disc is...

Страница 10: ...the disc It is recommended that subtitles be selected using the disc s menu 3 TITLE When a disc is playing press to make the player go back to the first section of the disc If you are playing a DVD A...

Страница 11: ...nputs O Find This function is available for all disc and file types but only during playback Press this button to display a dialog box that allows you to directly select a group title track or chapter...

Страница 12: ...ur TV and to your DMC 250 Player for improved video quality The SCART cable carries both audio and video You can select Composite Video or RGB video for that SCART connector s video output signal 7 Re...

Страница 13: ...h SCART connectors rather than with a normal video input yellow cinch In that case the SCART connection should be used providing the audio signal too Separate analog audio connections to TV are needed...

Страница 14: ...io decoding capabilities and make an optical or coaxial digital audio connection between the DMC 250 and your home theater system This simple connection is made as shown below with an optional coax or...

Страница 15: ...ge inside the remote control unit and install new batteries If leakage should come into contact with parts of your body wash it off thoroughly with water Batteries contain chemical substances and we r...

Страница 16: ...DVD s may include copy protection codes that do not permit digital output For full 96kHz fidelity from these discs use the analog outputs of the DVD IMPORTANT If your surround processor D A converter...

Страница 17: ...isc is in pause or freeze frame mode you may move slowly forward or back ward through the program being played at one of the speeds by pressing the Slow Buttons on the remote Each press of the buttons...

Страница 18: ...llow setup menus to be displayed while the disc is playing super imposed over the video playback However some discs are authored in a way that does not allow this If you see the icon displayed on the...

Страница 19: ...wn on the screen Note that only those languages will be available that are actual ly on the DVD you would like to play Digital Output If your system includes 5 1 digi tal audio surround decoding Dolby...

Страница 20: ...o setup adjustments we recommend that you first use the menu system in your receiver or processor to ascertain the settings already established for Speaker Size Output Level and Delay Time which may b...

Страница 21: ...the test noise circulation will pause on the channel being adjusted to give you time to make the adjustment When you release the button the circulation will resume after five seconds The on screen cur...

Страница 22: ...on whether the HDMI Output is in use This setting may also be changed by pressing the Video Mode Button on the remote repeatedly to cycle through the available settings options HDMI Output In Use With...

Страница 23: ...line needs to have the same clear difference between each bar as before the contrast adjustment If not go back to the brightness adjustment and repeat step 3 and then the contrast adjustments making...

Страница 24: ...tely begin at the selected time position Time Bar This display is a graphic representation of the time elapsed for the title being played As the disc plays the number of bars will increase to reflect...

Страница 25: ...e tracks on the disc Repeat Play This setting controls whether the tracks are repeated Track Repeats the track currently playing until play is manually stopped The Repeat Indicators will light in the...

Страница 26: ...compressed files a special Contents Menu will appear that allows you to select items for play back See the section on MP3 WMA and JPEG file playback for more information A B Repeat Play The Repeat A B...

Страница 27: ...hen they are recorded on most com puters JPEG files may be created by a digital still camera and then edited and burned to a disc in your personal computer recorded on a CD ROM disc from film images b...

Страница 28: ...This is normal and does not indicate a fault with the unit If a disc containing MP3 WMA and or JPEG files is created in more than one session the DMC 250 may not recognize files added during the late...

Страница 29: ...es in the current folder view Use the Numeric Keys to enter a new file number and the DMC 250 will immediately display that file Info Menu While a JPEG image file is playing you may press the Info But...

Страница 30: ...s to enter the title number containing the first selection and press the N Button to move the cursor to the Chapter column It is not necessary to use the Enter Button Step Six Use the Numeric Keys to...

Страница 31: ...e the Navigation Buttons to highlight the Browser View command and press the Enter Button Recording One of the unique features of the DMC 250 is its ability to record audio from a CD or the Auxiliary...

Страница 32: ...ile recording is in progress If you do so you may corrupt the media so that it can no longer be used for any purpose losing all data stored on the media or possibly even rendering it permanently unusa...

Страница 33: ...create an environment that is inherently electronically noisy due to the amount of circuitry and memory chips and drives inside the PC s chassis The DMC 250 is engineered precisely to minimize or eve...

Страница 34: ...It is a normal artifact of DVD playback for pictures to jump or show fast forward or reverse play some distortion during rapid play Some remote buttons do not operate Function not permitted at this t...

Страница 35: ...onnectors Height measurement includes feet and chassis All specifications subject to change without notice Harman Kardon and Logic 7 are trademarks of Harman International Industries Incorporated regi...

Страница 36: ...250 Crossways Park Drive Woodbury New York 11797 www harmankardon com Harman Consumer Group Inc 2 Route de Tours 72500 Ch teau du Loir France 2007 Harman Kardon Incorporated Partnumber CQX1A1258Z...

Отзывы: