background image

6

ENGLISH

3. 

HDMI (High Definition Multimedia Interface) CONNECTION

4. 

CONNECTING AUDIO COMPONENTS

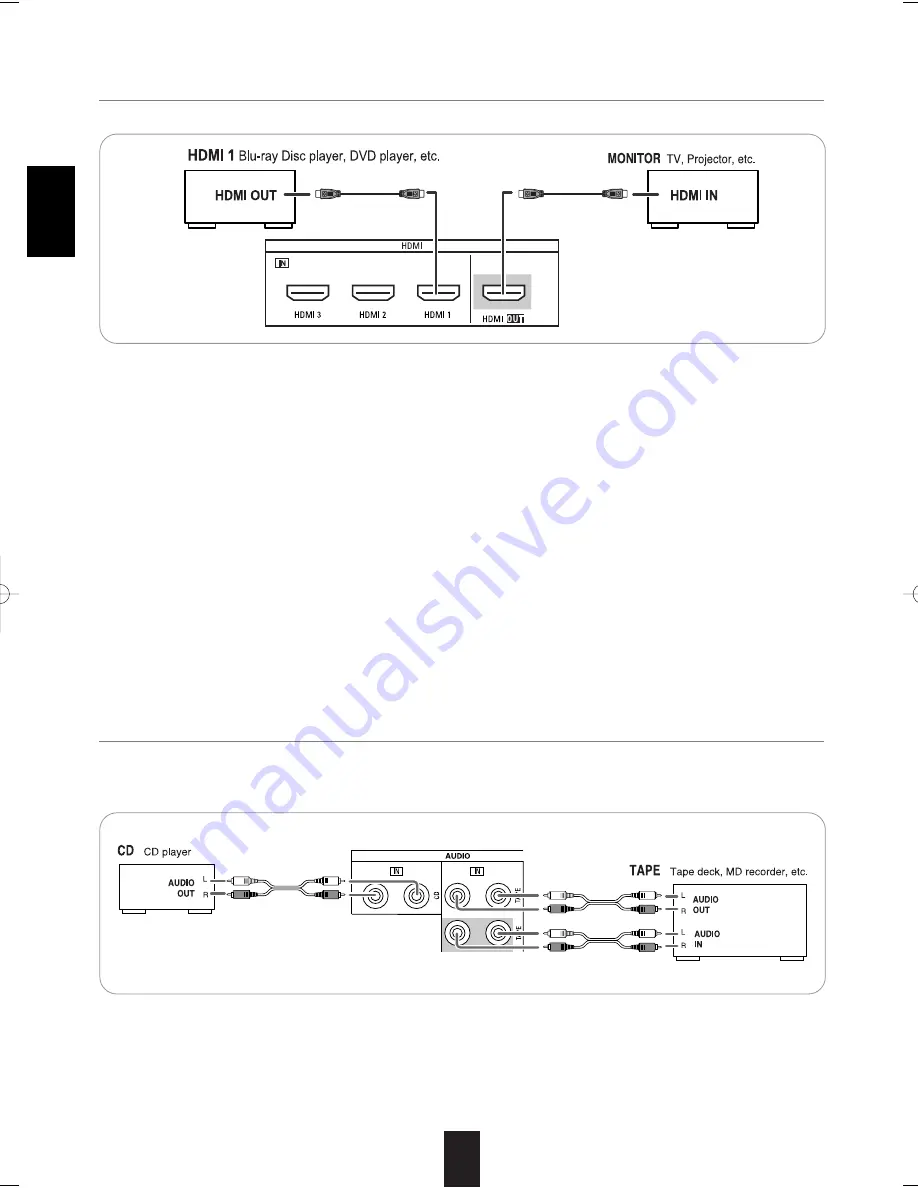
• The TAPE IN/OUT jacks can be connected to audio recording equipment such as a tape deck, an MD recorder, etc.
• The CD IN jacks can be connected to an additional audio components such as CD player, a tape deck, etc.

• HDMI 1 IN can be connected to a Blu-ray disc player or DVD player, etc.
• Connect HDMI 2/HDMI 3 IN to the video component in the same way.

HDMI connection

• You can connect the source component (Blu-ray disc player, DVD player, etc.) to the display component (TV, projector, etc.)

through this receiver with using a commercially available HDMI cord.

• The HDMI connection can carry uncompressed digital video signals and digital audio signals.
• This receiver can output digital video and digital audio signals from the HDMI MONITOR OUT of this receiver without passing

through any circuits as they were input into the HDMI IN(, meaning the audio signals which are input into the HDMI IN cannot
be reproduced on this receiver). Therefore, to reproduce the audio signals on this receiver, you should make the digital audio
connection additionally between the source component and this receiver. (For details, refer to "CONNECTING DIGITAL INs"
on page 7.)

• This unit is HDMI Ver. 1.3 compatible.
• HDMI, the HDMI logo and High-Definition Multimedia Interface are trademarks or registered trademarks of HDMI licensing

LLC.

Notes:

• Depending on the connected component, unreliable signal transfer may happen. (For details, refer to the operating instruction

of your component.)

• For stable signal transfer, we recommend using HDMI cords that are a maximum of 5 meters in length.

AVR-134  2008.12.1  10:31 AM  페이지 6

Содержание AVR 134

Страница 1: ......

Страница 2: ...ing the ventilation openings with items such as newspapers table cloths curtains etc No naked flame sources such as lighted candles should be placed on the unit Please be care the environmental aspect...

Страница 3: ...NGE 15 LOADING BATTERIES 15 Operations LISTENING TO A PROGRAM SOURCE 16 SURROUND SOUND 19 ENJOYING SURROUND SOUND 20 LISTENING TO RADIO BROADCASTS 24 PLAYING MUSIC FILES USB 26 RECORDING 29 OTHER FUNC...

Страница 4: ...ANTENNAS Change the position of the FM indoor antenna until you get the best reception of your favorite FM stations Place the AM loop antenna as far as possible from the receiver TV set speaker cords...

Страница 5: ...additional video component such as a cable TV tuner an LD player or satellite system There are two types of video jacks COMPONENT composite VIDEO for analog video connections Connect them to the corr...

Страница 6: ...audio signals This receiver can output digital video and digital audio signals from the HDMI MONITOR OUT of this receiver without passing through any circuits as they were input into the HDMI IN meani...

Страница 7: ...round Dolby Digital or PCM format digital signals etc For details refer to the operating instructions of the component connected When making the COAXIAL DIGITAL connection be sure to use a 75 COAXIAL...

Страница 8: ...st the speaker settings according to your environment and speaker layout For details refer to SETTING THE SPEAKER SETUP on page 37 Caution For safe amplifier operation in case of using either front A...

Страница 9: ...t the main listening position Surround left and right speakers Place the surround speakers approximately 1 meter 40 inches above the ear level of a seated listener to the direct left and right of them...

Страница 10: ...own When the tuner is in use these buttons will tune up or down through the selected frequency band Pressing and holding down either of the buttons for more than 0 5 sec will cause the tuner to seek t...

Страница 11: ...y be used for temporary connection to video games or portable audio video products such as camcorders and portable audio player Fluorescent Display This display delivers messages and status indication...

Страница 12: ...Up Down Channel Select button Navigation buttons OK button Setup button Digital Input button Test Tone button Numeric keys Memory button Tuning Up Down buttons Preset Up Down buttons Sleep button Dim...

Страница 13: ...ting See page 22 for more information Navigation buttons These buttons are used to make selections within the system setup menu OK button Press this button to confirm your selection Setup button Press...

Страница 14: ...ect Up Surround Select Up 17 Stereo Mode Select Stereo Mode Select 18 Tone Mode Tone Mode 19 Volume Up Volume Up 20 Surround Select Down Surround Select Down 21 Display Display 22 Speaker A B Select S...

Страница 15: ...about 7 meters 23 feet and angles of up to 30 degrees aiming at the remote sensor Remove the batteries when they are not used for a long time Do not use the rechargeable batteries Ni Cd type Be sure...

Страница 16: ...witch off the A and B speakers Each time the Source buttons on the front panel is pressed the input source changes as follows Tuner HDMI 1 HDMI 2 HDMI 3 TAPE 6 CH DIR Frequency display CD DVD VIDEO 3...

Страница 17: ...ource the analog input is selected automatically When the selected digital input is not connected the DIGITAL indicator flickers and the analog input may be automatically selected depending on the inp...

Страница 18: ...In general we recommend the bass and treble to be adjusted to 0 dB flat level Extreme settings at high volume may damage your speakers To complete tone adjustment repeat the above steps 11 and 12 If...

Страница 19: ...c this mode allows you to further enhance the sound quality by adding processing that emphasizes the musical effects Dolby Pro Logic ll Emulation This mode expands any 2 channel sources including Dolb...

Страница 20: ...ATION VS 2 SPK Corresponding DTS mode VS 2 SPK VS 3 SPK DOLBY PLII MOVIE DOLBY PLII MUSIC DOLBY PLII EMULATION VS 2 SPK THEATER HALL STADIUM CLUB ARENA 5CH STEREO DOLBY PLII MOVIE DOLBY PLII MUSIC DOL...

Страница 21: ...2 For each channel adjust the level as desired until the sound level of each speaker is heard to be equally loud 3 Cancel the test tone function You can select the desired channel with pressing the b...

Страница 22: ...sources or to suit your tastes You can adjust the current channel levels as desired These adjusted levels are just memorized into user s memory CAL not into preset memory REF 1 REF 2 The LFE level can...

Страница 23: ...button again The adjusted channel levels have now been memorized into the selected memory If the preset memory disappears perform the above step 1 again 1 After performing the steps 1 4 in Adjusting t...

Страница 24: ...l a station of sufficient strength has been found The display shows the tuned frequency and TUNE If the station found is not the desired one simply repeat this operation Weak stations are skipped duri...

Страница 25: ...3 For 15 For 30 The station has now been stored in the memory When using the NUMERIC buttons the station is stored automatically without pressing the MEMORY button A stored frequency is erased from t...

Страница 26: ...or memory file format FAT 16 or FAT 32 NOTES It is not possible to connect this unit to a PC for USB playback We cannot guarantee compatibility with all USB mass storage devices and assumes no respons...

Страница 27: ...ck Current file number Elapsed playing time of the file To resume playback press the PLAY button or the Tuning button Then playback of a file is stopped and the receiver memorizes the file where the S...

Страница 28: ...For 247 NOTE You can select a file in the current folder only Displaying file information during playback You can display file information such as file name title name artist name and file number ela...

Страница 29: ...D HDMI 1 3 VIDEO 1 2 is selected as an input source on page 17 The volume and tone bass treble settings have no effect on the recording signals 1 Select the desired input as a recording source except...

Страница 30: ...e input selector buttons on the remote control not the Source buttons on the front panel 1 Select VIDEO 2 as a video recording source 3 Start recording on the VIDEO 1 2 Select CD as an audio recording...

Страница 31: ...ound mode is not displayed When the USB IN is selected as an input source for details on the file information see Displaying file information during playback on page 28 Displaying the operation status...

Страница 32: ...hese menus are then divided up into various sub menus 32 The setup menu will be shown To turn the menu off press this button again When selecting SYSTEM see SETTING THE SYSTEM on page 34 When selectin...

Страница 33: ...low The setup menu flow is as follows When RETURN is selected in a sub menu it returns to the previous menu NOTE During setup menu operation only the POWER OFF button and the buttons required for syst...

Страница 34: ...channel also called the 1 channel and the channels set to S SW When the low frequency signals of channels set to L are reproduced simultaneously from those channels and the subwoofer channel In this m...

Страница 35: ...to ON to adjust the tone bass and treble Press the OK button to enter the tone adjustment The tone level can be adjusted within the range of 12 12 dB In general we recommend the bass and treble to be...

Страница 36: ...refer to CONNECTING DIGITAL INs on page 7 You can select the desired of OPT optical COX 1 coaxial 1 COX 2 coaxial 2 and ANL analog When selecting HDMI 1 3 as an input source ANL analog cannot be sele...

Страница 37: ...you should adjust the speaker settings again When selecting CONFIGURATION 1 Press the buttons to select CONFIG then press the OK button 2 Press the buttons to select the desired speaker CONFIG CONFIG...

Страница 38: ...g to their frequency characteristics For details refer to When selecting the CROSSOVER on page 39 When SUB W is set to N No FRONT is automatically set to L Large When the FRONT is set to S Small CENTE...

Страница 39: ...as if the center and surround speakers were at their ideal locations respectively You can adjust the crossover frequency within the range of 40 200 Hz in 10 Hz intervals When selecting the CROSSOVER A...

Страница 40: ...the desired channel 2 Press the buttons to adjust the level of the selected channel or program source s LFE as desired 3 Repeat the above steps 1 and 2 to adjust each channel level You can adjust the...

Страница 41: ...een memorized into the selected memory Recalling the memorized channel levels 1 After performing the steps 1 3 in Adjusting the current channel level procedure on page 40 press the OK button 2 Press t...

Страница 42: ...rom Dolby Digital or DTS program source are being input In some Dolby Digital or DTS software the night mode setting may not be valid OFF 0 1 Lower compression 0 2 0 9 Higher compression MAX 1 Press t...

Страница 43: ...WIDTH Center width control This adjusts the center image so it may be heard only from the center speaker only from the left right speakers as a phantom image or from all three front speakers to varyi...

Страница 44: ...No antenna is connected The desired station frequency is not tuned in The antenna is in wrong position An incorrect station frequency has been memorized The memorized stations are cleared No antenna i...

Страница 45: ......

Отзывы: