background image

6

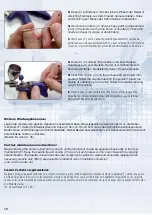
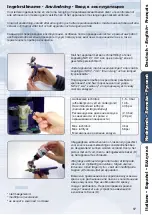
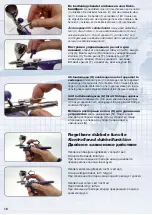
Vor jeder Inbetriebnahme, besonders nach jeder Reinigung und nach Reparaturarbeiten, ist der feste Sitz aller 
Schrauben und Muttern sowie Dichtheit des Gerätes und der Schläuche zu überprüfen.

All screws and nuts should be checked to ensure that they are fi tted tightly prior to every use, and particularly 
after each cleaning and repair. The instrument and hoses should also be checked for leaks. 

Avant chaque mise en service, notamment après chaque nettoyage et chaque travail de réparation, vérifi ez que toutes les vis et les boulons 
sont bien serrés et contrôlez l’étanchéité de l’appareil et des fl exibles. 

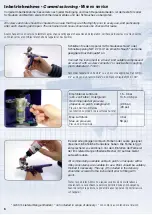
Inbetriebnahme 


Commissioning 


Mise en service 

* nicht im Lieferumfang enthalten / 

 * not included in scope of delivery / 

* non compris au contenu de la livraison

Schließen Sie den Apparat mit Schraubanschluss* oder 
Schnellkupplung NW 2,7 mm* an einen Schlauch* und eine 
geeignete Druckluftquelle* an. 

Connect the instrument to a hose* and suitable compressed 
air source* with a screw connector* or quick-action coupling 
(nom. diameter 2.7 mm)*. 

Raccordez l’appareil à un fl exible* ou à une source appropriée d’air compri-
mé* au moyen d’un raccord fi leté* ou d’un raccord rapide NW 2,7 mm*. 

Es sind alle gängigen Airbrush-Farben oder Lacke geeignet, 
die eine milchähnliche Konsistenz haben. Die Farbe ist ggf. 
entsprechend zu verdünnen. Vor dem Einfüllen der Farbe ist 
der im Lieferumfang enthaltene Becher (D) auf das Gerät 
aufzuschrauben.

All commercially-available airbrush paints or lacquers with a 
milky consistency are suitable for use. Paint should be suitably 
thinned if necessary. The cup (D) included in the delivery 
should be screwed to the instrument prior to fi lling with
paint.

Toutes les peintures Airbrush ou laques usuelles de viscosité laiteuse 
conviennent, le cas échéant, la peinture doit être diluée en conséquence. 
Avant de remplir la peinture, le godet livré avec l’appareil (D) doit être vissé 
sur l’appareil. 

Empfohlener Luftdruck 
(abh. von Farbe / Untergrund) 

Recommended air pressure 
(depends on paint / background)  

Pression d’air recommandée
(en fonction du produit / de la surface à peindre) 

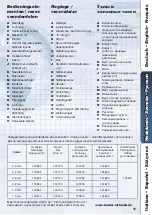
1,5 - 3 bar 
14,5 - 43,5 psi

(2,0 bar) 
(29 psi)

Max. Luftdruck 

Max. air pressure  

Pression d’air maximale

4 bar  
58 psi

Содержание Colanm

Страница 1: ...Bedienungsanleitung Instructions for use Mode d emploi Handleiding Driftsanvisningar Инструкция по эксплуатации Istruzioni per l uso Instrucciones de servicio Οδηγίες χρήσης ...

Страница 2: ...2 Deutsch 3 English 3 Français 3 Nederlands 14 Svenska 14 Русский язык 14 Italiano 25 Español 25 Ελληνικά 25 ...

Страница 3: ...acturers can result in damage serious impairment of one s own health or the health of other persons and animals and even fatalities Harder Steenbeck assumes no responsibility for damage or injury of this nature Never point the paint sprayer at yourself other persons or animals Particular care should be taken when handling the needle as there is a risk of injury Do not allow children to handle the ...

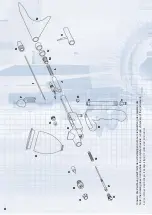
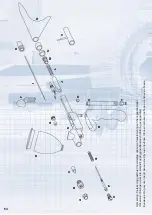
Страница 4: ...fbau Lieferumfang des Gerätes dar Note the drawing does not illustrate the complete structure scope of delivery of the instrument Avis Le schéma ne représente pas le montage intégral le contenu total de la livraison A B C D E F G H I J J1 K L M N O P Q R S T U V ...

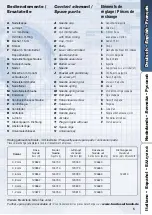
Страница 5: ...riffstück S Luftrohr T Stecknippel m Dichtung U Abstandsringe V Universalschlüssel Bedienelemente Ersatzteile Control element Spare parts Eléments de réglage Pièces de rechange A Needle cap B Air head C 0 4 mm Nozzle with Viton O ring D Cup 15 ml E Body F Lever with controlled double function G Needle seal screw H Button screw I Needle J Bracket with preliminary air screw J1 K Needle securing nut ...

Страница 6: ...uick action coupling nom diameter 2 7 mm Raccordez l appareil à un flexible ou à une source appropriée d air compri mé au moyen d un raccord fileté ou d un raccord rapide NW 2 7 mm Es sind alle gängigen Airbrush Farben oder Lacke geeignet die eine milchähnliche Konsistenz haben Die Farbe ist ggf entsprechend zu verdünnen Vor dem Einfüllen der Farbe ist der im Lieferumfang enthaltene Becher D auf d...

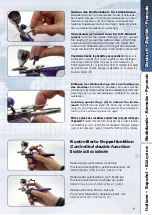
Страница 7: ...he needle I Loosen the button screws H with the universal key V Remove the lever F rotate 180 and turn the flattened side of the finger ball forwards Insert the lever F and screw in the button screws H Transformation de la gâchette pour gauchers Dévisser le contre écrou aiguille K et tirer l aiguille I vers l extérieur Libérer les boulons filetés H avec la clef universelle V Sortir la gâchette F l...

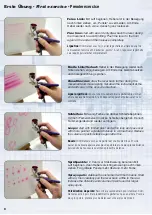
Страница 8: ...a fin déposer l appareil et pulvériser en sens contraire Schleifen Mit wenig Farbe und dünner Schleife beginnen mit mehr Farbe Abstand in dicke Schleife übergehen Danach Farbmenge Abstand wieder verringern Loops start with limited paint and a thin loop and pass over with more paint at a greater distance in a broad loop Reduce the volume of paint distance again after this Boucle Commencer avec peu ...

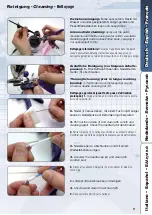
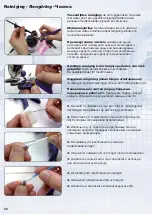
Страница 9: ...er K abschrauben Thorough cleaning prior to longer working breaks 1 Terminate the compressed air supply Unscrew needle securing nut K Nettoyage approfondi avant toute pause d utilisation prolongée 1 Stopper l arrivée d air comprimé Dévisser le contre écrou de l aiguille K 2 Nadel I herausziehen mit einem Tuch und Reiniger säubern Nadelspitze auf Deformierung überprüfen 2 Pull out the needle I and ...

Страница 10: ...nfluencer négativement la qualité du jet L aiguille la buse et les joints d étanchéité sont des pièces d usure qu il convient au besoin de remplacer Les jeux de buses B C I peuvent être montés en différentes tailles N de commande voir p 05 5 6 5 Düse C entnehmen mit sehr feinem Pinsel oder Nadel I vorsichtig Farbreste aus dem Inneren herausschieben Düse und Dichtung auf Risse oder Deformationen üb...

Страница 11: ...el mehrmals vor und zurück bewegen Danach Nadel wieder ganz einschieben Klemmmutter festdrehen d Düse und Nadel reinigen e ggf verwendete Farbe verdünnen a Top up the paint b Check the needle securing nut K and tighten if necessary c Loosen the needle securing nut K draw the lever F back and move the needle forwards and backwards several times Push the needle in completely again after this tighten...

Страница 12: ...lung der Vorluftschraube J1 für längere kürze Vorluftphase späteren früheren Farbaustritt Nadelklemmmutter K abschrauben Nadel I herausziehen Vorluft schraube J1 mit Universalschlüs sel V hineindrehen für längere Vorluft späterer Farbaustritt bzw herausdrehen für kürzere Vorluft früherer Farbaustritt Nadel I hineinschieben Nadelklemmmutter K festschrauben Setting for preliminary air screw J1 for l...

Страница 13: ...beck paint sprayers are developed designed and manufactured in compliance with EU Directive 98 37 EC The following harmonised norms were applied in this respect DIN EN 292 Safety of Machines Equipment and Plant DIN EN 1953 DIN 31000 DIN 31001 Part 1 BGR 500 BGV D25 BGV D24 and where appropriate ZH 1 406 ZH 1 375 and ZH 1 181 Complete technical documentation is provided along with the operating man...

Страница 14: ...everomvang van het apparaat weer Observera Ritningen visar inte komplett uppbyggnad leveransomfattning av apparaten Внимание На рисунке представлена конструкция прибора объем поставки прибора не в полном объеме 14 1 A B C D E F G H I J J1 K L M N O P Q R S T U V ...

Страница 15: ...иновым кольцом круглого сечения из витона фторированного каучука D бачок 15 мл E Корпус F триггер с двойным зависимым действием G Винт уплотнения иглы H Винт щупа I Игла J Кронштейн с продувочным винтом J1 K Гайка цангового зажима иглы L Пружина иглы M Винт пружины иглы N Наконечник O Винт отсечки клапана P Шток воздушного клапана Q Пружина воздушного клапана R Рукоятка S Воздушная трубка T Сменны...

Страница 16: ... förändring eller kombination med olämpliga externa delar kan följden bli materiella skador allvarliga hälsoskador dödfall för användaren själv eller andra personer och djur Harder Steenbeck ansvarar inte på något sätt för dylika skador Rikta aldrig färgsprutan mot dig själv andra personer eller djur Var extra försiktig när nålen hanteras det finns risk för skador Låt inte barn hantera appara ten ...

Страница 17: ... Подсоедините прибор посредством резьбового крепления или быстроразъемного штуцера NW 2 7 мм к шлангу и подходящему источнику сжатого воздуха niet meegeleverd medföljer ej leveransen не входит в комплект поставки Alle gangbare airbrushverven of lakken zijn geschikt voor zover ze een melkachtige consistentie hebben en desgevallend kunnen worden verdund Voor u het pistool met verf vult dient u de bi...

Страница 18: ...F и завинтить винты щупов H Afstandsringen U aanbrengen om het apparaat te verlengen Afstandsringen U aanbrengen om het apparaat te verlengen Het eindstuk N aftrekken Een of twee afstands ringen U aan de achterkant op het apparaat steken en tot de aanslag naar voren schuiven Het eindstuk N weer opsteken Sätt in distansringarna U för att förlänga appara ten Dra bort änddelen N Sätt på en eller två ...

Страница 19: ...ь прибор и нанести покрытие напылением в обратном направлении Lussen met weinig verf en een dunne lus begin nen met meer verf een grotere afstand de lus dikker maken en vervolgens de hoeveelheid verf afstand opnieuw verkleinen Slinga Börja med lite färg och tunn slinga övergå till tjock slinga med mer färg större avstånd Minska sedan färgmängd avstånd igen Круговые движения Начать с нанесения небо...

Страница 20: ...engöring innan längre arbetspauser 1 Stäng av tryckluftsmatningen Skruva bort nålfästmuttern K Основательная чистка перед большим перерывом в работе 1 Прекратить подачу сжатого воздуха Отвинтить гайку цангового зажима иглы K 2 De naald I uittrekken en met een doek en reinigingsmid del reinigen De naaldpunt op vervorming controleren 2 Dra ut nålen I rengör med en trasa och rengöringsme del Kontroll...

Страница 21: ...es Leg nooit het complete pistool in oplosmiddel Breng af en toe een beetje dunne olie aan op het hendel mechanisme F Hou de naaldpunt en het spuitstuk C olie en vetvrij anders kan het verstuivingspatro on worden beïnvloed De naald het spuitstuk en de afdichtingen zijn slijtageonderdelen en dienen indien nodig te worden vervangen Spuitstuksets B C I met verschillende maten kunnen worden gemonteerd...

Страница 22: ...volgens de naald weer volledig in het pistool schuiven de klemmoer vastschroeven d Het spuitstuk en de naald reinigen e Evt de gebruikte verf verdunnen a Fyll på färg b Kontrollera nålfästmuttern K och dra åt om det behövs c Lossa nålfästmuttern K dra spaken F tillbaka och flytta nålen flera gånger fram och tillbaka Skjut sedan in nålen helt skruva åt låsmuttern d Rengör munstycke och nål e Förtun...

Страница 23: ...не так далеко назад б Увеличить расстояние до поверхности на которую наносится краска в Разбавлять краску в меньшей степени или уменьшить давление воздуха De voorluchtschro ef J1 instellen voor een langere of kortere voor luchtfase de verf komt later of vroe ger naar buiten De naaldklemmoer K losschroeven en de naald I uittrekken De voorluchtschroef J1 met de universele sleutel V inschroeven voor ...

Страница 24: ...harmoniserade normer har tillämpats DIN EN 292 Säkerhet för maski ner apparater och anläggningar DIN EN 1953 DIN 31000 DIN 31001 del 1 BGR 500 BGV D25 BGV D24 och vid behov ZH 1 406 ZH 1 375 und ZH 1 181 Fullständig teknisk dokumentationen finns och den manual som hör till färgsprutan finns i originalversion samt på användarens språk Гарантия Мы предоставляем гарантию на 24 месяца с момента покупк...

Страница 25: ...zador de pintura lea detenidamente y comprenda las instrucciones de servicio para efectuarlas debidamente El uso inadecuado del apa rato pulverizador de pintura o cualquier modificación o combinación con piezas ajenas inapropiadas pueden dar lugar a daños materiales daños para la salud del usuario o para personas ajenas y anima les incluso hasta la muerte Harder Steenbeck no se responsabiliza en n...

Страница 26: ...otazione dello strumento Nota El dibujo no representa la instalación completa el volumen de suministro completo del aparato Υπόδεξη Από το σχέδιο δεν προκύπτει ουν η πλήρης κατασκευή τα συμπαραδιδόμενα της συσκευής 26 2 A B C D E F G H I J J1 K L M N O P Q R S T U V ...

Страница 27: ...vula Q Resorte de válvula R Empuñadura S Tubo de aire T Boquilla para enchufar con junta U Anillos distanciadores V Llave universal A Πώμα βελόνας B Κεφαλή αέρα C Μπεκ με δακτύλιο Viton O D Δοχείο 15 ml E Στέλεχος F μοχλός με Ελεγχ διπλή λειτουργία G Βίδα στεγανοποίηση βελόνης H Βελόνα διακόπτη I Βελόνας J Στήριγμα με βίδα προαερισμού J1 K Παξιμάδι βελόνας L Ελατήριο βελόνας M Βίδα ελατηρίου βελόν...

Страница 28: ...da Συνδέστε τη συσκευή με τη βιδωτή σύνδεση ή με τον ταχυσύνδεσμο NW 2 7mm σε σωλήνα ή κατάλληλη πηγή πεπιεσμένου αέρα non fornito in dotazione no incluido en el volumen de suministro δεν συμπαραδίδεται Si possono utilizzare tutti i colori o vernici per aero grafia aventi una consistenza simile al latte il colore va poi diluito a seconda dei casi Prima di effettuare il rifornimento di colore il se...

Страница 29: ... F και βιδώστε τις βίδες του διακόπτη Η Inserimento degli anelli distanziatori U per prolungare lo strumento sfilare l estremità N Aggiungere uno o due anelli distanziatori U nella parte posteriore dello strumento e spingerli in avanti fino ad arresto Riporre l estremità N Insertar los anillos distanciadores U para prolongar el aparato Retirar la pieza terminal N Encastrar uno o dos anillos distan...

Страница 30: ...νηση Στο τέλος ψεκάζετε προς την αντίθετη κατεύθυνση Spirali iniziare con spirali sottili e poco colore poi passare a più colore e spirali più larghe Dopodiché ridurre di nuovo la quantità di colore la distanza Lazos Empezar con poca pintura y lazo fino pasar al lazo grueso aumentando el caudal de pintura la distancia A conti nuación volver a reducir el caudal de pintura la distancia Κορδέλες Αρχί...

Страница 31: ...ntes de pausas de trabajo prolongadas 1 Finalizar el suministro de aire comprimido Desenroscar la tuerca de fijación de la aguja K Γενικός καθαρισμός πριν από μεγαλύτερα διολείμματα εργασίας 1 Διακόψτε την παροχή πεπιεσμένου αέρα Ξεβιδώστε το παξιμάδι βελόνας Κ 2 Estrarre l ago I pulire con un panno e del detergente Controllare che la punta dell ago non sia deformata 2 Extraer la aguja I limpiar c...

Страница 32: ...mento in un solvente Di tanto in tanto lubrificare il meccanismo del pulsante F Badare che la punta dell ago e l ugello C non presentino tracce di olio e grasso che potrebbero alterare l effetto finale del lavoro L ago l ugello e le guarnizioni sono pezzi soggetti ad usura e in quanto tali occorre che all uopo vengano sostituiti Gli ugelli B C I sono disponibili in diverse misure Numero d ordine a...

Страница 33: ...e stringere il dado di serrag gio dell ago K c Allentare il dado di serraggio dell ago K trascinare il pulsante F indietro e spingere più volte l ago avanti e indietro Inserire quindi l ago fino in fondo avvitare bene il dado di serraggio d Pulire l ugello e l ago e Eventualmente diluire il colore utilizzato a Rellenar con pintura b Comprobar la tuerca de fijación de la aguja K y si procede apreta...

Страница 34: ... του αέρα Β Regolazione della vite dell aria iniziale J1 per prolungare accorciare la fase di aria iniziale il colore fuoriesce dopo prima Svitare il dado di serraggio dell ago K sfilare l ago I Utilizzando la chiave universale V avvitare la vite dell aria iniziale J1 per prolungare la fase di aria iniziale il colore fuoriesce più tardi o svitarla per accorciare la fase di aria iniziale il colore ...

Страница 35: ...s agujas etc Declaración de conformidad de la UE Los aparatos pulverizadores de pintura de la empresa Harder Steenbeck han sido desarrollados construidos y fabricados en conformidad con la directiva europea 98 37 CE Se aplicaron las siguientes normas armonizadas DIN EN 292 Seguridad de máquinas aparatos e instalaciones DIN EN 1953 DIN 31000 DIN 31001 parte 1 BGR 500 BGV D25 BGV D24 y en caso neces...

Страница 36: ...Harder Steenbeck GmbH Co KG Hans Böckler Ring 37 D 22851 Norderstedt www harder airbrush de ...

Отзывы: