10
FINAL INSTALLATION
2.
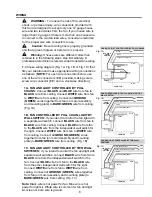
Locate three large screws at top of motor housing
(A). Align large screws with slots on the edges of the
mounting plate (B). Turn motor housing (A)
clockwise
,
to the RIGHT, until it no longer turns. (Fig. 2)
Note:
It is extremely important that you make sure
that you turn the motor housing (A)
all the way
to
ensure that the motor housing (A) is completely
secure.
Fig. 2
3.
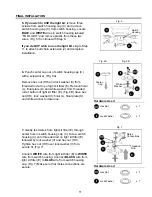
Partially insert three blade screws (BB), along with
three blade washers (DD), to attach one blade arm
(G) to a blade (H). Then, tighten each blade screw
(BB), starting with the one in the middle (Fig. 3)
Repeat with remaining blades (H).
4.
Insert two motor screws (AA), along with lock
washers (CC), through one blade arm (G) to attach
blade arm (G) to motor. Tighten motor screws (AA)
securely. (Fig. 4) Repeat with remaining blade arms
(G), making sure to completely secure each blade
arm (G) before proceeding with the next.
A
G
G
DD
BB
CC
AA
H
H
Fig. 3
DD
BB
3/16 Blade Screw x 15
Blade Washer x 15
Fig. 4
Hardware Used
CC
AA
Motor Screw x 10
Hardware Used
5.4 M/M Lock Washer x 10
Large
Screws
A
B


