P - 1
IMPORTANT
The following section contains important information regarding the safety and
operation of PTO drive equipment. As our spreaders are sold throughout the world
we install a standard length PTO shaft to accommodate multiple types and brands of
tractors. Therefore, modification (i.e. shortening) of the shaft may be required to
meet the specific needs of your tractor. Follow the guidelines set forth in this manual
to ensure proper and safe operation of your spreader.
HOW TO SHORTEN THE PTO DRIVE SHAFT
1)
Attach the implement to the draw bar. Align the implement with the tractor on
level ground - this will be the position at which the driveline is at its shortest
length. If the driveline will fit the tractor and implement at this point, without
bottoming out, no further action is necessary.
2)
If the driveline will not fit without bottoming out, separate the driveline
into two half shafts. Mount the tractor half on the PTO, and mount the
implement half on the power input connection (PIC).
3)
Hold the two halves side-by-side. Mark the outer shield tube where it overlaps
the end of the shield cone on the implement half shaft, plus 1/4".
4)
Disassemble the shields from the half shafts.
5)
Cut the outer shield tube at the mark made in (c). Using the cut piece as a
guide, cut an equal amount from the inner shield tube, the outer drive tube,
and the inner drive tube.
6)
Using a half round or rat tailed file, carefully deburr the cut end of the drive
tubes. Shake and/or wipe metal chips / filings from the drive tubes.
7)
Coat the inner drive tube with #2 grease along its entire length.
8)
Reassemble the shields onto each half shaft. Slide the inner half shaft into the
outer.
Содержание PT-6 FSS
Страница 1: ...Model PT 6 FSS Fertilizer and Lime Spreader SERIAL __________________ WORK ORDER ___________...
Страница 2: ......
Страница 8: ......
Страница 12: ......
Страница 13: ...Fertilizer and Lime Spreader Safety...
Страница 17: ...S 4 PTO SAFETY DECAL...
Страница 18: ...S 5 LUG NUT DECAL MAXIMUM LOADED SPEED MAKE SURE TO CHECK LUG NUTS DAILY CAUTION WARNING DO NOT EXCEED 25 MPH...
Страница 19: ...S 6 HYDRAULIC SYSTEM DECAL...
Страница 20: ...S 7 ROTATING CHAIN WARNING ROTATING SPINNERS WARNING...
Страница 21: ...PTO Shaft Adjustment And Maintenance...
Страница 24: ......
Страница 25: ...Section 1 Basic Information...
Страница 26: ...1 1 6PT FSS...
Страница 27: ...1 2...
Страница 29: ...Section 2 PTO Drive Spinners...
Страница 33: ...2 4...
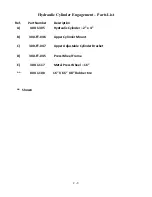
Страница 36: ...2 7 Hydraulic Cylinder Engagement Assembly...
Страница 38: ......
Страница 39: ...PTF 71 2 RZ PTO Drive Spinner Gear Case Assembly and Parts List...
Страница 43: ...Section 3 Full Press Wheel Drive Assembly...
Страница 44: ...3 1...
Страница 47: ...3 4...
Страница 48: ...3 5...
Страница 49: ...3 6 Hydraulic Cylinder Engagement Assembly...
Страница 51: ...PTF 71 2 RZ FP Full Press Wheel Drive Spinner Gear Case Assembly and Parts List...
Страница 55: ...Section 4 Press Wheel for Plug to Tractor Hydraulic Spinners...
Страница 58: ...4 3...
Страница 61: ...4 6 Hydraulic Cylinder Engagement Assembly...
Страница 63: ...Section 5 Hydraulic Spinners...
Страница 64: ...5 1...
Страница 67: ...5 4...
Страница 68: ...5 5...
Страница 74: ......
Страница 75: ...Section 6 Flow Divider Assembly...
Страница 76: ......
Страница 77: ...5 4...
Страница 79: ...Section 7 Rigid Axle Assembly...
Страница 80: ...7 1 6 Bolt 7 000 per Pair Hub Assembly J I H G A F E C B D L K...
Страница 82: ...7 3 8 Bolt 12 000 per Pair Hub Assembly J I H G A F E C B D L K...
Страница 85: ...Section 8 Basic Set Up Operation...
Страница 88: ...8 3...
Страница 90: ......
Страница 91: ...Section 9 Maintenance Troubleshooting...
Страница 97: ...Section 10 Spread Pattern...
Страница 101: ...10 4 Data Recording...
Страница 102: ...10 5 Data Recording Unacceptable Pattern Acceptable Pattern...
Страница 104: ...10 7 Acceptable Pattern Using a 3 Pass Switchback Driving Method...
Страница 106: ...10 9 Notes...


