11
Subject to change without notice
8.3 Ethernet interface parameters at the host (PC)
8.3.1 Parameters under Windows XP
Reference! In order to be able to accomplish the following
parameters, you have to be announced at the host concerned
(PC) as “administrator“, or you have to be member of the user
group “administrators“ (e.g. in the network).
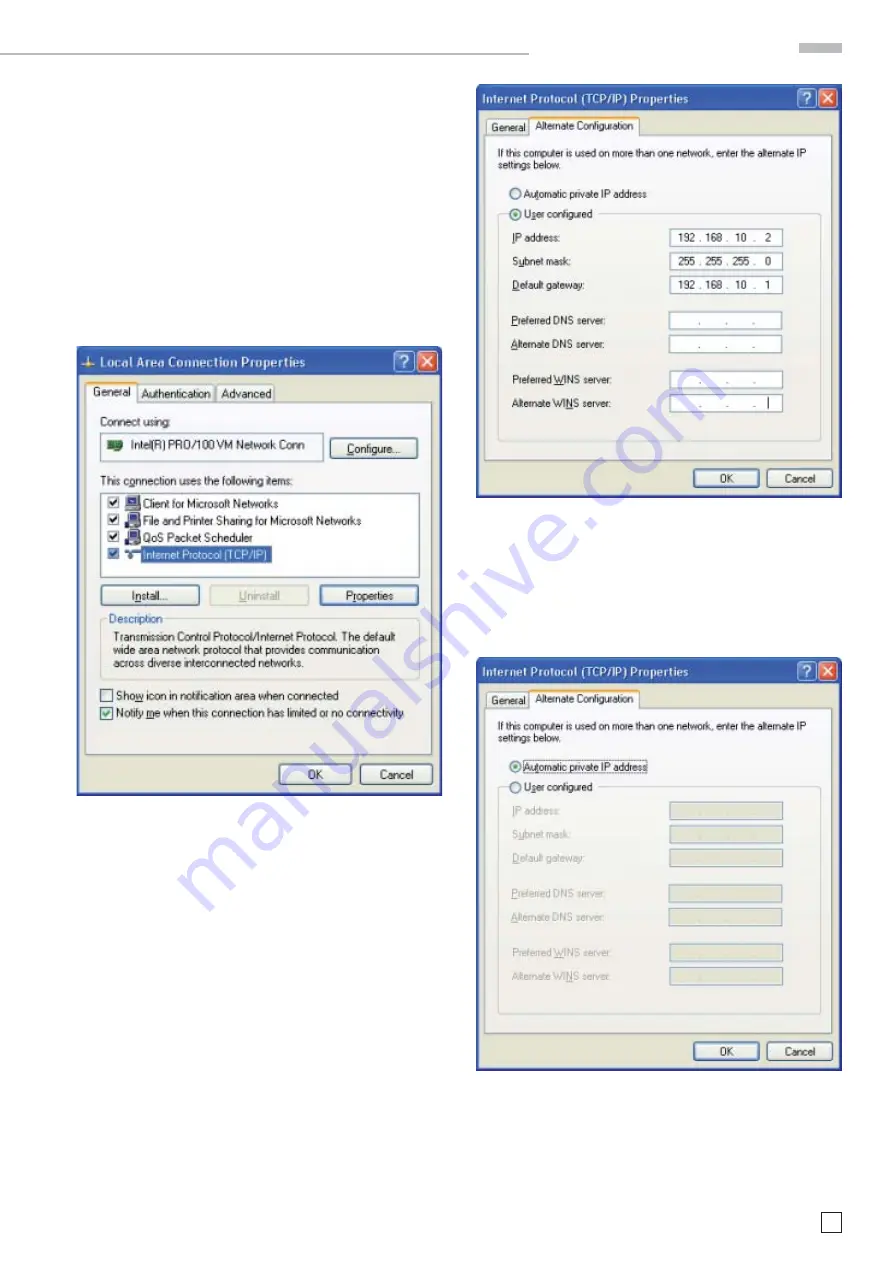
To preset the interface parameters of the Ethernet LAN inter-
face at the host PC please go to “Start“ menu and select under
the menus “Control Panel“
>
„Network connections“ the menu
“Local Area Connection“. In the new opened window to “Local
Area Connection Properties“ please click on “Internet Protocol
(TCP/IP)“ and click on “Properties“.
In the new opened window “Internet Protocol (TCP/IP) Proper-
ties“ please click on “Alternative Confi guration“ and select the
option “User confi gured“ for the manual preset of the network
parameters. In the input fi eld „IP address:“ please enter from
your (or from a network administrator specifi ed) IP address
for the PC (e.g. 192.168.10.2). In the input fi eld “Subnet mask“
please enter from your (or from a network administrator spe-
cifi ed) subnet mask for the PC (e.g. 255.255.255.0). In the input
fi eld “Default gateway“ please enter your (or from a network
administrator specifi ed) IP address of the gateway (e.g. the IP
address of the router of its LAN network). With a direct con-
nection of oscilloscope and host (PC) over a network cable this
input is optional.
Reference! The preset IP addresses at the oscilloscope and at
the host (PC) have to be different and be in the same subnet (ex.:
oscilloscope 192.168.010.010, PC 192.168.010.002, with subnet
mask 255.255.255.000).
If you attached the oscilloscope and the host (PC) to a network
with existing DHCP server (with activated DHCP function),
the presets for IP address, subnet mask and gateway of the
existing DHCP server are assigned dynamically automatically.
In this case you don’t need the described manual presets of
IP address, subnet mask and gateway. In the opened window
“Internet Protocol (TCP/IP) Properties“ please click on „Alter-
nate Confi guration“ and select the option „Automatic private
IP address“.
After the presets you confi rm the inputs please click „OK“.
E t h e r n e t c o n f i g u r a t i o n


