background image

www.hameco.eu

HV-55 User Manual

hameco

3

5, Install with caution

6, Do not dismantle the product without permission

7, Magnetic field interference

1)

 Do not rotate the camera head violently, otherwise it may cause mechanical malfunction;

2)

 This product should be placed on a stable desktop or other horizontal surfaces. Do not install the 

product obliquely, otherwise it may display an inclined image;

3)

 When installing the camera on TV or personal computer, use the four double faced adhesive pads 

at 

the bottom for fixing;

4)

 This product shell is made of organic materials. Do not expose it to any liquid, gas or solids which 

may corrode the shell.

5)

 During installation, ensure that there are no obstacles within rotation range of the holder;

6)

 Do not power on before finishing installation;

This product contains no parts which can be maintained by users. Any damage arising from disman-
tling the product by user without permission will not be included in warranty.

Magnetic field under specific frequency may affect this product image; this is a Class A product. 

Application in domestic environment may cause radio interference. Therefore, the user should take 
measures.

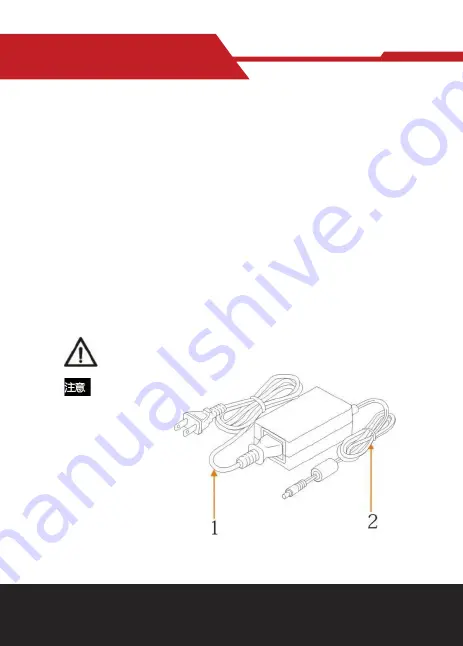
If the power line of the camera needs to be extended, extend it from terminal 1

(220V/110V) rather 

than terminal 2 (DC12V), otherwise it will prevent the device from functioning!

Содержание HV-55

Страница 1: ...User Manual HV 55 Operation Manual for Teacher Tracking Camera hameco www hameco eu...

Страница 2: ...t open the main case only qualified technicians are allowed to install or maintain the device 3 Do not use the device beyond scope of its temperature humidity or power supply specification 4 When clea...

Страница 3: ...s Do not expose it to any liquid gas or solids which may corrode the shell 5 During installation ensure that there are no obstacles within rotation range of the holder 6 Do not power on before finishi...

Страница 4: ...18 6 Description of recording and broadcasting host 19 6 1 Auto tracking control 20 6 2 Action code docking 22 7 Description of remote control 23 7 1 Description of keys 24 7 2 Use remote control 24...

Страница 5: ...on algorithm unrelated to location Status detection and recognition of teachers and stu dents adopts unique smart partitioning algorithm to ensure that the result of detection and recogni tion is unre...

Страница 6: ...pping motor and precision motor driven controller ensure the holder operate at low and stable speed without noise Multiple video compression standards It supports H 265 H 264 video compression Multipl...

Страница 7: ...iew Rear view SDI model 1 Close up lens 2 Panorama lens 3 LAN network port for panorama lens 4 SDI output 1 panorama lens output 5 SDI output 2 close up lens output 6 RS 232 control port 7 Audio input...

Страница 8: ...tput 2 close up lens output 7 HDMIoutput 2 close up lens output 8 RS 232 control port 9 Audio input port 10 LAN network port for close up lens 11 Power supply port DC12V HDMI U3 Model Pin definition N...

Страница 9: ...www hameco eu HV 55 User Manual hameco 9 3 DIMENSION...

Страница 10: ...blackboard writing detection and camera Space for installation of student tracking camera student status detection camera and student binocular camera Blackboard Platform Student area Space for insta...

Страница 11: ...m era shooting 4 2 System wiring The teaching tracking camera products provide a smart camera solution for the education information field and customers can select all or some products as needed Diffe...

Страница 12: ...ck Settings IP address Search successively refer to Figure 5 1 1 for details the configuration interface will display all valid devices in the LAN check type of device to be configured and click Confi...

Страница 13: ...eco eu HV 55 User Manual hameco 13 Here the following is a description of settings according to the process The main interface of config uration tool is shown in Figure 5 2 1 Figure 5 2 1 Operation in...

Страница 14: ...cher s image in the picture uses Platform preset as a reference When tracking target disappears it can select close up lens to go back to Platform preset Panoramic preset Control teacher tracking came...

Страница 15: ...means scope of tracking teacher When the tracking target goes out of the tracking area the tracked target will be lost The tracking area can be set into a polygon according to certain environment con...

Страница 16: ...ve dynamic changes for example TV projector doors and windows See Figure 5 2 5 3 Set tracking parameters Target lost when target is lost the close up lens will return to designated preset position Thi...

Страница 17: ...tracking camera when the tracking target changes from stationary state to motion state The higher the action sen sitivity the smaller the movement of tracking target that will trigger the camera s tra...

Страница 18: ...After setting click Save Parameter It allows to the user enter advance parameter settings in the col umn to change configuration value to obtain the best result subject to specific scenes and custome...

Страница 19: ...Auto tracking control The recording and broadcasting host sends command by LAN network port or concentrator RS232 serial port and controls the automatic tracking motion of teacher tracking camera In a...

Страница 20: ...or concentrator RS232 serial port in the form of an action code 1 Configure recording and broadcasting host address If recording and broadcasting host uses LAN to receive the action code then it needs...

Страница 21: ...1 Operation interface Figure 6 2 2 Operation interface 2 Configure action code Edit action code as needed via IVESmart configuration tool Click Configuration advance parameters successively After modi...

Страница 22: ...eset cancel preset number key 0 9 that is cancel preset of corresponding number key 8 Holder control key UDLR Up Down Left Right arrow l it controls UDLR movement of the holder HOME key Holder returns...

Страница 23: ...rol holder Rotate upward Press rotate downward Press Rotate to left Press rotate to right Press Center position Press HOME Press the UDLR key for a longer time it will rotate from low speed to high sp...

Страница 24: ...ocusing in focusing out releasing midway will stop focusing Auto focusing support Manual focusing Support 6 Set infrared remote control address of camera F1 stop tracking everytime when use remote con...

Страница 25: ...ect Press to select menu item Change value Press to change value Menu return Press menu key to return Home OK Press Home key to confirm 8 2 System parameter settings On the main menu move the cursor t...

Страница 26: ...menu item Style Default standard clear bright gentle 1 Exposure On CAMERA menu move the cursor to EXPOSURE press HOME key to enter exposure page as shown below Mode Options Auto manual shutter priorit...

Страница 27: ...erture priority modes Brightness Options 0 23 only valid in brightness pri oritymode 2 Color On CAMERA menu move the cursor to COLOR press HOME key to enter COLOR page as shown below WB Mode Options a...

Страница 28: ...ions on off B W Mode Options color black white Gamma Options default 0 45 0 50 0 55 0 63 Dzoom Options on off DCI dynamic contrast options off 1 8 4 Focus On CAMER menu move the cursor to FOCUS press...

Страница 29: ...3D Options off 1 8 Dynamic hot pixel Options off 1 5 8 4 P T Z On the main menu move the cursor to P T Z press HOME key to enter P T Z page as shown below Speed by zoom It only works on remote contro...

Страница 30: ...menu 8 6 Version On the main menu move the cursor to Version press HOME key to enter Version page Version information varies from product model and date of production Version information contains vers...

Страница 31: ...optics zoom 12X optical zoom f 3 9 46 1mm 20X optical zoom f 4 7 94mm Visual angle 6 3 narrow angle 72 5 wide angle 2 9 narrow angle 55 4 wide angle Aperture coefficient F1 8 F2 4 F1 6 F3 5 Digital z...

Страница 32: ...85 Control protocol VISCA Pelco D Pelco P Baud rate 115 200 9 600 4 800 2 400bps Audio input port Dual track 3 5mm linear input Audio compression format AAC MP3 PCM Power port HEC3800 power socket DC1...

Страница 33: ...mmand with illegal command parameters is accepted Command Not Executable z0 61 41 FF Returned when a command cannot be executed due to current conditions For example when commands con trolling the foc...

Страница 34: ...01 04 07 3p FF Direct 8x 01 04 47 0p 0q 0r 0s FF pqrs Zoom Position CAM_Focus Stop 8x 01 04 08 00 FF Far Standard 8x 01 04 08 02 FF Near Standard 8x 01 04 08 03 FF Far Variable 8x 01 04 08 2p FF p 0 l...

Страница 35: ...r Priority Automatic Exposure mode Iris priority 8x 01 04 39 0B FF Iris Priority Automatic Exposure mode Bright 8x 01 04 39 0D FF Bright mode CAM_Shutter Reset 8x 01 04 0A 00 FF Shutter Setting Up 8x...

Страница 36: ...CAM_Flicker Off 8x 01 04 23 00 FF Off 50HZ 8x 01 04 23 01 FF 50Hz 60HZ 8x 01 04 23 02 FF 60HZ CAM_Aperture Reset 8x 01 04 02 00 FF Aperture Control Up 8x 01 04 02 02 FF Down 8x 01 04 02 03 FF Direct 8...

Страница 37: ...0 0p 0q FF pq Brightness Position CAM_Contrast Direct 8x 01 04 A2 00 00 0p 0q FF pq Contrast Position CAM_Flip Off 8x 01 04 A4 00 FF Single Command For Video Flip Flip H 8x 01 04 A4 01 FF Flip V 8x 01...

Страница 38: ...0Y 0Y 0Y 0Z 0Z 0Z 0Z FF W 1 UpRight 0 DownLeft YYYY Pan Limit Position TBD ZZZZ Tilt Limit Position TBD Clear 8x 01 06 07010W 07 0F 0F 0F 07 0F 0F 0F FF Search command Command Command package Return p...

Страница 39: ...deInq 8x 09 04 33 FF y0 50 02 FF On y0 50 03 FF Off CAM_NRLevel 2D Inq 8x 09 04 53 FF y0 50 0p FF P 2DNRLevel CAM_NRLevel 3D Inq 8x 09 04 54 FF y0 50 0p FF P 3D NRLevel CAM_FlickerModeInq 8x 09 04 55...

Страница 40: ...0q FF pq Brightness Position CAM_ContrastInq 8x 09 04A2 FF y0 50 00 00 0p 0q FF pq Contrast Position CAM_FlipInq 8x 09 04A4 FF y0 50 00 FF Off y0 50 01 FF Flip H y0 50 02 FF Flip V y0 50 03 FF Flip HV...

Страница 41: ...nzz zz Tilt Position Note x on table above means address of camera to be operated y x 8 11 PELCO D PROTOCOL COMMAND LIST Function Byte1 Byte2 Byte3 Byte4 Byte5 Byte6 Byte7 Up 0xFF Address 0x00 0x08 Pa...

Страница 42: ...ition Response 0x55 0x00 0x00 0x5D Value High Byte Value Low Byte 12 PELCO P PROTOCOL COMMAND LIST Function Byte1 Byte2 Byte3 Byte4 Byte5 Byte6 Byte7 Byte8 Up 0xA0 Adress 0x00 0x08 Pan Speed Tilt Spee...

Страница 43: ...result 13 2 Troubleshooting 1 No image displayed by video output Solution a Check camera power for connection and check if power indicator is lit b Power off restart the device and check if it perform...

Страница 44: ...ntrol line connects correctly d Check if camera is in normal operating mode refer to table 2 2 and table 2 3 6 Failure to log in to webpage Solution a Use display to check if camera outputs image norm...

Страница 45: ...parately collected Consumers should contact their local authority or retailer for information concerning the correct disposal of their old appliance Copyright Notice All the contents of this manual an...

Отзывы: