background image

6

2. Main Menu Screen

6-23

MONITOUCH Ope

ra

tio

ns

3.

Ethernet

* For more information on the IP address setting, refer to the V-SFT Additional Specifications 

Manual.

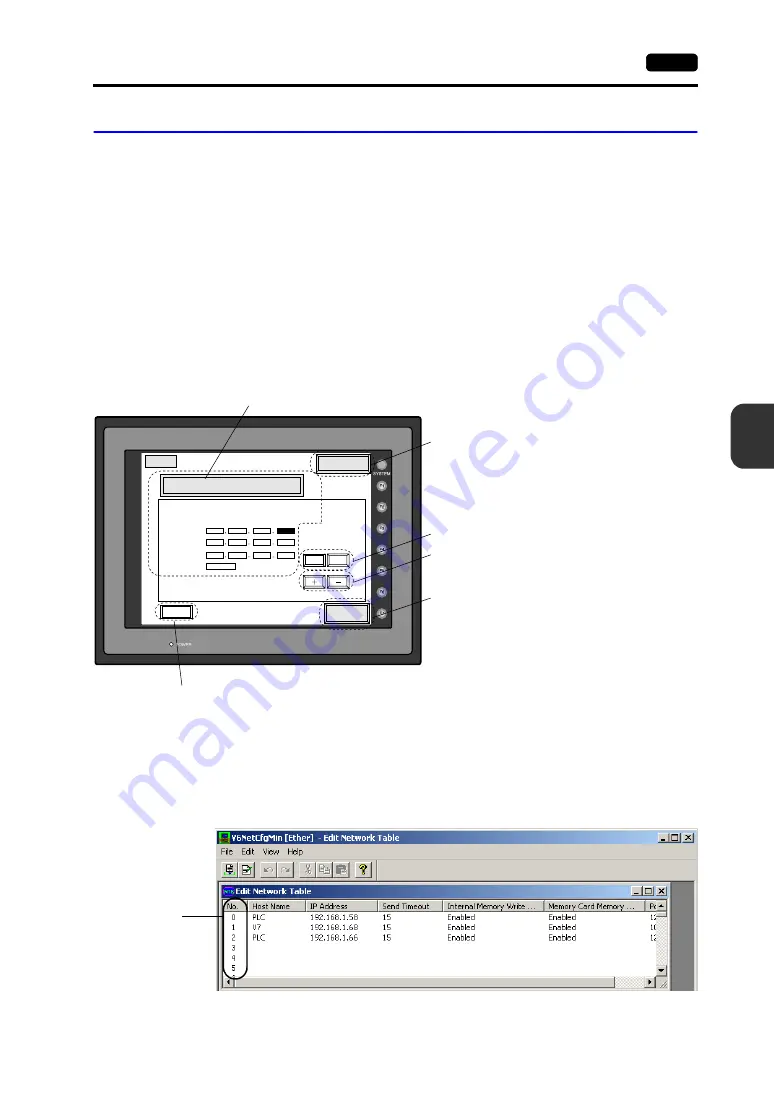
The “Ethernet” screen is displayed by pressing the [IP Address (English)] switch on the initial screen 
when transferring screen data via Ethernet for the first time, or by pressing the [Ethernet] switch on the 
Main Menu screen when transferring screen data to the MONITOUCH.
This screen is used for setting the IP address (a number that identifies the V7 series on the network) 
that is indispensable for Ethernet communications.

Depending on whether the LAN (10BASE-T) connector at V7i or the communication interface unit 
CU-03-2 for V7 is used, the “Ethernet” screen contents and the required settings vary as described 
below.

Connection with LAN (10BASE-T) Connector at V7i

*1

Network Table
Register IP addresses and other information for the V7 series, PLCs or computers that should be included for 
Ethernet communications on the V-SFT editor.
([System Setting]


[Network Table Setting]


[Ethernet]


Edit Network Table)

The registered network table can be used or not used depending on the [Not Use Network Table/Use Network 
Table] switch.

Return

<-

Ethernet

Not Use Network Table

It is not used when the gate way or the sub-mask is zero.

IP Address:

Gate Way:

Sub-mask:

Port No.

Connect

->

Setting

Finished

0

0

0

0

0

0

0

0

10000

0

0

0

0

Cursor switches

[Increment/Decrement] switch for the value 
in the cursor position

Determines the setting such as IP address, 
and moves back to the Main Menu screen.

Used for checking the 10BASE-T interface.

Normal:

Connect

Error:

Disconnect

Moves back to the Main Menu screen 
or the initial screen.

Selects [Not Use Network Table] or [Use Network Table].

*1

Network table 
number

Содержание Monitouch V7

Страница 1: ...V7 Series...

Страница 2: ...FX1S FX2N series PLC2Way MITSUBISHI QnH Q series CPU FX series link A protocol OMRON CS1 CS1DNA Ethernet ALLEN BRADLEY PLC5 SLC500 Control Logix Ethernet SIEMENS S7 300 400MPI S7 300MPI Helmholz SSW7...

Страница 3: ......

Страница 4: ...BUS Communication Unit Instructions for PROFIBUS are contained 1036NE Connection with AB Control Logix The connection communication parameters and tag setting for AB Control Logix are explained 1041NE...

Страница 5: ......

Страница 6: ...when you set up the unit connect cables or perform maintenance and inspection Otherwise electrical shock or damage may occur Never touch any terminals while the power is on Otherwise electric shock ma...

Страница 7: ...r incorrect cable connection could cause fire malfunction or damage to the unit Be sure to establish a ground of MONITOUCH Ground FG terminal which must be used for the unit Otherwise electric shock o...

Страница 8: ...OUCH surface Use alcohol or benzine commercially available If a data receive error occurs when MONITOUCH and the counterpart PLC temperature controller etc are started at the same time read the manual...

Страница 9: ......

Страница 10: ...cifications 2 4 Function Performance Specifications 2 5 2 Dimensions and Panel Cut out 2 6 V708 V708i External View and Dimensions 2 6 V710 V710i External View and Dimensions 2 7 V712 V712i External V...

Страница 11: ...4 5 SYSTEM Switch 4 5 Chapter 5 Connections 1 1 1 Connection 5 1 2 1 n Connection Multi drop 5 2 3 n 1 Connection Multi link 2 5 3 4 n 1 Connection Multi link 5 4 5 Universal Serial Communications 5 5...

Страница 12: ...28 Chapter 7 Error Correction 1 Error Message 7 1 1 Communication Error 7 1 2 Check 7 4 3 Warning 7 5 4 SYSTEM ERROR 7 6 5 Touch Switch is Active 7 6 2 Troubleshooting 7 7 In the Event of an Error 7...

Страница 13: ......

Страница 14: ...11 Features 2 Models and Peripheral Equipment 3 System Composition Overview...

Страница 15: ......

Страница 16: ...riting data from to the server 4 Video Display Upgraded for high performance type only optional The video display function is upgraded drastically to allow saving the current video screen taking snaps...

Страница 17: ...with CE UL cUL V708iSD TFT color 800 600 dots high performance DC power supply Compliant with CE UL cUL V708CD STN color 640 480 dots standard DC power supply Compliant with CE UL cUL V710 series 10...

Страница 18: ...ts standard AC power supply V712SMD TFT color 800 600 dots standard DC power supply Compliant with CE UL cUL V712iSM TFT color 800 600 dots high performance AC power supply V712iSMD TFT color 800 600...

Страница 19: ...p copy of screen data or works as an external memory storage system for memory manager and data logging functions REC MCARD memory card compliant with JEIDA ver 4 0 Used with the card recorder when ha...

Страница 20: ...and a personal computer or a personal computer and the card recorder CREC V7 PT printer cable 2 5 m Used for connection between the V7 series and a printer For the CBM292 293 printer use the V7 PTCBM...

Страница 21: ...he operation panel surface 5 sheets set V7xx GSN10 xx 08 V708 V708i 10 V710 V710i 12 V712 V712i protective sheet This anti glare sheet protects the operation panel surface 5 sheets set V7 BT battery f...

Страница 22: ...TMP Computer PC Printer cable V7 standard During operation Link communication V series configuration software Creating screens General purpose computer CF card During operation Universal serial commu...

Страница 23: ...high performance During operation Link communication V series configuration software Creating screens General purpose computer CF card During operation Universal serial communication Link unit Transf...

Страница 24: ...1 Specifications 2 Dimensions and Panel Cut out 3 Names and Functions of Components 4 Serial Connector CN1 5 Modular Jack MJ1 MJ2 6 10BASE T LAN 7 CF Card CF 8 Printer Connection PRINTER Specification...

Страница 25: ......

Страница 26: ...60 C Ambient Humidity 85 RH or less without dew condensation Solvent Resistance No cutting oil or organic solvent attached to the unit Atmosphere No corrosive gas or conductive dust Mechanical Working...

Страница 27: ...rast Ratio 25 1 250 1 350 1 300 1 300 1 350 1 Angle of Vertical Visibility 40 30 35 55 30 20 45 55 35 45 40 45 Angle of Horizontal Visibility 50 50 45 70 50 55 Backlight Cold cathode rectifier exchang...

Страница 28: ...on ESC P24 J84 CBM292 293 printer 1 Barcode printer MR400 EPSON printer STYLUS PHOTO series 2 CF Card Interface Compliant with CompactFlashTM Ethernet Connection 10BASE T Standard with V7i Compliant w...

Страница 29: ...dots 2 byte 16 16 dots or 32 32 dots Enlarge W 1 to 8 times H 1 to 8 times Number of Displayable Characters Resolution 640 480 800 600 1 4 size 80 characters 60 lines 100 characters 75 lines 1 byte 80...

Страница 30: ...Display No limitation within 256 kbyte per screen 1 Message Display Resolution 640 480 max 80 characters 1 byte 800 600 max 100 characters 1 byte No limitation within 256 kbyte per screen 1 Sampling...

Страница 31: ...t mm 24VDC F1 F2 F3 F4 F5 F6 F7 SYSTEM POWER LAN CN1 MJ1 MJ2 PRINTER CF CN5 MEMORY CN6 165 24 3 220 220 5 0 5 0 165 5 66 1 165 233 178 220 6 6 0 5 0 See operating or maintenance instruction for type o...

Страница 32: ...AC L N F1 F2 F3 F4 F5 F6 F7 SYSTEM POWER LAN CN1 MJ1 MJ2 PRINTER CF CN5 MEMORY CN6 289 0 5 0 216 2 0 5 0 288 0 288 0 215 2 35 2 215 2 303 8 231 72 8 See operating or maintenance instruction for type o...

Страница 33: ...F4 F5 F6 F7 POWER CN5 MEMORY CN6 CF PRINTER MJ2 MJ1 CN1 LAN 100 240VAC L N 326 4 259 6 8 312 312 245 2 313 0 5 0 0 5 0 246 2 72 245 2 63 8 See operating or maintenance instruction for type of battery...

Страница 34: ...RINTER CF CN5 MEMORY CN6 2 1 3 4 5 6 7 8 9 10 11 12 13 15 14 See operating or maintenance instruction for type of battery to be used Battery replacement 100 240VAC L N F1 F2 F3 F4 F5 F6 F7 SYSTEM POWE...

Страница 35: ...REC etc 7 PLC communication connector CN1 Used for connection between the V7 series and a PLC or an external control unit computer custom controller etc 8 10BASE T connector LAN V7i only Used for Ethe...

Страница 36: ...n memory connector MEMORY This is the connector where the optional FLASH memory cassette V7EM F or SRAM cassette V7EM S is mounted 14 DIP switch 8 bit DIP switch used for setting terminating resistanc...

Страница 37: ...e ground 2 SD RS 232C send data 3 RD RS 232C receive data 4 RS RS 232C RS request to send 5 CS RS 232C CS clear to send 6 Not used 7 SG Signal ground 8 Not used 9 5 V Use prohibited 10 0 V Use prohibi...

Страница 38: ...the next section Barcode Reader Connection 4 Select this option when connecting the serial extension I O V I O 5 Select this open when Multi link 2 is selected for Connection and 1 is set for Local Po...

Страница 39: ...Not usable at the same time 1 This is not possible when the V7 series and the PLC are connected via Ethernet MJ1 MJ2 Multi Link 2 Card Recorder Barcode V I O Temp PLC 2Way V Link Touch Switch Ladder T...

Страница 40: ...nection It is possible to receive the signal from a barcode reader by connecting the barcode reader at the modular jack MJ1 2 of the V7 series To connect a barcode reader to the modular jack MJ1 2 use...

Страница 41: ...nnector Use this connector for Ethernet connection For V708i For V710i V712i The LAN 10BASE T pins correspond to signals as given below Side View Bottom View CAUTION MJ1 2 and LAN connector are 8 pin...

Страница 42: ...ble For more information refer the HUB specifications Node Node Distance between the node and the HUB 100 m maximum Maximum network nodes 100 UTP cable Straight Ethernet unit Straight cable with HUB C...

Страница 43: ...ce is provided on the side of the unit For V708 V708i For V710 V710i V712 V712i Manufacturer Type Capacity Kodak KPCN 32 32 MB SanDisk SDCFB 64 505 64 MB SDCFB xxxx 801 32 MB 64 MB 96 MB 128 MB 192 MB...

Страница 44: ...nu screen and the CF card operation screen is displayed it is not possible to insert or remove the CF card 3 Do not turn the power off or on during access to the CF card 4 Make a backup copy of the CF...

Страница 45: ...Connector PRINTER This is the printer connector for parallel interface For V708 V708i For V710 V710i V712 V712i The printer interface pins correspond to signals as given below CAUTION Be sure to turn...

Страница 46: ...t or sampling data EPSON STYLUS PHOTO series EPSON color ink jet printer STYLUS PHOTO series For printer models refer to the separate V SFT Additional Specifications Connection with Printer through Se...

Страница 47: ...2 22 8 Printer Connection PRINTER Please use this page freely...

Страница 48: ...31 Mounting Procedure 2 Power Supply Cable Connection Installation...

Страница 49: ......

Страница 50: ...the unit within the angle of 15 to 135 as shown on the right F1 F2 F3 F4 F5 F6 F7 SYST EM POW ER 216 2 289 0 5 0 0 0 5 165 5 220 5 0 5 0 0 0 5 246 2 313 V712 V712i V708 V708i 216 2 289 0 5 0 0 0 5 V71...

Страница 51: ...bles of 100 VAC and 24 VDC sufficiently away from high voltage large current carrying cables DANGER Electric shock hazard Shut the power off before connecting the power supply cable 24 VDC 24VDC LAN C...

Страница 52: ...cross section of more than 2 mm2 for grounding Set the grounding point near the MONITOUCH to shorten the distance of grounding cables When the V7 unit is attached to the mounting panel the fixtures an...

Страница 53: ...3 4 2 Power Supply Cable Connection Please use this page freely...

Страница 54: ...41 Coin type Lithium Battery 2 DIP Switch Setting 3 Function Switches Instructions...

Страница 55: ......

Страница 56: ...set the battery when using the calendar function or SRAM Without battery the contents in the SRAM or calendar will not be retained DANGER Electric shock hazard Steps 2 to 5 must be performed when the...

Страница 57: ...FONT VER 1 300 1 000 1 000 ENGLISH I F DRV VER 1 300 MELSEC AnA N U Editor MJ1 Connection 1 1 Signal Level RS232C PLC Stat No 0 Baud Rate 19200 Data Length 8 Stop Bit 1 Parity Odd Send Delay 20msec Ma...

Страница 58: ...unit off and open the battery holder A battery is set at the socket 3 Unplug the battery connector and remove the battery from the socket Take out the battery while pressing the center of the battery...

Страница 59: ...the CREC optional Serial extension I O Connection with the V I O optional Connection to the V7 series at the termination of V link connection via RS 485 CF Auto Load DIPSW1 A screen data file saved on...

Страница 60: ...function switch corresponds to the menu item displayed in the switch menu When the SYSTEM switch is pressed again the switch menu disappears and the function switches F1 to F7 work as defined by the...

Страница 61: ...djustment Brightness Adjustment Adjust the contrast Holding down the switch for one second or more changes the contrast rapidly Adjusts the screen brightness in three levels Applicable Models V708C V7...

Страница 62: ...ion 2 1 n Connection Multi drop 3 n 1 Connection Multi link 2 4 n 1 Connection Multi link 5 Universal Serial Communications 6 V Link 7 PLC2Way 8 Temperature Control Network 9 Ethernet 10 Other Network...

Страница 63: ......

Страница 64: ...is not necessary to have the dedicated communication program on the PLC slave station The V7 series reads the PLC memory for screen display It is also possible to write switch data or numerical data...

Страница 65: ...ultiple PLCs Maximum connectable PLCs 31 For more information on wiring and communication settings refer to the PLC Connection Manual PLC1 PLC2 PLC3 PLCn CN1 F1 F2 F3 F4 F5 F6 F7 SYSTEM POWER Maximum...

Страница 66: ...e one for 1 1 connection Use the RS 485 2 wire connection between stations of the V7 series Please use Hakko Electronics multi link 2 master cable V6 MLT for connection between the master station Loca...

Страница 67: ...n 2 wire connection The V7 and V6 series can be used together For more information on wiring and communication settings refer to the PLC Connection Manual PLC CN1 CN1 CN1 CN1 F1 F2 F3 F4 F5 F6 F7 SYST...

Страница 68: ...switch activation write command from the keypad and screen change Use CN1 of the V7 series for connection with a general purpose computer Either signal level RS 232C or RS 422 RS 485 can be selected I...

Страница 69: ...tions with the V7 series Data collection is available even between the products of different manufacturers Either signal level RS 232C or RS 485 can be selected With RS 232C one V7 series can be conne...

Страница 70: ...2 wire With RS 232C one PLC can be connected with RS 485 a maximum of 31 PLCs can be connected Constant reading sampling of PLC data connected to the MJ port When read write memory addresses are prese...

Страница 71: ...y table background data reading is performed at regular intervals It is also possible to save the read data in the V7 internal buffer SRAM or CF card Data transfer It is also possible to transfer data...

Страница 72: ...protocol is provided so that the user can create an original application by using Visual C or Visual Basic etc to allow the server to access the memory device such as V7 internal memory memory card or...

Страница 73: ...on the Ethernet For more information refer to the PLC Connection Manual PLC Ethernet V7 RS 232C RS 485 V SFT PROGRAMMER PROGRAMMER F1 F2 F3 F4 F5 F6 F7 SYSTEM POWER Ethernet ready PLC Server PLC 1 Et...

Страница 74: ...n the V7 series is equipped with the communication interface unit CU 03 2 it becomes an FL net OPCN 2 ready device When CU 03 2 is mounted for FL net OPCN 2 communications on V7i the 10BASE T connecto...

Страница 75: ...r communications with the PLC no program is required in the same way as communications via a link unit The V7 series supports the optical loop system of NET 10 Use fiber optic cables for connection RU...

Страница 76: ...0 1FF 200 2FF 300 3FF RUN STOP RUN STOP 1Mp1 1Ns2 1Ns3 1Ns4 1Mp1 1Ns2 1Ns3 1Ns4 F1 F2 F3 F4 F5 F6 F1 F2 F3 F4 F5 F6 F1 F2 F3 F4 F5 F6 F1 F2 F3 F4 F5 F6 F1 F2 F3 F4 F5 F6 F1 F2 F3 F4 F5 F6 Possible to...

Страница 77: ...es a CC Link ready device For communications with the PLC no program is required in the same way as communications via a link unit It is possible to perform high speed communications by connecting mul...

Страница 78: ...on The GET PUT service is supported and communications with the PLC can be performed without program in the same way as communications via a link unit The V7 series that supports OPCN 1 communications...

Страница 79: ...hat are allocated to the items placed on the screen such as lamp parts or counter parts When switch data or counter setting data on the V7 series should be written the V7 series issues a write command...

Страница 80: ...ies can only communicate with the master PLC PROFIBUS DP supports I O communications only With I O communication it is not possible to directly access the device memory DB or MW used in the CPU To ena...

Страница 81: ...5 18 10 Other Networks Please use this page freely...

Страница 82: ...61 Operational Procedures 2 Main Menu Screen MONITOUCH Operations...

Страница 83: ......

Страница 84: ...refer to the separate PLC Connection Manual 3 MONITOUCH power on New MONITOUCH Other than the above When the check screen below and then the next user screen are displayed correctly go to step 5 4 Scr...

Страница 85: ...et the IP address Press the Setting Finished switch The initial screen is displayed again 3 Transfer screen data from the computer via Ethernet 4 Auto uploading screen data from the CF card to the V7...

Страница 86: ...1 300 1 000 1 000 ENGLISH I F DRV VER 1 240 MELSEC QnH Q CPU Port Editor MJ1 Connection Signal Level PLC Stat No Multi Link RS232C 0 Baud Rate Data Length Stop Bit Parity Send Delay 19200 8 1 Odd 20ms...

Страница 87: ...heck switch appears only when V I O is selected for a modular jack on the V SFT editor Main Menu SYS F 1 F 2 F 3 F 4 F 5 F 6 F 7 Printer Check Ext I O Check Self Loop Test CTS RTS CN1 RS232C MJ1 RS485...

Страница 88: ...pins 2 and 3 of CN1 on the backside of the V7 unit 2 Press the Self Loop Test switch When the OK lamp lights up the test is successfully completed If the NG lamp lights up consult your local distribu...

Страница 89: ...stributor CTS RTS Test Check the signals CTS and RTS 1 Install a jumper between pins 14 RTS and 19 CTS of CN1 and between pins 17 RTS and 18 CTS on the backside of the V7 unit 2 Press the RTS switch a...

Страница 90: ...ble V6 CP Connect the modular jack side of the cable to MJ1 or MJ2 and the ADP25 9 side to CN1 2 Press the Self Loop Test switch When the OK lamp lights up the test is successfully completed If the NG...

Страница 91: ...n Switch Test Check operations of eight switches provided vertically on the right side of the V7 panel Press the switch and check that the lamp on the screen lights up while the switch is held down Ma...

Страница 92: ...shown below 2 Press a position on the panel and check that the pressed position turns white The switch is activated normally when the pressed position turns white To move back to the I O Test screen p...

Страница 93: ...shing at the corner When the finger is released a beep sounds and the position is set 6 To re set the positions press the F2 switch and follow step 2 and later 7 Press the F1 switch A long beep sounds...

Страница 94: ...J port of the V7 series and transferring screen data between the V7 series and a memory card 2 Screen Data switch Press this switch when transferring screen data between the V7 series and a CF card 3...

Страница 95: ...Port Selection field 2 Mounting the Memory Card Insert a memory card in to the card recorder CREC 3 Memory Card Information Press the Modular Jack MJ1 MJ2 switch The memory card information contained...

Страница 96: ...m Data Selection Display Display Display Card Card Card Memory Card Information Sys Program Version Font Date Version I F Driver Version Screen PLC Type Screen Comment YOKOGAWA FA 1 250 YOKOGAWAFA M3...

Страница 97: ...rs are created The folder name cannot be changed 3 The folder name for screen data auto uploading cannot be changed Folder Name Contents Folder Name Contents BITMAP Saves pattern data bitmap data to r...

Страница 98: ...Card Menu Return Card Card Card Transfer Menu Display Display Display Screen Data SRAM Data Selection CREC Menu Card Menu Return Card Card Card Data selection Transfer selection Card Transfer CF Card...

Страница 99: ...isplayed To see the details of the folder press the Folder Detail switch The Folder Detail screen is displayed Select the desired folder using the switch and press the OK switch The Card Transfer scre...

Страница 100: ...ERAL Access Data Selection Select All Screen Data I F Driver Font Data Sys Program Card Transfer CF Card File Infomation Access Folder Name AAAAAAAA Rest Size 29437KB Return Select Data Select Folder...

Страница 101: ...wing window is displayed Press the OK switch The CF card file information shows data that has been transferred If any other message is displayed refer to page 6 22 4 Press the Return switch The Card M...

Страница 102: ...er to page 6 22 4 Press the Return switch The Card Menu screen is displayed again Card Transfer CF Card File Infomation Folder Name AAAAAAAA Rest Size 29437KB Return Start Display Card Access Sys Prog...

Страница 103: ...s shown on the screen The transferred file is named as SRM0000 BIN Transfer Menu Display Display Display Screen Data SRAM Data Selection CREC Menu Card Menu Return Card Card Card Transfer Menu Display...

Страница 104: ...data transfer When data has been transferred successfully the following window is displayed Press the OK switch If any other message is displayed refer to the next page 6 Pressing the Return switch m...

Страница 105: ...er than the capacity of a memory card Write Protect ON Cannot write data into a memory card because the write protect switch in a memory card is ON Writing Error occurred The error occurred while writ...

Страница 106: ...ed below Connection with LAN 10BASE T Connector at V7i 1 Network Table Register IP addresses and other information for the V7 series PLCs or computers that should be included for Ethernet communicatio...

Страница 107: ...reen the initial screen is displayed again Use Network Table In the following cases select Use Network Table The network table is set for screen data of the V7 series and you would like to change the...

Страница 108: ...ting Ethernet Edit Network Table Set the network table number with the rotary switch on the communication interface unit CU 03 2 0 0 0 0 0 0 0 10000 0 0 0 10BASE T 0 0 Return Ethernet It is not used w...

Страница 109: ...nd for initializing the SRAM area 2002 4 1 SYSTEM PROG VER 1 000 CPU Port Editor MJ1 Main Menu V 7 1 0 i T D System Information PLC Type MITSUBISHIQnH Q series CPU Comment Screen Data Information Size...

Страница 110: ...cute switch The SRAM area is initialized in the current screen data format When initialization has been completed the message Format Completed is displayed 5 Extension Program Information When the Ext...

Страница 111: ...rate used between the V7 and the modem is set 2 The Main Menu local main screen is displayed automatically Modem Connect Mode automatically appears under Editor MJ1 3 To transfer screen data without...

Страница 112: ...71 Error Messages 2 Troubleshooting Error Correction...

Страница 113: ......

Страница 114: ...ution Remarks Time Out Although a request to send is given to the PLC no answer is returned within the specified time 1 Check the communication parameters 2 Check the cables and wiring 1 3 Data may be...

Страница 115: ...k 1 2 3 described below TNS discrepant applicable to Allen Bradley PLC Transmitted TNS data and received TNS data are not in agreement Check 1 2 3 described below Communication Error An unclear commun...

Страница 116: ...ion set on the PLC for OPCN 1 communications 2 Timeout on the V SFT editor The timeout time can be set from System Setting Comm Parameter on the V SFT editor This error is indicated when the above 1 a...

Страница 117: ...g for the received screen At the start of communications the V7 series regards the value in the read area n 2 as the screen number Check that the value in the read area n 2 is an existing screen numbe...

Страница 118: ...NGLISH I F DRV VER 1 250 MELSEC QnH Q CPU Port Editor MJ1 Main Menu V 7 1 0 i T System Information PLC Type MITSUBISHI QnH Q series CPU Comment Screen Data Information Size 5111808 Ethernet Card Menu...

Страница 119: ...Bad program Solve relevant problems by following the directions in Troubleshooting page 7 7 If the problem persists contact your local distributor 5 Touch Switch is Active If the power is turned off...

Страница 120: ...n successful However opening a certain page always causes a Communication Error Error code received error The error code denotes a PLC error NAK 1 When the error code appears only on a certain screen...

Страница 121: ...ches may be faulty 3 Return the MONITOUCH to your local distributor The screen becomes dark or black 1 Touching the screen restores it to the previous illuminated state The backlight operates automati...

Страница 122: ...81 Inspection and Maintenance 2 Warranty Policy Inspection and Maintenance...

Страница 123: ......

Страница 124: ...r the environment is hot humid or dusty Periodical Inspection Inspect the following points periodically Are the ambient temperature and humidity appropriate 0 to 50 C 85 RH or less Are the environment...

Страница 125: ...in the warranty period Breakage of or damage to the appearance case or surface sheet touch switches LCD or other components due to dropping impact or mishandling LCD or backlight at the end of life Fu...

Страница 126: ...bet 2 Enter the version if it can be checked The version is displayed on the Main Menu screen page 6 3 Your name Company name Contact E mail TEL FAX Model code 1 Ser No 1 MONITOUCH version 2 SYS PROG...

Страница 127: ...8 4 2 Warranty Policy Please use this page freely...

Страница 128: ...awa 924 0035 Japan TEL 076 274 2144 FAX 076 274 5208 TEL 03 3255 0166 FAX 03 3255 0298 238 Kamikashiwano machi Matto shi Ishikawa 924 0035 Japan Tokyo Office Head Office Sales TEL 06 6385 8234 FAX 06...

Отзывы: