background image

7.6 Loading the appliance


Put in the laundry piece by piece.


Don‘t overload. Check if you can put a hand upright on top of the load. 


Close the door carefully. Make sure that no pieces of laundry are pinched.


Note: Tub Clean

amount of detergent or special machine cleaner to remove possibly corruptive residues.

7.5 Selecting a drum

1.


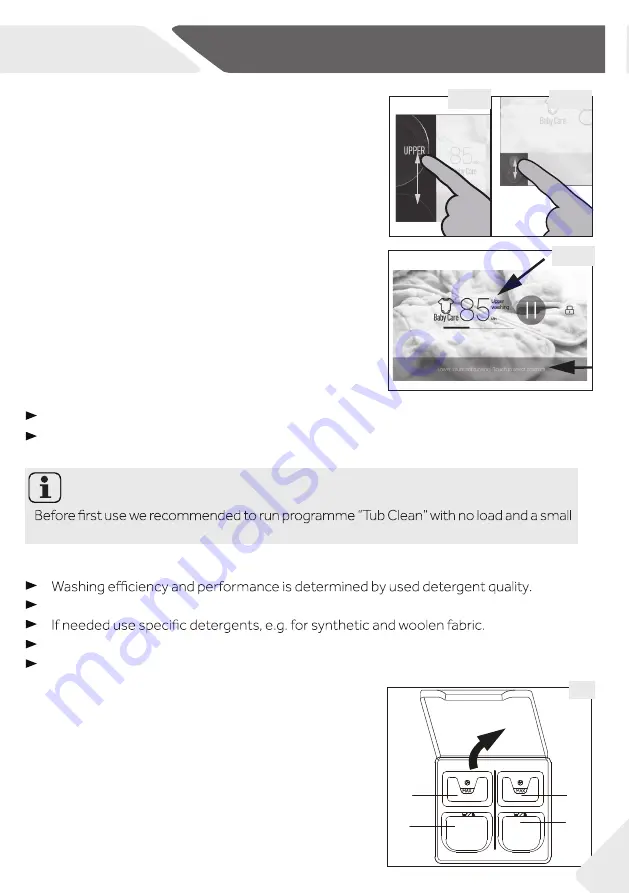
Touch in the area of the drum selector on the left 

side of the screen to switch between the drums 

(Fig.  7.5-1).  Choose  the  drum  according  to  de-

sired programme and weight of laundry:
Upper drum:


max. 4 kg

Lower drum:


max. 8 kg

After  starting  a  programme  the  drum  can  be 

choosen by touching the marked area in Fig. 7.5-2.

2.


After  starting  a  programme  follow  the  instruc-

tions  on  the  screen  (Fig.  7.5-3)  and  touch  to 

choose programme for the other drum.

LOWER

Cotton 

min

high 

w

s

soak

i

additional fun

special stains

juice

hours

Delay

7.5-1

7.5-2

7.5-3

7.7 Selecting detergent


Use only machine wash approved detergents. 


Always mind detergent manufacturer recommendations. 


Do not use dry cleaning agents such as trichloroethylene and similar products.

7.8 Adding detergent

1.  Open the detergent drawer cover (Fig. 7.8). 
2.


Put  the  required  chemicals  according  to  the  list 

“Choose the best detergent” into corresponding 

compartments. 
1: Lower drum; softener, Conditioning agent etc.
2: Lower drum; detergent for programme
3: Upper drum; softener, Conditioning agent etc.
4: Upper drum; detergent for programme

3.


Close the cover.

1

2

3

4

LOWER

UPPER

MAX

MAX

7.8

GB

7- Daily use

23

Содержание HWD120-B1558

Страница 1: ...User manual Washing machine GB User manual Washer dryer HWD120 B1558 ...

Страница 2: ...tions carefully before using this appliance The instructions con tain important information which will help you get the best out of the appliance and ensure safe and proper installation use and maintenance Keep this manual in a convenient place so you can always refer to it for the safe and proper use of the appliance If you sell the appliance give it away or leave it behind when you move house ma...

Страница 3: ...tion 4 2 Product description 9 3 Control panel 11 4 Consumption 15 5 Programmes 18 6 Eco friendly washing 19 7 Daily use 20 8 Care and cleaning 29 9 Troubleshooting 32 10 Installation 37 11 Technical data 40 12 Customer service 42 ...

Страница 4: ...d Keep away children under 3 years of age from the appliance un less they are constantly supervised Children shall not play with the appliance Do not let children or pets come close to the appliance when the door is open Store washing agents out of reach of children vent laundry from being entangled If necessary use an appropri ate bag or net Do not touch or use the appliance when barefoot or with...

Страница 5: ...ol panel or metal buttons on the clothing shortly after washing programme at high temperature or the water outlet hose when draining out hot water undertaking any routine maintenance and disconnect the appli ance from the electrical supply to save electricity and for safety Hold the plug not the cable when unplugging the appliance Do make sure the room is dry and well ventilated The ambient temper...

Страница 6: ...n the dryer Items which contain a large proportion of rubber foam rubber latex foam or rubber like materials such as shower caps wa terproof textiles rubberised articles and items of clothing and pillows with foam rubber lling Notice that the last part of the drying cycle occurs without heat cool down cycle to ensure remaining the garments at a temper ature which does not damage them Do not leave ...

Страница 7: ...f the tumble dryer door as this limits the full opening of the tumble dryer door The appliance should be placed in a well ventilated place Ensure a location which allows opening the door fully Never install the appliance outdoors in a damp place or in an area which may be prone to water leaks such as under or near a sink unit In the event of a water leak cut the power supply and allow the machine ...

Страница 8: ...ge the electric cable and the plug If dam aged have it replaced by an electrician For the power supply use a separate earthed socket which is ea syly accessible after installation The appliance must be earthed no leakage 1 Safety information GB 8 ...

Страница 9: ...creen display 14 Upper drum 15 Upper sealing 16 Rating plate 17 Lower drum 18 Lower sealing 19 Service 2 1 Intended use This appliance is intended for washing machine washable and dryable laundry only Always follow the instructions given on the label of each garment label The appliance is designed exclusively for domestic use inside the house It is not intended for commercial or indus trial use ar...

Страница 10: ... S2 4 Blanking plugs 7 in all 5 Water outlet connector 6 Filter B 7 Water inlet connection point 8 Upper rear cover 9 Lower rear cover 10 Transportation bolts T1 T5 11 Adjustable feet 4 in all Spanner Hose attached on back of appliance 1 2 3 4 5 10 9 8 1 7 S1 T4 T5 S2 T3 T1 T2 6 11 2 2 2 Drain hose bracket User manual Warranty card 2 3 2 Productdescription GB 10 ...

Страница 11: ... through a full touch screen display Fig 3 0 The touch screen clearly shows how to choose between upper and lower drums programmes and settings The user gets access to all functions with one slight touch 3 Submenu 4 Power button 3 1 Drum selector Touch this area to switch between the drums 5 Quick Start button Note Select the language Before using the appliance refer to section 3 Submenue System s...

Страница 12: ...fault settings Otherwise it runs with the previous settings 1 Touch on right edge of the display to enter settings Fig 3 0 2 Child lock sound language brightness and WIFI setting and remote control can set separately Fig 3 3 2 1 3 3 2 System settings 3 3 2 1 3 Open next level menu of Language to select the language Fig 3 3 2 2 3 3 2 2 3 3 1 Operation guide Touch on right edge of the display Fig 3 ...

Страница 13: ...ed after 1 minute Fig 3 7 1 2 When child lock is in operation press its symbol on the screen for 3 seconds to stop this function 3 7 1 1 3 7 1 2 3 6 Programme status indicators A Upper drum B Lower drum 1 Selected programme 2 Remaining operation time 3 Washing process indicator 4 Start Pause button 5 Door is locked 6 Programme progress indicator A B 1 2 3 5 6 4 5 2 3 6 4 1 3 6 GB 3 Control panel 1...

Страница 14: ...perature in the drum is too high or the drum is still rolling the door can not be opened even when the programme is paused Please note that this is a normal situation You also need to unlock the door to open it during the delay period 3 7 2 3 7 3 Drum lamp lamp lights up Note Standby mode energy saving mode The switched on appliance goes into standby mode if it is not activated within 2 minutes be...

Страница 15: ...3 drying c ycles are necessary Standard programme for the Energy Labelling according to 96 60 EU Washing 12 kg Standard programme with max spin speed and 60 C temperature setting Both drums work simultaneously Drying Reduce the load to 4 kg Select Dry programme then touch Dry setting screen Fig 5 0 for 6 seconds Fig 4 0 until the time switches to 147 min utes Repeat twice for rest of washing load ...

Страница 16: ...nt of laundry U Bulky Heavily soiled cotton laundry L Mix L Jeans Jeans L Shirts Shirts L Sensitive white or coloured laundry Delicate Down L Synthetic Synthetic L Curtain Curtains co L Outdoor Care Outdoor clothes L Silk Washable silk U Sports Wear Sportswear L Wool Woolen clothing L Color Wear Dark colored laundry U Quick Wash 2 Lightly soiled laundry of cotton or synthetic U L Delicates Handwas...

Страница 17: ...15 3 1000 P 2 68 5 2 1200 P 4 51 10 2 1000 P 5 3 92 20 3 1000 P 4 3 67 15 2 1000 P 4 2 72 20 2 1000 P 4 2 70 10 3 1000 P 2 72 25 2 600 P 4 2 93 40 2 1200 P 4 58 5 2 800 P 4 2 55 15 2 800 P 1 41 10 2 600 P 4 2 25 5 1 800 P 2 46 15 1 800 P 3 59 25 2 600 P 1 3 1 15 3 1 1000 P 3 41 10 2 600 P 3 6 3 26 2 1000 3 6 4 7 1000 4 4 150 1 30 70 90 in C 3 Due to multiple distribution inlet waiting spin waiting...

Страница 18: ...Care U 3 Kids Wear U 3 Cotton L 8 4 Underwear U 2 Bedding L 5 3 Towels U 2 Casual U 4 Bulky L 5 3 Mix L 4 3 Jeans L 4 2 Shirts L 4 2 Delicate Down L 2 Synthetic L 4 2 Curtain L 4 Outdoor Care L 4 2 Silk U 1 Sports Wear L 4 2 Wool L 2 Color Wear U 3 Quick Wash 2 U L 1 3 1 Delicates L 3 Special Rinse Spin U L 3 6 3 Spin U L 3 6 4 Dry L 4 Refresh L 1 Tub Clean U L available Following functions are av...

Страница 19: ...h programme Apply exact dosages of each washing agent Choose the lowest adequate washing temperature modern detergents clean ef Raise default settings only to get rid of heavy staining Spin the laundry with the maximum spin speed if you want to use a drying pro gramme afterwards Drying Loosen up the laundry before starting the drying programme Do not use softener when washing the laundry will beco...

Страница 20: ...shing drying programme for the loaded drum on the display the degree of soiling and sort of laundry type 7 10 Maybe add individual selections and or a start delay time 7 11 Touch to start the programme 7 12 After the programme ends take out the laundry Close the water tap pull out the electrical plug Select a drum Select a programme Add individual selections Upper drum Lower drum e g Baby Care e g...

Страница 21: ...ten tiontothecarelabellingofwashinglabels Fig 7 4 and 7 4 1 Care chart Separate white clothes from coloured ones they fade or run Empty pockets keys coins etc and remove harder decorative objects e g brooches as well as ammable objects paper tissues lighters matches etc into a laundry bag to care for this delicate laundry hand or dry cleaning would be better CAUTION Non textile as well as small lo...

Страница 22: ... irre versibledamage Do not iron Professional Textile Care Dry cleaning in tetra chloroethene Dry cleaning in hy drocarbons Do not dry clean Professional wet clean Do not professional wet clean Note Special hints for drying Sort clothes according to fabric cotton synthetics etc desired dry level and equal residual moisture Follow the instructions on the laundry label and dry only machine dryable g...

Страница 23: ...ed area in Fig 7 5 2 2 After starting a programme follow the instruc tions on the screen Fig 7 5 3 and touch to choose programme for the other drum LOWER Cotton min h w special stains juice hours Delay 7 5 1 7 5 2 7 5 3 7 7 Selecting detergent Use only machine wash approved detergents Always mind detergent manufacturer recommendations Do not use dry cleaning agents such as trichloroethylene and si...

Страница 24: ...ic L P L P L o Wool L o Mix L P L P L o Jeans L P L P L o Sports Wear L o Shirts L P L P o Curtain L o Down L o Outdoor Care L o Bedding L P L P o Quick Wash L o Hygiene L P L P o Delicates L L o Bulky L P L P o 12 kg Standard L P L P o 7 8 1 Choose the best detergent L gel liquid detergent P powder detergent O optional _ no We recommend using Laundry powder 20 C to 90 C best use 40 60 C Colour de...

Страница 25: ... drawers This is the normal water supply or condensation gathered during the washing circle 7 9 Selecting a programme Afterchoosingthedrum thescreenshowstheavailableprogrammes Threeprogrammes are shown on one page slide to right to check all available programmes for chosen drum Fig 7 9 Touch the symbol of the desired programme to get a quick start using the default set tings Touch the area above t...

Страница 26: ...itional rinsing cycles for people with sensitive skin Speed Change of spin speed For very del icate fabrics reduce speed 7 10 1 Screen 1 Settings Fig 7 10 1 Function Meaning Function Meaning Dry Add a drying cycle at end of washing programme Only available for lower drum Delay Start of wash cycle will be delayed Stains Special feature for stains of Blood Grass Wine Juice Soil Milk Additional Water...

Страница 27: ...ethesurplusofloadforjoineddryingcycle 7 10 2 2 Drying There are two possibilities to get dry laundry for the lower drum 7 10 2 2 1 Set programme Dry 1 Set programme Dry 2 Slide or touch within the option cube to set up drying time in steps of 30 minutes from OFF 120 minutes Fig 7 10 2 2 1 Select AUTO for intelli gent drying The dry programme stops when laun dry is dry 3 Touch symbol to start the d...

Страница 28: ...2 Cancel wash programme To cancel a running programme and all its individual settings 1 Touch pause symbol 2 Touch the return symbol and go back to the parameter setting page 3 Re adjust the still not running parameters 4 Touch the return symbol again to re select programme 5 6 Select a new programme and start 7 12 After washing 1 2 Remove laundry as soon as possible to go easy on it and to preven...

Страница 29: ...hine cleaner Note Tub Clean For regular maintenance we recommend to run the Tub Clean programme without a load in order to remove possible corruptive residues quarterly Add a small amount of detergent or use a special machine cleaner To prevent blockage of water supply by solid substanc supply Unscrew the water inlet hose on the tap 8 3 Cleaning the drums Remove accidentally washed metal parts suc...

Страница 30: ...ll out the electrical plug Fig 8 4 1 2 3 Open the doors to prevent formation of moisture and odours Leave doors open while not in use Before next usage carefully check the power cord wa ter inlet and drain hose Make sure everything is prop erly installed and does not leak 8 4 1 8 4 2 Note Tub Clean After long periods of disuse we recommend to run the Tub Clean programme without a load and a small ...

Страница 31: ... can escape 9 Remove contaminants and dirt Fig 8 5 6 10 Fig 8 5 7 11 12 Close service fl Note Filter at the back Fig 8 5 9 Normally it is unnecessary to clean this E1 is displayed WARNING Do not replace the drum lamps yourself it must only be replaced by either the manufac turer or the authorised service agent See CUSTOMER SERVICE 8 5 5 8 5 6 8 5 7 8 5 8 8 5 9 8 ...

Страница 32: ...ess power button to get rid of it If it keeps ap pearing pull out power plug and contact customer service Incaseyouareaskedtocontactthecustomerservice Notetroubleshootingmessage and refer to CUSTOMER SERVICE Tip code Cause Solution E1 The appliance cannot empty the water and drain pipe are not blocked E2 The door is not locked Please open then close the door again and press the OK key to start the...

Страница 33: ...tected tersales service FE Abnormal drying fan system detect ed Clean cles reminder Please run the drumself cleaningpro gram 100 wash cycles reminder Please run the drum self cleaning program 100 wash cycles reminder H High drum temperature High drum temperature the door will remain locked until the drum cools down for safety rea sons LOCK The door is locked The door is locked due to high water le...

Страница 34: ... sure the drain hose is not in water Drainage failure Drain hose is blocked Drain hose end is higher than 100 cm above floor level Unblock drain hose Make sure that drain hose is properly installed Strong vibration while spinning Not all transportation bolts have been removed Appliance has no solid position Machine load is not correct Remove all transportation bolts Ensure solid ground and a ev ell...

Страница 35: ...tion is in function be cause load is too little This is normal Increase loading The drying results are not satisfactory Incorrect programme setting Check the programme setting The drum is overloaded Reduce the amount of laundry There is a coating on the inner surface of the drum Clean the inner surface of the drum with a cloth soaked in vin egar The laundry was too wet Spin the laundry properly be...

Страница 36: ...rating wash programme door opening is mechanically blocked To get out any laundry water level should not be seen in the glassy porthole of the doors Danger of burns Water level has to be lowered as described in Care and Cleaning Pull the corresponding emergency ring Fig 10 4 be hind the service fl upper drum door B lower drum door until door is un 9 4 WARNING If you were using a drying cycle before...

Страница 37: ...o be moved to a distant location re place the transportation bolts removed before instal lation to prevent damage 1 Remove the blanking plugs 2 Insert the plastic spacers and the transportation bolts as well as the packaging screws 3 Tighten the bolts with a spanner 10 2 Dismantle the transportation bolts and packaging screws The transportation bolts are designed for clamping anti vibration compon...

Страница 38: ...Fig 10 3 2 Get the appliance to horizontal level through ad justing the feet 2 3 Use spanner to tighten the screw caps 1 to di rection tight 10 3 Adjusting the feet 1 2 10 3 Following connections are possible 10 4 1 Drain hose to sink Hang the drain hose with the U support over the edge of a sink with adequate size Fig 10 4 1 ping 10 4 2 Drain hose to waste water connection The internal diameter o...

Страница 39: ... 5 1 Tighten the screw joint by hand 2 The other end connect to a water tap Fig 10 5 2 WARNING dry and leack free Take care these parts are never to be crushed kinked or twisted If the supply cord is damaged it must be replaced by the service agent see warranty card in order to avoid a hazard Note Tub Clean nance run programme Tub Clean with no load and small amount of detergent or with special ma...

Страница 40: ...ating cycle 138 Water consumption for washing and spinning only 2 in L complete operating cycle 64 Washing and drying time Programme time for complete operating cycle in min 766 Estimated annual consumption for a four person household always using the drier 200 cycles in kWh 1628 Estimated annual consumption for a four person household never using the drier 200 cycles in kWh 190 Noise during washi...

Страница 41: ...GB 11 Technical data 41 Dimension HxWxD in mm 1280x600x600 Voltage current 220 240 V 50 Hz 10 A Max power W 2100 Water pressure MPa 0 03 1 0 Net weight kg 121 11 2 Additional technical data ...

Страница 42: ...r or and FAQs and where you can activate the service claim To contact our Service ensure that you have the following data available The information can be found on the rating plate Model ____________________ Serial No _____________________ Also check the Warranty Card supplied with the product in case of warranty 42 ...

Страница 43: ...GB 43 ...

Страница 44: ...0020507767V ...

Отзывы: