2U14CS1ERA
2U18FS1ERA
1.
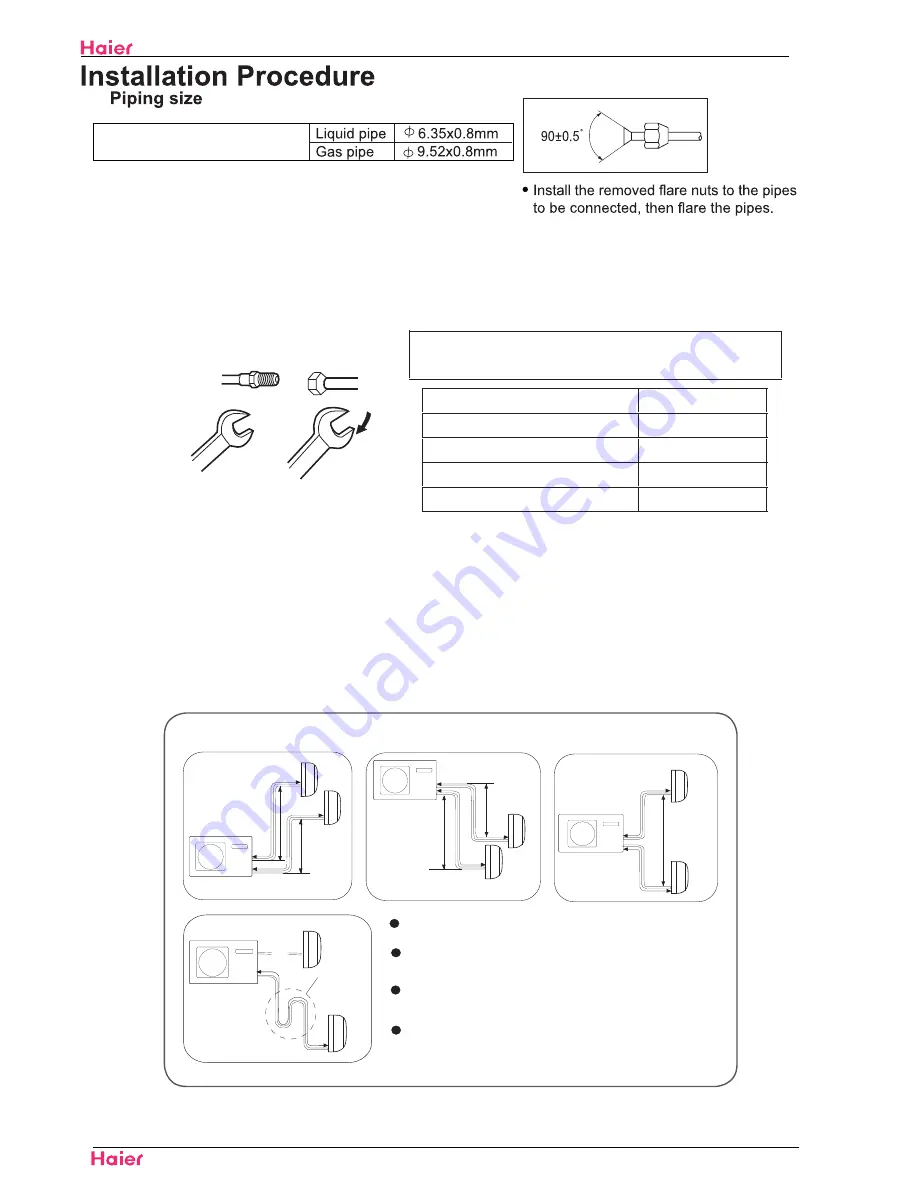
To bend a pipe, give the roundness as large as possible not to crush the pipe ,
●
and the bending radius should be 30 to 40 mm or longer.
Connecting the pipe of gas side first makes working easier.
●
The connection pipe is specialized for R410A.
●
Half union
Flare nut
Torque wrench
CAUTION:
Be careful that matters, such as wastes of sands,water,, etc. shall not enter the pipe.
Spanner
Forced fastening without careful centering may
damage the threads and cause a leakage of gas.
Pipe Diameter(ǿ)
Fastening torque
Liquid side6.35mm(1/4")
18N.m
Liquid/Gas side9.52mm(3/8")
42 N.m
Gas side 12.7mm(1/2")
55N.m
Gas side 15.88mm(5/8")
60 N.m
Connection of pipes
2.
In case the elevation B is more than 5m,
oil trap shoud be installed every 5~7m
Max. Length: B1 max =20m B2 max =20m
Max.Elevation: A1 max =15m A2 max =15m
In case the pipe total length (B1+B2) is more than
20m, the refrigerant should be charged, according
to 20 g/m.
B
Outdoor unit
Indoor unit
A1
B1
Indoor unit
A2
B2
Outdoor unit
Indoor unit
B1
Indoor unit
B2
Outdoor unit
Indoor unit
Oil trap
A3
A3 max =15m
(B1+B2) max =30m
Outdoor unit
Indoor unit
A1
B1
Indoor unit
A2
B2
CAUTION
Indoor unit
Be careful that matters, such as wastes of sands, etc. shall not enter the pipe. The standard pipe
length of each indoor unit is 5m. If total pipe length is over 20m, the function of the unit will be
affected, charge more refrigerant is needed, according to 20 g/m. But the charge of refrigerant
must be conducted by professional air conditioner engineer. Before adding additional refrigerant,
perform air purging from the refrigerant pipes and indoor unit using a vacuum pump,then charge
additional refrigerant.
Installation
2U14CS1ERA-SM
78
Domestic air conditioner
Содержание 2U14CS1ERA
Страница 44: ...41 2U14CS1ERA SM ...
Страница 73: ...70 Domestic air conditioner WARNING CAUTION Installation 2U14CS1ERA SM ...
Страница 74: ...71 Domestic air conditioner Installation 2U14CS1ERA SM ...
Страница 77: ...Installation 2U14CS1ERA SM 74 Domestic air conditioner ...
Страница 78: ...Installation 2U14CS1ERA SM 75 Domestic air conditioner ...
Страница 79: ...Installation 2U14CS1ERA SM 76 Domestic air conditioner ...
Страница 82: ...Installation 2U14CS1ERA SM 79 Domestic air conditioner ...
Страница 86: ...83 Domestic air conditioner Removal of procedure 2U14CS1ERA SM ...
Страница 89: ...86 Domestic air conditioner Removal of procedure 2U14CS1ERA SM three two HOOKS ...
Страница 90: ...87 Domestic air conditioner Removal of procedure 2U14CS1ERA SM 3 horizontal flap flap flap flap flap ...
Страница 96: ... Domestic air conditioner Removal of procedure 2U14CS1ERA SM 8 ...
Страница 98: ...Domestic air conditioner Removal of procedure 2U14CS1ERA SM 9 ...
Страница 100: ... Domestic air conditioner Removal of procedure 2U14CS1ERA SM Loosen the csrews and pull the panel ...
Страница 102: ...99 Domestic air conditioner Removal of procedure 2U14CS1ERA SM 10 ...
Страница 103: ... Domestic air conditioner Removal of procedure 2U14CS1ERA SM 11 ...
Страница 104: ...101 Domestic air conditioner Removal of procedure 2U14CS1ERA SM 2 Loosen the fixing screws and remove the motor ...
Страница 105: ...Domestic air conditioner Removal of procedure 2U14CS1ERA SM 102 12 ...
Страница 106: ...103 Domestic air conditioner Removal of procedure 2U14CS1ERA SM and remove the reactor Loosen the screw ...
Страница 107: ...104 Domestic air conditioner Removal of procedure 2U14CS1ERA SM 13 Loosen the marked screws and pull out the backgurd ...
Страница 109: ...106 Domestic air conditioner Removal of procedure 2U14CS1ERA SM and remove the reactor Loosen the screw ...
Страница 110: ... SSHQGL 107 10 Appendix 10 1 Piping Diagrams 2U14CS1ERA SM ...
Страница 111: ...Domestic air conditioner Wring Diagram 108 10 2 Wiring Diagrams Indoor 2U14CS1ERA SM ...
Страница 116: ...W Hongjin Chen Huimin Li Peng Yang Bifei The end Sincere Forever Haier Group 88936935 2U14CS1ERA SM ...


