


2U14CS1ERA-SM
Service diagnosis
62
Domestic Air Conditioner
Troubleshooting * Caution Be sure to turn off power switch before connect or disconnect connector,
or else parts damage may be occurred.
7.4.9 Overheat Protection For Exhaust Temperature
outdoor display LED1 flash 8 times
Method of The exhaust temperature control is checked with the temperature being detected
Malfunction by the exhaust pipe thermistor
Detection
Malfunction when the compressor discharge temperature is above 110
ć
Decision
Conditions
Supposed
Ŷ
Electronic expansion valve defective
Causes
Ŷ
Faulty thermistor
Ƶ
Faulty PCB
Troubleshooting * Caution Be sure to turn off power switch before connect or disconnect connector, or
else parts damage may be occurred.
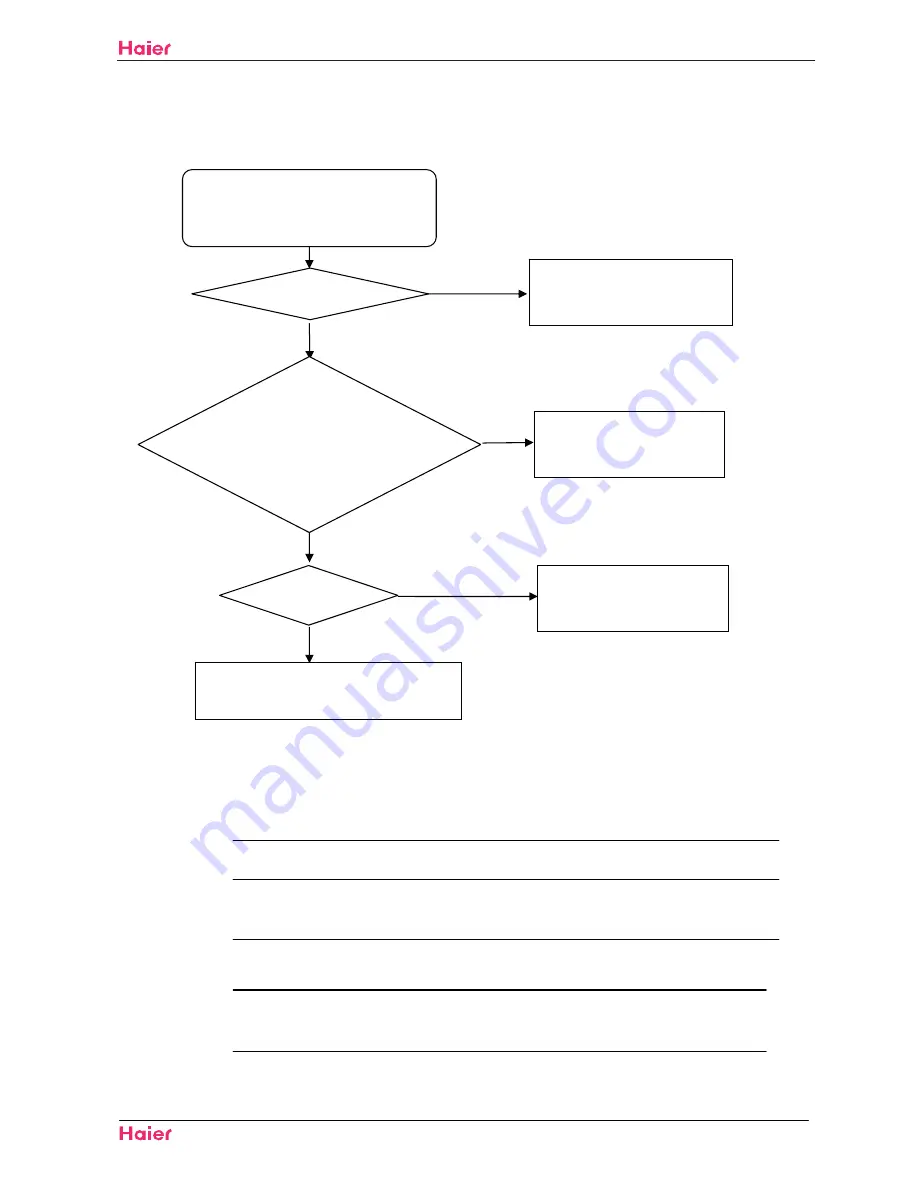
Electrify the machine again and turn it on with
the remote controller. Check whether the
compressor is started normally
Is it ok?
Yes
Maybe there is some disturbance
NO
No
~220 is ok?
Yes
Yes
This question may be caused by the power.Repair
the power supply.
NO
Change the IPM module
Change the IPM module
Test the outdoor power supply
(+310VDC) with a multimeter.
check whether the power
is >150 V or <390V?
Содержание 2U14CS1ERA
Страница 44: ...41 2U14CS1ERA SM ...
Страница 73: ...70 Domestic air conditioner WARNING CAUTION Installation 2U14CS1ERA SM ...
Страница 74: ...71 Domestic air conditioner Installation 2U14CS1ERA SM ...
Страница 77: ...Installation 2U14CS1ERA SM 74 Domestic air conditioner ...
Страница 78: ...Installation 2U14CS1ERA SM 75 Domestic air conditioner ...
Страница 79: ...Installation 2U14CS1ERA SM 76 Domestic air conditioner ...
Страница 82: ...Installation 2U14CS1ERA SM 79 Domestic air conditioner ...
Страница 86: ...83 Domestic air conditioner Removal of procedure 2U14CS1ERA SM ...
Страница 89: ...86 Domestic air conditioner Removal of procedure 2U14CS1ERA SM three two HOOKS ...
Страница 90: ...87 Domestic air conditioner Removal of procedure 2U14CS1ERA SM 3 horizontal flap flap flap flap flap ...
Страница 96: ... Domestic air conditioner Removal of procedure 2U14CS1ERA SM 8 ...
Страница 98: ...Domestic air conditioner Removal of procedure 2U14CS1ERA SM 9 ...
Страница 100: ... Domestic air conditioner Removal of procedure 2U14CS1ERA SM Loosen the csrews and pull the panel ...
Страница 102: ...99 Domestic air conditioner Removal of procedure 2U14CS1ERA SM 10 ...
Страница 103: ... Domestic air conditioner Removal of procedure 2U14CS1ERA SM 11 ...
Страница 104: ...101 Domestic air conditioner Removal of procedure 2U14CS1ERA SM 2 Loosen the fixing screws and remove the motor ...
Страница 105: ...Domestic air conditioner Removal of procedure 2U14CS1ERA SM 102 12 ...
Страница 106: ...103 Domestic air conditioner Removal of procedure 2U14CS1ERA SM and remove the reactor Loosen the screw ...
Страница 107: ...104 Domestic air conditioner Removal of procedure 2U14CS1ERA SM 13 Loosen the marked screws and pull out the backgurd ...
Страница 109: ...106 Domestic air conditioner Removal of procedure 2U14CS1ERA SM and remove the reactor Loosen the screw ...
Страница 110: ... SSHQGL 107 10 Appendix 10 1 Piping Diagrams 2U14CS1ERA SM ...
Страница 111: ...Domestic air conditioner Wring Diagram 108 10 2 Wiring Diagrams Indoor 2U14CS1ERA SM ...
Страница 116: ...W Hongjin Chen Huimin Li Peng Yang Bifei The end Sincere Forever Haier Group 88936935 2U14CS1ERA SM ...