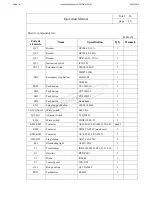
Operation Manual
Total 26
page 20
Installation:
Working area of the machine shall be the size when the worktable rounds its column in one
cycle. Its diameter is about
Ø2000
mm. Further more, space for the work pieces, toolbox, and
machine accessories as well as operating and maintenance space must be considered.
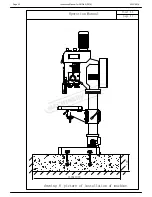
The machine should be placed on a solid ground. No foundation construction is required if
ground of workshop is solid enough. However, we suggest that you’d better to make a
foundation as per the attached drawing 8 and shall consider some space for foundation screw
bolts use.
When the foundation is completely dry, the machine could be laid down on the adjustable
pad. Concrete could be filled when screw bolts are placed. Fastening screw bolts after
concrete is completely dry. Leveling the machine first, required tolerance should not be
over 0.04/1000mm both in horizontal and cross plane. Checking all items of the accuracy as
per the table sheet of the certificate. Accuracy value for each checked item must not be over
the required value.
Preparation before machine running:
A strict checking, testing and try cutting of the machine have been made before machine
delivery. No adjustment of the machine itself is necessary. Before machine running, clean all
surfaces of the machine first by using cloth with kerosene or gasoline, checking all
lubrication points then turn the main switch of the machine to the “on” position, running the
machine with middle or slow speed and checking all revolution direction is correct, operating
levers are in a correct position, checking machine noise and working temperature are all ok.
The machine should be running for a certain period of time, then it could be used if no any
un-normal condition happened.
7.
Use and operation of the machine
:
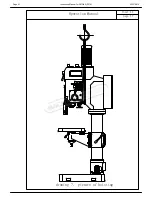
For the operating levers, handles, electric switches and buttons, please refer to the diagram 1
and diagram 4.
Mounting and dismounting of tool cutters:
The machine equipped with a tool dismounting device to be controlled by a nob ( 16 ). Push
forward the nob ( 16 ) to the spindle box direction when tool mounting is required. As for
dismounting tool cutters, pull out the nob ( 16 ), hold the tool cutter by left hand,
meanwhile, turn the feed lever ( 4 ) by right hand, then the spindle quill goes up rapidly,
the tool cutter will fall down until tool taper shank strokes the shaft of spindle.
Page 22
Instruction Manual for GHD-50 (D178)
23/12/2014


