background image

29

Installation

3.6.2 Power supply connection (high voltage instruments)

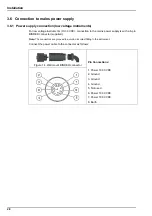
High voltage instruments (100-240 VAC) have a 4-pin male connector pre-wired internally with a 
male BINDER connector ready for mains connection. A compatible female connector is supplied 
with the instrument. 

If this female connector was supplied with a mains power plug already pre-attached (cable part 
numbers 33031, 33032, 33033 and 33034) then the female connector can be plugged directly 
into the instrument power connector. The two connectors are grooved to avoid an incorrect 
fitting. Tighten the female connector to the instrument power connector finger-tight.

If no power cable was ordered with the equipment, a mains power plug must be connected to 
the supplied female connector as described in the following procedure.

User-supplied power cable specifications:

3-wire (live, neutral and earth)

cable 

ø




7mm;  

 9.5mm

wire selection 



mm

2

, AWG18;  

 2.5mm

2

, AWG14

Prepare the user-supplied power cable as follows:

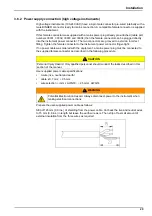
Strip off 23 mm (0.9 ins.) of shielding from the power cable. Cut back the live and neutral wires 
to 15 mm (0.6 ins.) in length but leave the earth wire as is. Then strip off a small amount of 
external insulation from the three wires as required:

CAUTION

Personal Injury Hazard. Only qualified personnel should conduct the tasks described in this 
section of the manual.

WARNING

Potential Electrocution Hazard. Always disconnect power to the instrument when 
making electrical connections.

Содержание ORBISPHERE K1200

Страница 1: ...DOC024 52 93022 ORBISPHERE Model K1200 Sensor and Model 510 Analyzer USER MANUAL 11 2017 Edition 12...

Страница 2: ...ount instrument 24 3 4 1 Instrument dimensions 24 3 4 2 Mounting 25 3 4 3 Connection panel bottom of instrument 26 3 5 Connectors assembly instructions 27 3 5 1 Cable gland wiring instructions 27 3 6...

Страница 3: ...igh level adjustment 56 7 6 Sensor verification 56 7 7 Barometric pressure calibration 57 7 8 Calibration reports 57 Section 8 Inputs Outputs Menu 59 8 1 Configure snooze 60 8 2 View inputs outputs 60...

Страница 4: ...aintenance 93 14 2 Sensor maintenance 93 14 2 1 Equipment required 93 14 2 2 Sensor spot removal 93 14 2 3 Sensor spot replacement 94 14 3 Storage handling and transportation 95 14 4 Troubleshooting 9...

Страница 5: ...4 Table of Contents...

Страница 6: ...setting up or operating this analyzer Pay particular attention to all warning and caution statements Failure to do so could result in serious injury to the operator or damage to the equipment To ensur...

Страница 7: ...jury to the person carrying out the repair It renders the warranty null and void and could compromise the correct working of the analyzer and the electrical integrity or the CE compliance of the analy...

Страница 8: ...risk of electrical shock and or electrocution exists and indicates that only individuals qualified to work with hazardous voltages should open the enclosure or remove the barrier This symbol when note...

Страница 9: ...r glementation europ enne directive UE 2002 96 EC les utilisateurs de mat riel lectrique en Europe doivent d sormais retourner le mat riel us ou p rim au fabricant pour limination sans frais pour l u...

Страница 10: ...htlijn 2002 96 EC dienen gebruikers van elektrische apparaten voortaan hun oude of afgedankte apparatuur kosteloos voor recycling of vernietiging naar de producent terug te brengen Nota Als u apparatu...

Страница 11: ...t marked with the above symbol may not be disposed of in European public disposal systems after 12 August 2005 Hach will offer to take back free of charge to the customer any old unserviceable or redu...

Страница 12: ...s below the relevant threshold of the SJ T11363 2006 standard X SJ T11363 2006 Indicates that the concentration of the hazardous substance of at least one of all homogeneous materials in the parts is...

Страница 13: ...12 General Information...

Страница 14: ...sion on the measurement board 0 5 V output hardware option 3 configurable outputs Minimum load 10 KOhm Sensitivity 5 mV Accuracy 0 5 between operating temperature limits Measurement alarm relays on th...

Страница 15: ...s phase 30 seconds in liquid phase High range sensors 10 seconds in gas phase 50 seconds in liquid phase Warm up time None Display resolution 0 1 ppb Calibration Low range sensors Single point calibra...

Страница 16: ...such as no oxygen consumption independence from sample flow velocity no electrolyte and low maintenance Optical sensing of oxygen is based on the measurement of the red fluorescence of a dye indicator...

Страница 17: ...of the temperature 2 3 Hardware description The instrument hardware is made of one main board and one measurement board for the measurement channel the sensor The main board includes the controls for...

Страница 18: ...ement file X X Calibration chan 3 X X X Verification chan 1 X X X Calibration 0 1 2 3 4 Verification chan 2 X X X Gas sensor X X X Verification chan 3 X X X Interferences X X X Config chan 1 X X Barom...

Страница 19: ...e Dissolved Gas unit ppm ppb Liquid Water Display resolution XXX X Storage mode Rolling buffer User offset Disabled Out of range protection Enabled Temp unit C Pressure unit bar Calibration Mode Zero...

Страница 20: ...connect AC power to a 5 VDC powered model WARNING Potential Electrocution Hazard Always disconnect power to the instrument when making electrical connections WARNING Potential Electrocution Hazard If...

Страница 21: ...eds Refer to section 6 2 on page 50 8 Enable the calibration timer and set the number of days to 180 days 6 months or according to your quality needs to ensure a regular sensor calibration Refer to se...

Страница 22: ...21 Installation 3 3 Wall mount and pipe mount instruments 3 3 1 Instrument dimensions Figure 4 Wall and pipe mount instrument dimensions in millimeters...

Страница 23: ...rument angle for better screen vision and lock both side screws Figure 5 Wall mount bracket Assemble the pipe mount bracket to the U bracket using the two screws provided Attach this assembly to the p...

Страница 24: ...located on the right side of the instrument on the top and bottom panels number 9 in Figure 9 below The front panel can be easily pivoted to the left as shown in Figure 8 below To retain the instrume...

Страница 25: ...24 Installation 3 4 Panel mount instrument 3 4 1 Instrument dimensions Figure 10 Panel mount instrument dimensions in millimeters...

Страница 26: ...oint pliers 4 Slide the instrument in the bracket frame The instrument should go over the four T pins Rotate the 4 fast locking screws on both sides of the front panel and slide it in 5 Rotate the 4 f...

Страница 27: ...l opening 3 Remove the instrument cover 4 Slip the cables through the instrument cover 5 Slip the cables through the instrument back panel cable glands 6 Connect the cables to the instrument electroni...

Страница 28: ...rip the wires about 8 mm from their ends see illustration below 3 Pass the cable through the nut the rubber gasket and the two washers 4 Pinch the shield so that its entire circumference is pressed be...

Страница 29: ...to the mains power supply is with a 8 pin BINDER connector supplied Note The connectors are grooved to avoid an incorrect fitting to the instrument Connect the power cable to the connector as follows...

Страница 30: ...ger tight If no power cable was ordered with the equipment a mains power plug must be connected to the supplied female connector as described in the following procedure User supplied power cable speci...

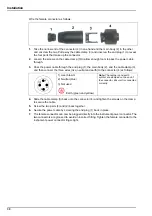
Страница 31: ...wires live neutral and earth to the connector 4 as follows 4 Slide the cable clamp 3 back onto the connector 4 and tighten the screws on the clamp to secure the cable 5 Screw the two parts 4 and 2 ba...

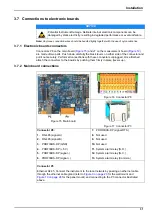
Страница 32: ...Potential Instrument Damage Delicate internal electronic components can be damaged by static electricity resulting in degraded performance or eventual failure Figure 15 Main board Figure 16 Connector...

Страница 33: ...Note It is recommended to use this functionality in order to extend the sensor lifetime for installations with a CIP process that can damage the spot 10 Not used 11 Not used 12 Digital GND 13 to 16 N...

Страница 34: ...situations where not all the above conditions can be met If this is the case or you have any concerns please consult your Hach representative to appraise the situation and define the best applicable s...

Страница 35: ...m or 2 When welding the socket to the pipe check that setback between the pipe s inner diameter and the sensor tip does not exceed 4 mm see diagram Note Be sure to remove the two O rings from the sock...

Страница 36: ...3095 sensor housing Another type of sensor housing the ORBISPHERE 33095 housing is available for use with the K1200 sensor but requires that the sample flow be turned off prior to insertion or removal...

Страница 37: ...ts location in the sample The device is designed to hold a 1 liter gas cylinder as shown above but is fully compatible for use with other kinds of gas cylinders When using other types of gas cylinders...

Страница 38: ...ambers are used to draw the calibration sample past the sensor They connect to 6 mm or stainless steel tubing by means of two Swagelok fittings If necessary copper or plastic tubing with low permeabil...

Страница 39: ...38 Installation...

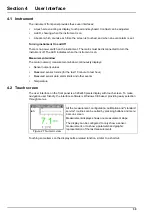
Страница 40: ...values Measured sensor trends for the last 10 minute to last hour Measured sensor data alarm limits and other events Temperature 4 2 Touch screen The user interface on the front panel is a 320x240 pi...

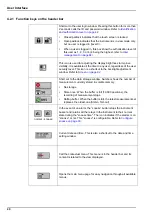
Страница 41: ...ght adjustment window Refer to Screen on page 92 Short cut to the data storage window Number shows the number of measurement currently stored in volatile memory No storage Store once When the buffer i...

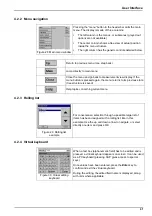
Страница 42: ...enu button is pressed again the menu returns to its previous state tree structure is saved Help topics concerning current menu Figure 29 Rolling list example For convenience selection through a possib...

Страница 43: ...fication window The user identification and password must be entered to access functionalities authorized by the security level of the given user 5 levels available Refer to User management on page 84...

Страница 44: ...menu structure This is the structure of the main menu which is used to control every functionality of the instrument These submenus are detailed in the following sections of this Operator Manual Figu...

Страница 45: ...44 User Interface...

Страница 46: ...45 Section 5 View Menu Figure 34 View menu...

Страница 47: ...tatistics window gives some useful information The statistics are calculated from the data in the measurement file The values are updated each time a new value is added to this file Therefore the chan...

Страница 48: ...ture Display mini graph yes no Display time base yes no Upper bound Adjust graph upper limit Lower bound Adjust graph lower limit Time base Adjust graph time span Grid button Set up the graph to displ...

Страница 49: ...48 View Menu...

Страница 50: ...process measurement Continuous mode cycle Every 2 sec measurements are refreshed on the display The relays and the analog outputs are updated Measurements are continuously stored in memory volatile an...

Страница 51: ...to a sensor calibration Make sure your sensor has been correctly calibrated before applying this feature Offset enabled Check this box to enable the user measurement offset option If checked enter an...

Страница 52: ...22 units Delay The delay in seconds before alarms go on whenever concentration values go above High alarms or below Low alarms Set this to a minimum value but enough to avoid alarms for non representa...

Страница 53: ...nt resumes measurement storage after the last measurement stored in flash RAM time volatile memory Delay in seconds between two recordings of measured data FLASH time non volatile memory Delay in seco...

Страница 54: ...ment has been installed configured and the channel has been set up You must also ensure that you have the correct access rights to access the calibration menu The temperature sensor is factory calibra...

Страница 55: ...to check the calibration parameters Ensure the parameters are set up as illustrated left Auto calibration This option is not available for the K1200 sensor Manual calibration Auto End On by default H...

Страница 56: ...mended to leave these parameters at their default values and not change them These values apply to manual calibrations with the Auto End parameter set Start period is the minimum time period that must...

Страница 57: ...also fails then refer to your Hach representative for advice Note If the Auto End parameter is set refer to Calibration configuration on page 55 then the calibration will be deemed successful when the...

Страница 58: ...ue in the lower box and Validate the new setting On completion a calibration report is created Calibration reports Once a calibration is completed for a gas or pressure sensor the calibration report i...

Страница 59: ...58 Calibration Menu...

Страница 60: ...59 Section 8 Inputs Outputs Menu Figure 40 Inputs Outputs menu...

Страница 61: ...eral standard events or a combination of events custom The relays output can be used to turn on a beacon horn or PLC Refer to Connections to electronic boards on page 31 Note Relays can be set to Norm...

Страница 62: ...61 Inputs Outputs Menu 8 4 Analog outputs Figure 41 Analog outputs menu...

Страница 63: ...e For some events sensor out purge failure etc the actual measurement is not significant but the PLC needs to know how the analog output behaves in these cases Two Event indication modes are available...

Страница 64: ...cteristic is set to None Configure the events that should be signaled at the corresponding current shown in the right column Only one event signal at a time can be sent via the current output As there...

Страница 65: ...s read on the amperometer before pressing the Continue button Calibration of the selected analog output channel is completed Direct test Test to check the calibration of the analog outputs A precision...

Страница 66: ...signal locked at 20 mA Settings must be made in balancing these aspects Settings For the output set ML and MH in the current measuring unit e g C for a temperature output When a compound unit is selec...

Страница 67: ...actual conditions As before the downside is that any measure below or over the Range 1 2 and 3 will have the same signal locked at 4 mA and 20 mA respectively but Range 1 2 and 3 should cover a large...

Страница 68: ...OL I 0 M MLL ML MLL I AOL R ML MLL 20 AOL 1010 2 AOH I AOL M ML MH ML I AOL AOH AOL R MH ML 20 AOH AOL 1010 3 20 I AOH M MH MHH MH I AOH 20 AOH R MHH MH 20 20 AOH 1010 Analog output characteristics co...

Страница 69: ...68 Inputs Outputs Menu...

Страница 70: ...nected to a RS 485 bus single twisted pair Optionally it can be connected to a fieldbus module gateway The RS 485 menu allows to select between RS485 simple or Profibus DP communication protocol depen...

Страница 71: ...ta are sent These additional data can be useful for diagnostic purpose Note In case of problem verify first that jumper J3 is not installed on the mother board default configuration Send data This dia...

Страница 72: ...not described here Refer to List of events and alarms on page 97 Example of one measurement CH1 697 176 ppb 20 1 C 0 982 bar C00 2 If the option Mode expert is chosen the following message is sent wit...

Страница 73: ...0 976 bar Calibration offset 3 73 kPa User action log file example The User action log file below contains 3 user actions Nr mm dd hh mm ss User ID User Name Action ID Description 1 1 21 15 13 44 100...

Страница 74: ...fer Capture Text Start On the instrument 1 Use the menu Communication RS 485 Simple Send files and the button All files When the transfer is finished close the file with Hyperterminal Menu Transfer Ca...

Страница 75: ...n 2 15 1 Install the PROFIBUS DP module and the jumper J3 on the main board location highlighted in the illustration below 2 Select the menu Configuration RS 485 and choose PROFIBUS DP as the protocol...

Страница 76: ...ards The field types Byte and Double Word are unsigned Measurements Measurements are formatted in the Profibus Input Buffer as follows Name Type Size Offset Barometric pressure Input float 32 bits 0 B...

Страница 77: ...value not updated 0x80000000 bit mask Gas unit Value Temperature unit Value Barometric pressure unit Value bar 0 K 0 bar 0 mbar 1 C 1 mbar 1 Pa 2 F 2 psia 2 kPa 3 atm 3 hPa 4 Pa 4 psia 5 kPa 5 atm 6...

Страница 78: ...Output byte 8 bits 4 Output command data byte 4 OCD4 Output byte 8 bits 5 Name Type Size Offset Input command toggle ICT Input byte 8 bits 28 Input command status ICS Input byte 8 bits 29 Input comman...

Страница 79: ...used Name Value Comment ICT 1 2 ICS 0 3 0 OK 1 Unknown command ID 2 Invalid parameter e g invalid channel no 3 Execution failure ICD1 Not used ICD2 Not used ICD3 Not used ICD4 Not used Name Value Com...

Страница 80: ...or P3 Refer to Main board connections on page 31 The network must have a DHCP server installed Check the Enable server box to enable the web server communication link Enter the Server name for the ins...

Страница 81: ...ination has been entered the initial web page will be displayed giving a list of options Click on any of these options and the data will be displayed on the PC screen The following shows an example of...

Страница 82: ...connection Report configuration Calibration Choose the channel s for which calibration reports are required Choose to print the last report or all reports for the selected channel s User actions Defi...

Страница 83: ...ailable Indicates that no printer has been detected Check that the printer is connected to the USB A port and is powered on Paper out Indicates that the printer is out of paper In cyclic mode it is ne...

Страница 84: ...gure 43 Security menu Access rights management Each user has a unique ID and user password The ID and password are used by the software to Allow or deny a user to perform specific actions To trace thi...

Страница 85: ...r all user actions log file Confirm to clear the log file This functionality is aimed at clearing demo or test logs for example The log file is a rolling buffer recording the past 100 actions User man...

Страница 86: ...85 Section 11 Products Menu Figure 44 Products menu...

Страница 87: ...99 to be analyzed or use the Next and Previous buttons to scroll sequentially through the existing product list Alternatively use the Search facility to search for a product Enter a full or partial se...

Страница 88: ...o re enter all the parameters when using the instrument for a different application Save Define the index 1 9 to save the current configuration Use the Next and Previous buttons to scroll sequentially...

Страница 89: ...88 Global Configuration Menu...

Страница 90: ...89 Section 13 Services Menu Figure 46 Services menu Part 1...

Страница 91: ...90 Services Menu Figure 47 Services menu Part 2...

Страница 92: ...ce For more information on this please refer to the manual delivered with the sensor Sensor Select either General or Zero diagnostic from the menu General will display values for the measurements in t...

Страница 93: ...ound type can also be adjusted Press the Test button to test the adjustment made Press again to stop Boards info Main board info For reference this display gives information on the instrument model so...

Страница 94: ...14 2 1 Equipment required 14 2 2 Sensor spot removal CAUTION Personal Injury Hazard Any instrument maintenance should be carried out by a qualified Hach Service Technician Please contact your local re...

Страница 95: ...atching or damaging the sensor spot the black surface on the sensor head during this process 1 Push the maintenance tool square sides upmost as far down as possible over the new sensor spot Continue t...

Страница 96: ...tissue Always clean the instrument before storage Pay attention not to scratch the surface of the display to retain good clarity over time 14 4 Troubleshooting The possible events along with the text...

Страница 97: ...rm There is a severe problem causing the channel to be out of action and the system alarm relay to be enabled Warning Events less critical than a system alarm e g measurement alarm Information For inf...

Страница 98: ...h Gas concentration is above Alarm HighHigh limit 0x00000080 Calibration required A calibration of the sensor is required 0x00000100 Service required The sensor requires a service 0x00000200 Hold The...

Страница 99: ...98 Maintenance and Troubleshooting...

Страница 100: ...P65 sealing kit for 410 and 510 panel instruments LQV161 52 20000 Thermal printer USB for 410 51x controller EU LQV161 53 20000 Thermal printer USB for 410 51x controller USA LQV161 66 20000 Thermal p...

Страница 101: ...stainless steel 316 with 8 mm fittings Supplied with EPDM O rings 32003 Sensor insertion and retraction valve for use with Tuchenhagen adapter 32740 Replacement parts kit for 32003 insertion and retr...

Страница 102: ...eferenced Vext 10 000 psia pound per square inch absolute V V volume per volume ratio Terms Meaning Absolute pressure This is the total pressure in a system i e relative pressure plus atmospheric pres...

Страница 103: ...tween the results of measurements of the same measurand carried out under changed measurement conditions Resistivity The opposition offered by a body or substance to the passage through it of a steady...

Страница 104: ...orders hach com www hach com HACH LANGE GMBH Willst tterstra e 11 D 40549 D sseldorf Germany Tel 49 0 2 11 52 88 320 Fax 49 0 2 11 52 88 210 info de hach com www de hach com HACH LANGE S rl 6 route de...

Отзывы: