background image

Contents


1. Technical Data ................................................................................................................ 1

2. Dimensional drawing ...................................................................................................... 2

3. Cleaning operations ...................................................................................................... 3

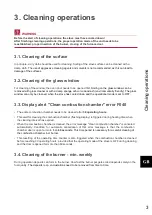
3.1. Cleaning of the surface .................................................................................................. 3


3.2. Cleaning of the glass window ....................................................................................... 3


3.3. Display alert "Clean combustion chamber" error F0403


3.4. Cleaning of the burner - min. weekly ............................................................................. 3


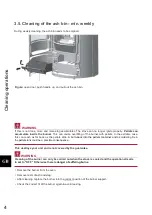
3.5. Cleaning of the ash bin - min. weekly ........................................................................... 4


4.  Service operations ........................................................................................................ 5

4.1.  Cleaning of the pellets container –

 yearly ................................................................. 5 

4.2. Cleaning of the hot gas flues ........................................................................................ 6


4.3.1. Disassembly of the cleaning cover ........................................................................... .7


4.3.2. Disassembly of the turbulator .................................................................................... 8


4.3.3. Cleaning of the induced draught casing................................................................... .10


4.3.4. Cleaning of the smoke pipes - yearly ....................................................................... .10


5. Spare parts list ............................................................................................................. 12

5.1. Comprehensive list HSP 7 ...........................................................................................12


5.2. Detail A1 .................................................................................................................... .14


6. Circuit diagram

 ............................................................................................................ 16

C

o

n

te

n

ts


Содержание 0545008000000

Страница 1: ... Geräteblatt Pelletofen DE Fiche technique Poele a pellets FR Scheda tecnica Stufe pellet IT Equipment sheet Pellet stove GB Tehnicki list Kotel na pelete HR Tehnicni list Kotel na pelete SLO V18 I26 0545008009033 ...

Страница 2: ...ger of damage to the heating unit or physical injury Points with the heading NOTE refer to possible damage to your heating unit Points with the heading Important refer to important information about the operation of your heating unit In general all points contain important information about the operation of your heating unit ...

Страница 3: ...weekly 3 3 5 Cleaning of the ash bin min weekly 4 4 Service operations 5 4 1 Cleaning of the pellets container yearly 5 4 2 Cleaning of the hot gas flues 6 4 3 1 Disassembly of the cleaning cover 7 4 3 2 Disassembly of the turbulator 8 4 3 3 Cleaning of the induced draught casing 10 4 3 4 Cleaning of the smoke pipes yearly 10 5 Spare parts list 12 5 1 Comprehensive list HSP 7 12 5 2 Detail A1 14 6...

Страница 4: ......

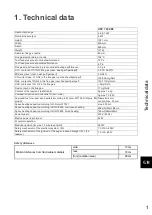
Страница 5: ... Dust content in the flue gas 17 mg Nm3 Content of the reservoir pellet tank Approx 12 kg Combustion period with one tank fill min max Approx 7 h 22 h Approved fuel low dust wood pellets according to Ö norm M 7135 DIN plus EN plus A1 Diameter 6 mm Length max 30 mm Space heating capacity according to Ö Norm M 7521 max 230 m3 Space heating capacity according to DIN 18893 continuous heating 250m3 145...

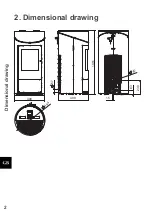
Страница 6: ...2 2 Dimensional drawing Dimensional drawing 1051 494 490 63 230 15 489 57 80 ...

Страница 7: ...lean combustion chamber error F040 The entire combustion chamber needs to be cleaned after 30 operating hours This alert for cleaning the combustion chamber flashing display is triggered during heating time when the cleaning interval has expired When the combustion chamber is cleaned the error message Clean combustion chamber is canceled automatically Condition for automatic cancellation of this e...

Страница 8: ...ar back as the pellets slide A burn back into the pellets container and a smoldering fire in the pellets tank could be a possible consequence This destroys your unit and is not covered by the guarantee WARNING Cleaning of the burner can only be carried out when the stove is cooled and the operational mode in set to OFF Otherwise there is danger of suffering burns Remove the burner from the oven Re...

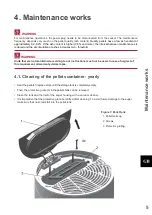
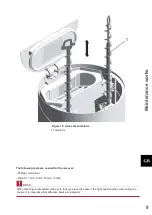
Страница 9: ... maintained according to our instructions must not be used In case of neglect of this requirement all warranty claims lapse 4 1 Cleaning of the pellets container yearly Heat the pellets fireplace stove until the storage tank is completely empty Then the protective grate 3 in the pellets tank can be removed Clean the tank and the inlet of the auger housing with a vacuum cleaner It is imperative tha...

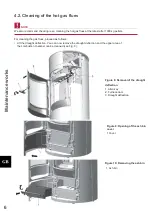
Страница 10: ...lues proceed as follows Lift the draught deflection You can now remove the draught deflection and the upper area of the combustion chamber can be cleaned see Fig 8 Figure 8 Removal of the draught deflection 1 Allen key 2 Furnace door 3 Draught deflection Figure 9 Opening of the ash bin cover 1 Cover Figure 10 Removing the ash bin 1 Ash bin Maintenance works ...

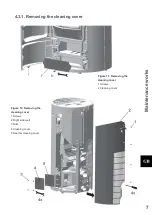
Страница 11: ...g the cleaning cover Figure 11 Removing the cleaning cover 1 Screws 2 Cleaning cover Figure 12 Removing the cleaning cover 1 Screws 2 Right side wall 3 Nuts 4 Cleaning cover 5 Seal for cleaning cover Maintenance works ...

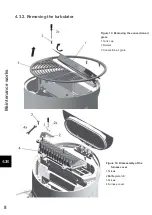
Страница 12: ... the turbulator Figure 13 Removing the convection air grate 1 Tank cap 2 Screws 3 Convection air grate Figure 14 Disassembly of the furnace cover 1 Screws 2 Baffle plate left 3 Screws 4 Furnace cover Maintenance works ...

Страница 13: ...ls are needed for the removal Phillips screwdriver Wrench 7 mm 8 mm 10 mm 13 mm NOTE When cleaning is completed make sure that you place the seals in the right position when remounting the covers It is imperative that defective seals are replaced Maintenance works ...

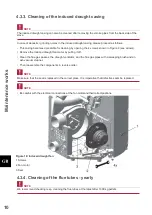
Страница 14: ...ulling it off Clean the flue gas passes the draught ventilator and the flue gas pipes with a sweeping brush and an ash vacuum cleaner Then reassemble the components in reverse order NOTE Make sure that the seal is replaced in the correct place It is imperative that defective seals be replaced NOTE Be careful with the electrical connections at the fan motor and their correct positions Figure 18 Ind...

Страница 15: ...11 Maintenance works ...

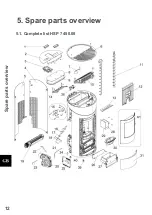
Страница 16: ...12 5 Spare parts overview 5 1 Complete list HSP 7 450 08 Spare parts overview ...

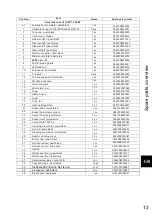
Страница 17: ... 16 Auger 1 pc 0545008007030 17 Clamp sleeve 1 pc 0545008005943 18 Auger 1 pc 0089500000006 19 Conv fan 1 pc 0545008007600 20 Induced draught fan 1 pc 0561008005807 21 Sensor flame temperature 1 pc 0561008005541 22 Sensor burner temperature 1 pc 0561008005543 23 Sensor flue gas temperature 1 pc 0561008005540 24 Sensor room temperature 1 pc 0089500390005 25 Control HSP7 450 08 1 pc 0545008007569 26...

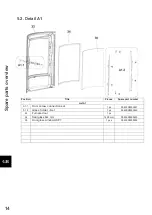
Страница 18: ...ion Title Pieces Spare part number List A1 A1 1 Door screw connection set 1 pc 0545008005221 A1 2 Glass holder Set 1 pc 0545008005222 33 Furnace door 1 pc 34 Seal glass 8x4 mm 1400 mm 0545008005223 35 Door glass window HSP 7 1 pcs 0545008005309 ...

Страница 19: ...ht 8 IX Safety temperature control 10 CONV FAN THS30B5 TFA745 S 5 PT160 HSP 7 35 36 Flue gas temperature sensor 37 38 Flame temperature sensor 39 40 Room temperature sensor 41 42 Flame temperature sensor bottom 43 44 Door contact switch 48 50 RPM flue gas fan F1 Fuse T 3 15A ignition induced draught fan auger F2 Fuse T 3 15A reserve F3 Fuse T 0 315A control unit Circuit diagram ...

Страница 20: ...16 ...
Отзывы: