mega macs 56 Bike
2. Set the trigger position with
.
You can also click in the signal depiction to set the trigger position.
3. Go one step back with
.
8.1.4.2
Setting the Trigger Mode
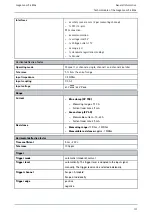
With the trigger mode, you can decide when the oscilloscope initiates the triggering. The following trigger modes are
available:
•
Automatic (standard setting)
The oscilloscope generates a triggering in regular intervals and depicts the signal on the screen, even if the
recorded signal delivers no trigger conditions.
•
Normal
The signal will be only displayed and actualized if it passes the manually prescribed trigger level. The former
depiction remains on the screen until the signal passes the trigger level again.
NOTE
To configure trigger mode, expert mode must be set to
>on<
.
Proceed as follows to set the trigger mode while measurement is in progress:
1. Call up Settings with
.
2. Select the
>Trigger<
tab.
3. Open the list under
Trigger mode
with
.
4. Select
>normal<
.
5. Confirm the selection with
.
The selection will be saved automatically.
8.1.4.3
Setting the Trigger Edge
Use the trigger edge setting to decide whether the triggering will be done with a positive edge (increasing voltage
signal) or negative edge (decreasing voltage signal). The trigger edge is set to
positive
as a standard feature ex
works. Therefore, a signal with an initially negative edge might not be displayed completely on the screen. Changing
the trigger edge can improve signal depiction.
NOTE
To modify the trigger edge, expert mode must be set to
>on<
.
Proceed as follows to set the trigger edge while measurement is in progress:
1. Call up Settings with
.
2. Select the
>Trigger<
tab.
3. Open the list under
>Trigger edge<
with
.
4. Select
>positive<
or
>negative<
.
5. Confirm the selection with
.
The selection will be saved automatically.
88

