16
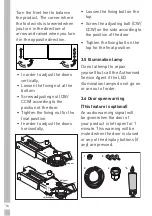
Turn the front feet to balance
the product. The corner where
the foot exists is lowered when
you turn in the direction of
arrow and raised when you turn
it in the opposite direction.
•
Loosen the fixing bolt on the
top
•
Screw the adjusting bolt (CW/
CCW) on the side according to
the position of the door
•
Tighten the fixing bolt on the
top for the final position
3.5 Illumination lamp
Do not attempt to repair
yourself but call the Authorised
Service Agent if the LED
illumination lamps do not go on
or are out of order.
3.6 Door open warning
(This feature is optional)
An audio warning signal will
be given when the door of
your product is left open for 1
minute. This warning will be
muted when the door is closed
or any of the display buttons (if
any) are pressed.
3
1
4
2
*5
•
In order to adjust the doors
vertically,
•
Loosen the fixing nut at the
bottom
•
Screw adjusting nut (CW/
CCW) according to the
position of the door
•
Tighten the fixing nut for the
final position
•
In order to adjust the doors
horizontally,
adjusting nut
fixing nut
fixing nut
adjusting nut
Содержание GSBS16312B
Страница 1: ...ENG www grundig co uk USER INSTRUCTIONS GSBS16312B...
Страница 2: ......
Страница 58: ...58 Notes...
Страница 59: ...59 EN Notes...


