15
GROWSPAN
™
ROLLING PREMIUM HIGH TUNNELS
Revision date: 01.01.16
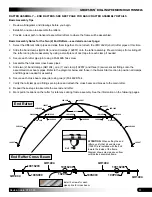
RAFTER ASSEMBLY (continued) — Mark Purlin Locations on Rafters
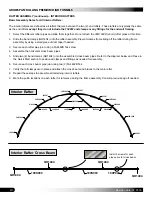
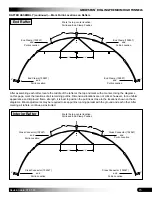
After assembling each rafter, locate the middle of the rafter at the top and mark with a marker. Using the diagrams
on this page, mark the locations of all remaining purlins. Dimensions/locations are not critical; however, for a uniform
appearance and improved frame strength, it is best to position the purlins as close to the locations shown on these
diagrams. Minor adjustments may be required to keep purlins running parallel with the ground and each other. After
marking all rafters, continue as instructed.
6'-6 3/4"
6'-6 3/4
"
4'-2"
6"
4'-2"
6"
End Rafter
Mark the top, center location.
Purlin and End Clamp Position
End Clamp (102857)
and
Purlin Location
End Clamp (102857)
and
Purlin Location
End Clamp (102857)
and
Purlin Location
End Clamp (102857)
and
Purlin Location
4"
4"
6'-6 3/4"
6'-6 3/4
"
4'-2"
6"
4'-2"
6"
Interior Rafter
Mark the top, center location.
Purlin and End Clamp Position
Cross Connector (102547)
and
Purlin Location
Cross Connector (102547)
and
Purlin Location
Cross Connector (102547)
and
Purlin Location
Cross Connector (102547)
and
Purlin Location
4"
4"


