background image

43

44

B

Delete


device

1 Select the first drop down list of add or remove devices to monitor the monitoing
mode


of


photovoltaic


devices

.

2

Select


the


type


of


photovoltaic


device


monitored


in


the


second


drop

-

down


list.

3

Fill


in


the


third


drop

-

down


list


with


the


photovoltaic


device


correspondenc 


address.

.

4

Select


the


following

 "

del

and


click


Save


to


complete


the


device


addition

.

5

Enter


the


device


status


page


after


successful


save


to


confirm


that


the


device


was


deleted


successfully

.

5>ShineMaster


Data


upload


to


ShineServer 

A

Register

Login

1

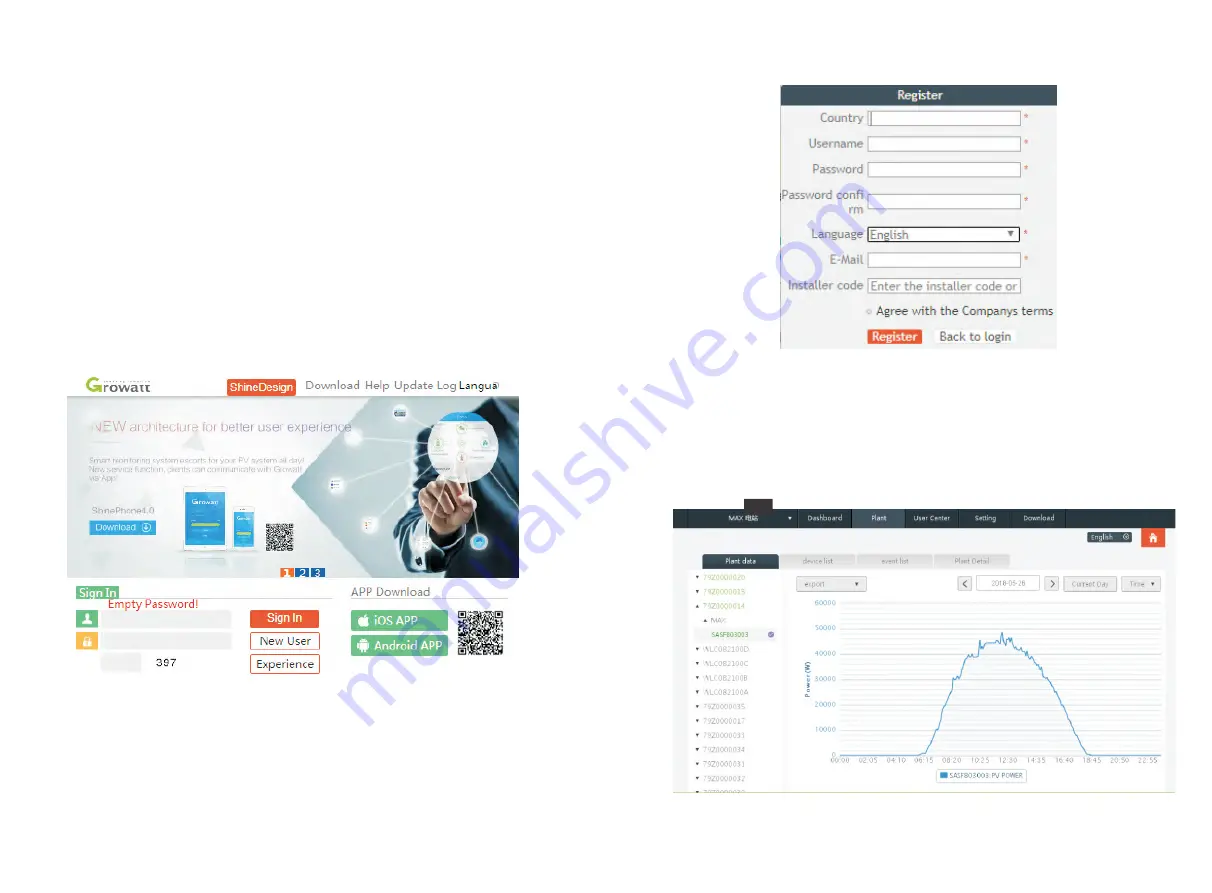
Enter


the


server


domain


name


in


the


computer


browser


to


enter


the


shineserver

login page

if


you


are


logged


in


for


the


first


time

please


register


the


user


name

Enter

the


domain


name


access


page

as


shown


in


figure 8.32


below

.

Chinese


user


server


domain


name

http

://

server

-

cn

.

growatt

.

com.

The


domain


name


of


the


international


user


server


is

http

://

server

.

growatt

.

com.


-


   "


"   


Fig 8.31

2

Register


user


name

input


user


information


according


to


prompt

after


information


is


completed

click

 "

register

".

Note

: "

collector


serial


number

and

 "

collector


check


code

see


shinemaster


serialnumber 

box or guarantee box.

Fig 8.32

B

View


monitoring


data

1)  After


registration


is


complete

jump


to


the


shineserver


main


interface


automatically

Click


on

  "

power


station

and

  "

work


information

to


display


the


information


for


the


power


station

'

s


total


power


flow


chart


on


the


same


day

The


drop

-

down


list

  "

Select


collector

allows


you


to


view


the


daily


power


flow


chart


of


a


single


inverter


for


the


power


station

.

Fig 8.33

Содержание MAX 50KTL3 LV

Страница 1: ...EN GROWATT NEW ENERGY TECHNOLOGY CO LTD No 28 Guangming Road Shiyan Street Bao an District Shenzhen P R China T 86 755 27471942 E service ginverter com W www ginverter com Installation Operation Manua...

Страница 2: ...roduction 4 Unpacking 5 Installation 5 1 Basic Installation Requirements 5 2 Installation Environment Requirements 5 3 Moving Requirements 5 4 Wall Mounted Installation 5 5 Installing the Inverter 3 1...

Страница 3: ...ound Cables 6 Connecting Cables 11 Decommissioning 7 System Commissioning 12 Quality Assurance 7 1 Inverter Commissioning 7 2 Modes 7 3 LED display 8 1 Remote Data Monitoring 8 2 Local Data Monitoring...

Страница 4: ...any warranty Before installation please read through this manual any damage Ensure that the MAX is not connected to a power supply and is not power on before installation at OFF also disconnect AC sw...

Страница 5: ...hnician Burn Warning Do not touch a running inverter cause it generates high temperature on the case Protective Grounding Connect inverter to grounding bar Delay discharge Residual voltage exists afte...

Страница 6: ...Size mm Weight kg Width Height Thickness 50 80K Inverters 860 600 300 82 50 80K Inverter with package 1035 735 465 98 3 3 Nameplate Note Other models of MAX series share the same label design with MA...

Страница 7: ...400V 400V 230V 230V 230V 480V 480V 480V Fig 3 5 Fig 3 6 AFCI Arc Fault Circuit Interrupter is a kind of circuit protection device the main function is to prevent the fire caused by fault arc The elec...

Страница 8: ...le or heat intolerant buildings D This inverter is IP 65 protection you can install it indoor or outdoor E To avoid inverter performance de rate due to the over heat please do not expose the inverter...

Страница 9: ...nstall multiple inverters on one surface inverters should be installed as following drawing D Do not install inverter into an enclosed space like following drawing Fig 5 6 12 11 5 3 Moving Requirement...

Страница 10: ...ls with at least 100mm thickness 5 5 Installing The Inverter After the wall mount bracket has been firmly installed on the wall put the inverter on that plate 1 Use the rope must meet the weight requi...

Страница 11: ...nverters It is forbidden to add load between inverter and breaker Each inverter must install one AC breaker AC breaker is forbidden to share Preparation before connection 1 Disconnect inverter DC swit...

Страница 12: ...ll be a risk of water 1 Following drawing shows inverter s AC terminal L1 L2 L3 are three live lines N is Neutral line Notice The screw is M8 screw inner ground connection AC terminal block Fig 6 1 2...

Страница 13: ...s maximum single string input current please refer to following table Inverter model Max single string input current MAX serial inverter 13A 2 7 Cable specifications Inverter model Cross sectional ar...

Страница 14: ...ring function In addition you can quickly update the software via a USB flash drive Steps to install the monitoring module 1 Loose waterproof cover and remove waterproof plug 2 As shown in Figure 6 8A...

Страница 15: ...down conductor and the equipment ground wire eventually sink at a total ground point but the two cannot share the wire That is the equipment grounding wire should be pulled separately and the wire di...

Страница 16: ...to 8 2 download mobile APP ShinePhone and connect to inverter WIFI to enter local monitoring page this operation is performed by a professional 1 Click Parameters 2 Enter passwor When you use it for t...

Страница 17: ...at this status inverter consume very small power to check the internal system status Note only when the PV modules supply enough power voltage 200Vdc then the inverter will start automatically Power o...

Страница 18: ...LED status B AC voltage indicator light With AC voltage inverter is in a fault state The green light flashes slowly and the alarm or fault indicator light is steady red C Alarm or fault indicator ligh...

Страница 19: ...device and edit edit operation includes change device alias icon and delete device Fig 8 7 2 User can add datalogger at the datalogger list page to add a datalogger edit delete configure etc 3 User ca...

Страница 20: ...back to login page input the registered username and password click Sign In Fig 8 13 Fig 8 14 2 Add datalogger At Plant page click device manage then click add datalogger input the SN and valid code t...

Страница 21: ...ding A Basic production reading Energy today total production revenue today and accumulative revenue are showing on this page Fig 8 19 Fig 8 17 shenzhen B Plant data page can check device power voltag...

Страница 22: ...ts with a high speed CPU and a stable Linux system that intelligently records the user s system characteristics Feature 1 A versatile and high performance communication data logger that notifies the u...

Страница 23: ...tor for operation Note The router needs to enable automatic IP assignment that is open the DHCP function C Enter the shinemaster IP address in the browser to enter the shinemaster built in page 2 Shin...

Страница 24: ...toring mode for monitoring photovoltaic devices in the first drop down list of add or remove devices Fig 8 27 2 Select the type of photovoltaic device monitored in the second drop down list 3 Fill in...

Страница 25: ...the first time please register the user name Enter the domain name access page as shown in figure 8 32 below Chinese user server domain name http server cn growatt com The domain name of the internat...

Страница 26: ...can get the wifi name of the collector by scanning the QR code or barcode The default password for WIFI is 12345678 If you have already connected you can click Skip to connect directly to the WIFI Fig...

Страница 27: ...ipment can be modified according to the usage 8 37 D Intelligent detection Detailed and accurate view of the device s detailed data and status Fig 8 38 Fig Fig 8 36 Fig 8 37 E Intelligent I V curve sc...

Страница 28: ...ick diagnosis I V curve diagnosis grid waveform THDV and cable impedance detection all at one click Fig 8 42 I High level setting According to the register address set parameters professionals J Devic...

Страница 29: ...needs to be programming at last time Fig 8 44 8 2 2 U Disk Monitoring Fig 8 45 2 Fault Recording Create the bconfig txt file under the root of the U disk write the following content then insert the U...

Страница 30: ...nce of load derating Inverter equipped with internal cooling fans when the internal temperature is too high the fans work in to reduce the internal temperature When the inverter is derating because of...

Страница 31: ...that need to replace with a cross screwdriver replace a new fan 4 Tidy up the wire 5 Install the fan fan guard fixed and the inverter again 9 2 Trouble Shooting 9 2 1 Warning Work on the Growatt Max m...

Страница 32: ...shows below may indicate a fatal error and require you to contact the supplier or Growatt for help Countercurrent prevention or Reactive power dispatching failure alarm Error Code Description Suggesti...

Страница 33: ...or module STC 75000W 90000W 105000W 120000W Max DC voltage 1100V Start voltage 250V Nominal voltage 585V 585V 600V 600V MPP voltage range 200V 1000V No of MPP trackers 6 6 7 7 No of PV strings per MPP...

Страница 34: ...0KTL3 MV MAX 70KTL3 MV MAX 80KTL3 MV MAX 90KTL3 MV MAX 100KTL3 MV Input Data DC Max recommended PV power for module STC 9000W 105000W 120000W 130000W 130000W Max DC voltage 1100V Start voltage 250V No...

Страница 35: ...RG DEWA 2016 BDEW G59 3 EMC EN61000 6 2 EN61000 6 4 Safety IEC EN62109 1 IEC EN62109 2 Note1 Self consumption less then 25W when AC power supply at night Model MAX 60KTL3 MV MAX 70KTL3 MV MAX 80KTL3 M...

Страница 36: ...e accordance with the disposal regulations for electronic waste which apply at the installation site at that time Ensure that the old unit and where applicable any accessories are disposed of in a pro...

Отзывы: