


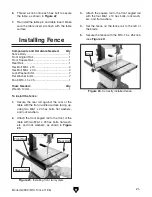


Model G0580 (Mfd. Since 11/06)
-23-
5. Loosen the lock nut on the tracking adjust-
ment knob threads so that the tracking
adjustment knob will rotate for adjustments
in the next steps.
Note: The blade tracking adjustment knob
controls the tilt of the upper wheel which,
in turn, controls the center tracking of the
blade.
6. Spin the upper wheel with one hand and
use the blade tracking adjustment knob with
the other hand to make the blade ride in the
center of the bandsaw wheel tire.
7. When the blade consistently rides in the
center of the wheel after several rotations,
tighten the tracking control lock nut and close
the upper wheel cover.
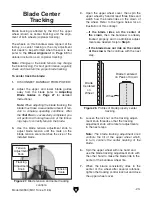
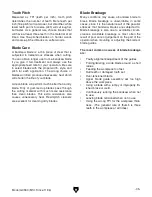
4. Open the upper wheel cover, then spin the
upper wheel by hand at least three times and
watch how the blade rides on the crown of
the wheel. Refer to the figure below for an
illustration of this concept.
—
If the blade rides on the center of
the crown, then the bandsaw is already
tracked properly and no additional adjust-
ments are needed. Skip to
Step 9.
—
If the blade does not ride on the center
of the crown, then continue with the next
step.
Blade tracking is affected by the tilt of the upper
wheel (known as center tracking) and the align-
ment of both wheels (coplanar tracking).
The wheels on this bandsaw were aligned at the
factory, so center tracking is the only adjustment
that needs to be performed when the saw is new
(refer to the
Wheel Alignment on Page 49 for
detailed instructions on coplanar tracking).
Note: Changes in the blade tension may change
the blade tracking. For best performance, regularly
check and maintain the proper blade tracking.
To center track the blade:
1. DISCONNECT BANDSAW FROM POWER!
2. Adjust the upper and lower blade guides
away from the blade (refer to
Adjusting
Blade Guides on Page 27 for detailed
instructions).
Note:
When adjusting the blade tracking, the
blade must have a reasonable amount of ten-
sion to simulate operating conditions. After
the
Test Run is successfully completed, you
will perform a thorough version of the follow-
ing steps to correctly tension the blade.
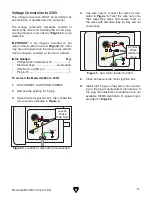
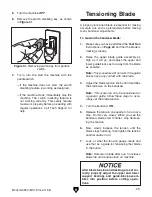
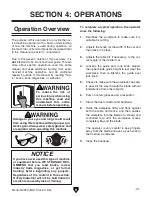
3. Use the blade tension adjustment knob to
adjust blade tension until the mark on the
blade tension scale matches the size of the
installed blade.
Blade Center
Tracking
Figure 27. Blade tension and center tracking
controls.
Tension
Scale
Tension
Adjustment
Knob
Tracking
Adjustment
Knob
Blade Centered
on Peak of Crown
Blade
Centered
on
Wheel
CENTER TRACKING
Wheel
Figure 28. Profiles of blade properly center
tracking.
Содержание G0580
Страница 15: ...Model G0580 Mfd Since 11 06 13 Hardware Recognition Chart...
Страница 64: ......