


Model G0580 (Mfd. Since 11/06)
-21-
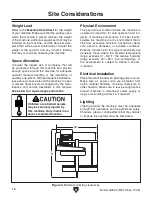
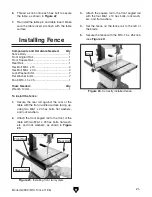
4. Set the fence on the fence rail to the left of
the blade.
5. Secure the fence with the M10-1.5 x 25 knob
(see
Figure 24).
Figure 24. Correctly installed fence.
Knob
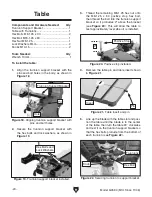
3. Attach the square rail to the front angled rail
with the four M6-1 x 10 hex bolts, lock wash-
ers, and flat washers.
Components and Hardware Needed:
Qty
Fence Body ....................................................... 1
Front Angled Rail ............................................... 1
Front Square Rail .............................................. 1
Rear Rail............................................................ 1
Hex Bolt M6-1 x 10 ............................................ 4
Hex Bolt M6-1 x 20 ............................................ 4
Lock Washer 6mm ............................................ 7
Flat Washer 6mm .............................................. 7
Knob M10-1.5 x 25............................................. 1
Tools Needed:
Qty
Wrench 10mm ................................................... 1
To install the fence:
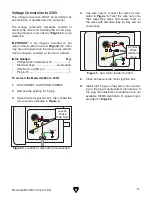
1. Secure the rear rail against the rear of the
table with the flat un-drilled surface facing up,
using two M6-1 x 20 hex bolts, flat washers,
and lock washers.
Installing Fence
6. Thread a knob onto each hex bolt to secure
the table, as shown in
Figure 22.
7. Re-install the table pin and table insert. Make
sure the table insert sits flush with the table
surface.
Figure 23. Installing front rail system.
Rear Rail
Front Rail
Square Rail
2. Attach the front angled rail to the front of the
table with two M6-1 x 20 hex bolts, flat wash-
ers, and lock washers, as shown in
Figure
23.
Содержание G0580
Страница 15: ...Model G0580 Mfd Since 11 06 13 Hardware Recognition Chart...
Страница 64: ......