❏
3. Install and glue the motor mount to former F1. When
viewed from the top, the mount should angle to the right.
❏
4. Insert and glue the die-cut 3-ply motor support in the
notch of the die-cut 3-ply motor mount aft bottom. Check
that the motor support is perpendicular to the motor mount
aft bottom.
❏
5. Glue the aft bottom motor mount between the sides.
The tabs on the motor mount aft bottom should be against
the angled part of the motor mount sides. The motor mount
aft bottom should also be tight against former F1A.
❏
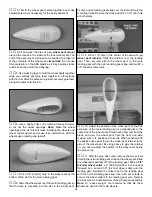
1. Position the wing in the wing saddle and visually align
it with the fuselage.
❏
2. Use a tape measure to measure the distance from the
corner of the aileron bay to the center of the tail. Then,
measure the distance from the other aileron bay and check
that the distances are the same. Adjust the wing until both
distances are equal. When the wing is perfectly aligned,
make reference marks on the wing TE and the bottom of the
fuselage to help keep the parts aligned during the next step.
❏
3. Tape the wing in position so that it cannot move. Use
a 13/64" [5.1mm] (or #10) drill bit to drill a hole through the
wing and the bolt plate in the fuselage, at the punch mark
on the wing bolt plate. Two small 90° triangles will help you
to align the drill perpendicular to the top surface of the wing.
Mount the Wing on the Fuselage
28
Содержание Ryan STA EP
Страница 7: ...7 DIE CUT PATTERNS...
Страница 48: ...TWO VIEW DRAWING Use copies of this page to plan your trim scheme...
Страница 49: ...B C...
Страница 50: ...D A...


