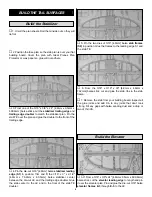
Then, remove the hatch and put a drop of thin CA in each
hole in the rails to harden the wood. After the CA has cured,
replace the hatch and screws.
❏
13. Go back to step 10 and install the other aileron hatch.
❏ ❏
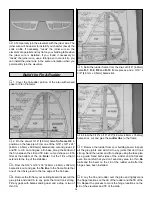
1. Position the die-cut 3/32" [2.4mm] balsa aileron base
over the plan. Mark the aileron rib locations on both sides of
the aileron base.
❏ ❏
2. Cut the 1/4" x 1/2" x 24" [6.4mm x 12.7mm x 609.6mm]
balsa aileron LE in half. Draw a centerline lengthwise on the
1/2" x 12" [12.7mm x 304.8mm] side.
❏ ❏
3. Glue the aileron base on the aileron LE along the
centerline and perpendicular to the face of the LE.
❏ ❏
4. From the 3/32" x 1/4" x 24" [2.4mm x 6.4mm x
609.6mm] balsa sticks, cut and glue aileron ribs to both
sides of the aileron base, perpendicular to the base.
❏ ❏
5. Trim the ends of the aileron LE and ribs flush with
the aileron base.
❏ ❏
6. From the remaining 1/4" x 3/4" x 30" [ 6.4mm x
19mm x 762mm] balsa stick, cut and glue aileron tip fillers
on the top and bottom of the aileron.
❏ ❏
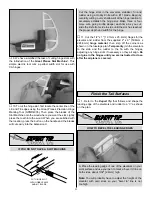
7. Use a razor plane and sanding bar to shape the
aileron ribs and LE to shape.
❏ ❏
8. Position the die-cut 3-ply aileron horn base on the
aileron LE. Mark the outline of the base on the LE. Carefully
trim a recess in the LE so that the base is flush with the LE
and the aileron rib.
❏ ❏
9. Glue the horn base to the LE and the rib. Make a
small wedge from leftover 3/32" [2.4mm] balsa to fit
between the horn base and the aileron base.
❏ ❏
10. Position the aileron on the wing and mark the
location of the hinges on the aileron and wing.
Assemble the Ailerons
19
Содержание Ryan STA EP
Страница 7: ...7 DIE CUT PATTERNS...
Страница 48: ...TWO VIEW DRAWING Use copies of this page to plan your trim scheme...
Страница 49: ...B C...
Страница 50: ...D A...


